 Did we miss anything in this location? Is there something we didn't discover?
Let us know!
Objectives
Did we miss anything in this location? Is there something we didn't discover?
Let us know!
Objectives
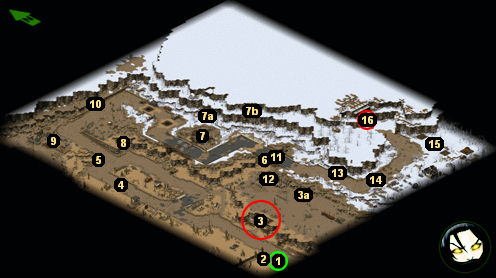
- Pilot the nuclear warhead (#2) to the vault doors (#16).
- Get your squad to safety (#3).
Walkthrough
This is the first part of the final, two-part mission. Once you've entered the mission
area, you won't be able to visit any more Brotherhood bunkers or explore any more of
the wasteland. So you should send your squad into the mission carrying as much ammunition
and medical supplies as possible. You can even overload them, because right next to your
starting position (#1) you'll find a vehicle (#2), and you'll be able to use the vehicle
for storage.
Note: In the second part of the mission, you'll be able to use
Barnaky's letter and the
general's locket. So if you have either of those items, you should bring them with you.
Your goal in the mission is to drive the nuke carrier (#2) to Vault 0's front door (#16), and then to hide your squad inside the bunker (#3) to protect them from the ensuing nuclear blast. As you might expect, the road to Vault 0 will be guarded by numerous robots, turrets, and land mines, so you'll have to proceed slowly and carefully. The nuke carrier can carry three squad members, and it has 350 hit points, so it can help you when dealing with the robots. You'll find two
tool kits during the mission (#6, #12), so you can even get the nuke carrier banged up a little as long as you don't get it destroyed.
There is a back door to the bunker (#3a), which is close to Vault 0's front door. Once you've parked the nuke carrier next to Vault 0, you'll be given 60 seconds to run your squad to the bunker, and you'll have to go through the back door to make it in time. Then once you've blown open the vault's doors, you'll be given 45, 950 experience points and then 183,800 more experience points, and you'll automatically start the next mission.
1 - Starting Point
2 - Nuke Carrier
The nuke carrier starts with 350 hit points, which is good, but it can only carry three squad members, which is bad. So you can use it in certain situations against the robots, but you won't be able to drive it non-stop to your goal (#16).
3 - Bunker
The bunker (#3) is the one place on the map where you'll be safe during a nuclear explosion. Conveniently, you'll find a back door to the bunker (#3a) right next to Vault 0's front door (#16). The back door will allow you to quickly reach the bunker after you've positioned the nuke carrier (#2) next to the vault. But realize that there's a locked door between the bunker and the back door, and it will only open from the eastern (Vault 0's) side, so you won't be able to use the bunker as a shortcut to Vault 0.
Inside the bunker you'll find a couple security bots and three computer terminals. If you click on the terminals, then you'll learn a little about the Calculator. Two of the terminals will play information that you should have heard before, but the third will describe why the Calculator decided to start its pacification protocol.
4 - Landmines
We didn't have any luck trying to disarm the landmines with a 115% traps skill, so you'll probably need to avoid the mines or blow them up.
5 - Turret
The turret will start out down and invulnerable, and it will only pop up to attack you once you've gotten pretty close to it. So fan out your squad and have them activate their heaviest weapons, and then let the turret have it when it pops up.
The generator (#9) behind the turret powers it, but it's easier to just destroy the turret than to sneak around it and take out the generator.
6 - Chest
Directly under the bridge (#11) you'll find a locked chest with some
dynamite and a
super tool kit inside.
7 - Crate / Turret
You'll discover a crate in this spot, at the end of a little canyon that branches off the main road. Inside you'll find some
.50 cal ammunition and some
2mm EC ammunition.
The turret is located directly above the crate. It'll behave just like the turret at #5,
except that it won't pop up until you've started crossing the bridge next to it. It'll
also fire
explosive rockets instead of lasers, making it much more dangerous. However, you can climb up the ladders to the east (#7a) and then destroy the generator in the mountains (#7b) to deactivate it.
8 - Trapped Crate
You'll find a few
super stimpaks inside the crate.
9 - Generator / Pacification Bot
The generator here powers the turret to the south (#5). The pacification bot will be all by itself, so you should be able to gang up on it and kill it quickly.
10 - Three Turrets
The turrets will all shoot
7.62mm ammunition at you, and they should barely make a dent in your
power armour. So just charge at the turrets and blow them away. You'll find four humanoid bots nearby, and they'll probably be more dangerous than the turrets.
11 - Bridge
A humanoid bot on the bridge will be wielding a
M72 Gauss Rifle.
12 - Shack
Inside the shack you'll find a chest containing
super stimpaks and a
tool kit.
13 - Crate
You'll find 150 rounds of
2mm EC ammunition inside the crate.
14 - Robots
You'll find about ten security bots and humanoid bots here, so make sure you have your
squad together before you approach them. One of the humanoid bots will have an
M72 Gauss Rifle.
15 - Turrets / Behemoth
Here you'll find a pair of turrets and a behemoth. The best way to deal with the trio is to line up your squad to the west, and have them activate their heaviest weapons. Then have your snipers attack the behemoth to get it to charge at you. Some scurry bots will probably wake up at the same time, but chances are none of them will reach your squad.
Once the behemoth is destroyed, you can deal with the turrets in any way you'd like, including by destroying the nearby generator.
16 - Vault 0
You'll find some robots here waiting to greet you. One will have a
rocket launcher, so don't charge in with the nuke carrier (#2).


