 Did we miss anything in this location? Is there something we didn't discover?
Let us know!
Objectives
Did we miss anything in this location? Is there something we didn't discover?
Let us know!
Objectives
- Rescue or neutralize Bartholomew Kerr (#13).
- Find out what happened to General Barnaky (#13).
- (Optional) Destroy the four jamming towers (#3).
- (Optional) Rescue the prisoners (#6).
Walkthrough
This is a long, combat-intensive mission -- even by
Fallout Tactics standards. You'll start out on the western side of the map (#1), and you'll have to fight your way to the big building on the eastern side (#13). Along the way you'll have to battle numerous patrols of robots, including at least half a dozen behemoth robots. So proceed slowly and carefully, and clear out the streets (to defeat the patrols) before going inside the buildings. Nothing's worse than fighting a behemoth and having a group of hover bots sneak in behind you with rockets blazing.
There are some optional things you can do on your way to Kerr (#13). If you destroy all of the jamming towers (#3), then you'll receive 6645 experience points, and you'll regain your mini-map. If you rescue the prisoners from the internment camp (#6a), then you'll receive 6645 experience points for each one.
But the focus of the mission is on the big building on the eastern side (#13). That's where you'll find Kerr and the remains of Barnaky, and where you'll also find several robots, including a behemoth on the ground floor and a humanoid bot with a
MEC Gauss Minigun on the third floor. If you enter the building on the second floor, then you'll be able to use the walkways there to attack the robots on the first floor, and the extra height will give you an advantage. On the third floor, try to shoot the robots through the windows. That way you'll be able to attack them one at a time.
When you reach Kerr, he'll ask you to kill him. This is more difficult than it sounds,
because Kerr will be neutral to you, and so you won't be able to target him directly.
In fact, we didn't have any luck trying to shoot him, and so we had to use grenades to kill him. When Kerr dies, you'll receive 33,235 experience points, and when you approach what remains of General Barnaky's, you'll receive 19,935 experience points more. Be sure to loot the
general's locket from Barnaky's corpse. You might be able to use it later in the game.
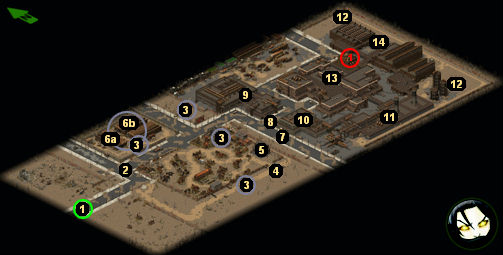
1 - Starting Point
2 - Behemoth Patrol
A behemoth and a pair of humanoid bots will patrol along the road here. Behemoths are tough, so watch the route it takes in its patrol, and then wait for it to leave so you can position your squad to attack it when it returns. Obviously, you should use your most powerful weapons.
3 - Jamming Towers
You'll find four jamming towers in the area. They'll all be heavily guarded, and by a variety of robots. However, when you destroy all four, you'll get back your mini-map, and you'll also receive 6645 experience points.
4 - Pacification Patrol
You'll encounter a pacification bot and some hover bots patrolling here.
5 - Building
The door to the second floor of the building starts out locked. You can get the key to it from the prison (#6), or you can pick the lock if you have enough skill (we had some trouble even at 120% lockpicking). Inside the building you'll discover a metal shelf and a dead civilian. You'll find a
44 M29 Revolver and some
stimpaks on the corpse, and you'll find a
first aid kit and a copy of
Guns and Bullets in the shelf.
Outside the building you'll find a trapped alarm console. If the alarm console does anything, we didn't detect it. Possibly, the robots are just hoping that you'll blow yourself up trying to disarm the
EMP trap.
Note: If you unlock and open the door to the second floor, and if you don't move your
character, then you'll be in a perfect position to attack the behemoth to the east (#7). You'll be able to hit the behemoth, but it will have to advance to hit you, and in doing so it will lose visual contact with you. After a while, it will return to its original position, where you'll be able to hit it again. If you're patient enough -- we just left one squad member at the door while we dealt with the jamming towers (#3) -- then you'll be able to kill the behemoth without taking a single shot in return.
6 - Internment Camp
You'll have to pick open all of the doors inside the internment camp, but most of them won't require much skill. Inside the western building (#6a) you'll meet three prisoners: Sebastian, Elaine and Derry. You'll get 6645 experience for each one you rescue (by talking to them twice). Elaine will mention that General Barnaky was a prisoner here at one point, and that what they did to him "sounded like someone was sawing a loud pig in half." In Elaine's cell you can also pick up a
house key. The
house key unlocks the door in the two-story building in the junkyard (#5).
You won't be able to talk to or rescue any of the other prisoners in the internment camp, but you can find a copy of
Maddock's Tricks & Traps in the northernmost building (#6b). It'll be lying on the floor.
7 - Behemoth
One behemoth will camp out at this point. You should be able to kill it by sniping at it from the building to the west (#5).
8 - Turrets
You'll encounter two turrets here. Both will use energy weapons, and both will be reasonably bad shots, so if you have competent snipers with
sunbeam laser rifles, you should be able to destroy the turrets while taking little damage in return. Just be careful of the behemoth that patrols the street in between the turrets.
9 - Building Complex
You'll find several robots in this building complex. You should be able to kill most of
them through the windows or from the elevated walkways. Once they're dead, feel free to
loot the
explosive rockets and
plasma grenades from the crates in the northern part of the complex.
10 - Building
Without surprise, you'll find a bunch of robots in this building. After you've dispatched them, you'll be able to loot a (locked) locker and a footlocker for some miscellaneous items, including a
vindicator minigun and a
Big Book of Science. If you crawl around, you can also explore a hidden room behind the oil drums, but inside you'll only discover a trapped and (apparently) buggy footlocker. When we tried opening the footlocker, nothing happened.
11 - Building
On the ground floor you'll find half a dozen humanoid bots lined up against the
northern wall. We attacked them through the windows in the western wall, and we didn't
have any trouble with them. Also on the ground floor, you can loot a couple of lockers
that contain things that might have been useful about 10 missions ago:
environmental armour, a
sniper rifle, a
rocket launcher, and more.
On the upper level / roof, you'll encounter some hover bots and security bots. You'll also find an alarm console. A security bot tripped the alarm when we played, and nothing happened, so it's not something you'll need to worry about.
If you stand on the eastern edge of the roof, you'll find yourself within range of a behemoth patrol (#12).
12 - Behemoth Patrols
You'll find two behemoth patrols in the far corners of the map. If your squad isn't good at dealing with behemoths (plus assorted other helper robots), then you can just avoid these patrols if you want.
13 - Big Building
This is the biggest building on the map, and it'll have the most interesting things inside.
Ground Floor
You'll have to face a behemoth in the main chamber of the ground floor, but if you kill it then you'll be able to use the nearby computer terminal. The terminal won't give you any sort of feedback, but clicking on it will turn off the turret on the third floor.
You can also access a locked stairwell on the northern side of the ground floor. If you
can get inside, then the stairwell will give you an alternative path to the third floor.
Second Floor
The second floor mostly only contains walkways, but inside the stairwell on this level
you can loot a crate for a
paramedic's bag and some ammunition.
Third Floor / Roof
The third floor is where all the interesting rooms are. In a southern room you'll find the remains of General Barnaky. When you get close to his body, you'll receive 19,935 experience points. Then when you click on the body, you'll find the
general's locket. It's a quest item that you might need in the final mission, so hang onto it.
In the middle room, you'll encounter a few robots and a turret. It's best to attack these guys through the windows rather than by opening up the door and trying to surprise them. That way, you'll be able to attack them one at a time. One of the robots in the room will drop the
MEC Gauss Minigun, the best minigun in the game. You'll also be able to loot three books from the shelves in the room, and a fourth book from on top of one of the desks.
In the northeastern room, you'll find Bartholomew Kerr. The turret outside his room can be tough, but if you use the computer terminal on the ground floor, then you won't have to deal with it, and you'll be able to confiscate all of its
.50 cal ammunition. Kerr will tell you that he didn't give any information to the robots, and he'll ask you to end his misery. If you don't kill him, then the game will react like you didn't talk to him at all, and you won't gain any experience points. If you do kill him (we had to throw grenades at him to hit him), then you'll receive 33,235 experience points.
14 - Connected Buildings
In these connected buildings you'll find some robots to kill but little else of interest.


