 Did we miss anything in this location? Is there something we didn't discover?
Let us know!
Objectives
Did we miss anything in this location? Is there something we didn't discover?
Let us know!
Objectives
- Meet with Pilot Christian (#1).
- Escort the Hummer to safety (Exit A).
- Retrieve the librarian's glasses (#15).
Walkthrough
You'll start out in a gas station (#1). Pilot Christian won't waste any time talking to you -- or
leaving you to fend for yourselves against the hordes of raiders and enemy civilians in the town. You'll find the Hummer in the gas station as well. If you've never used a vehicle before, then control-left-click to move a squad member inside, and press "i" with the character inside to see the vehicle's inventory.
Just like in previous escort missions, there isn't any timer here, and so there isn't any reason to start moving the Hummer until it is perfectly safe to do so. So take the time to deal with all of the enemies and mines in the area, and
then drive the Hummer to the extraction point (Exit A).
The first obstacle that you'll face is a locked gate (#3). To open it, you'll need to kill the raiders in the building next to it (#3a) and flip the switch there. You'll also have to deal with a couple of snipers on the rooftops. You'll encounter lots of snipers like this in the mission, and they'll be annoying because they'll often be able to shoot at you without you being able to shoot back. If such a thing happens to you, move your squad around to try and lure the sniper to the edge of the roof he is on. Then you should be able to target him. For some snipers, like the one at #3a, you might find a ladder nearby, allowing you to move to the same level as the snipers. For others, like the snipers on the southern edge of the street, you'll just have to deal with them from the street level, or try and skirt around them until you can get to the ladder that leads up to them.
The second gate (#7) works much like the first. You'll have to flip a switch (right next to the gate)
to get it to open. The difference is that this time the switch is locked in a small shed. When you
approach the gate, a raider will offer to tell you where the key to the shed is if you give him some
food. Soon thereafter, he'll tell you that the key can be found on the roof (#5), and then he'll open
fire on you. There doesn't appear to be a way to actually give him food.
You'll find the third gate (#8) being guarded by a trio of raiders, one of which will have a
rocket launcher, and another of which will have several grenades. The best way to deal with the raiders is to have some female characters sneak through the alleyway into the building to the south (#8a), and attack the raiders from there (male characters are too big to fit in the alley). Once the raiders are dead, go ahead and flip the switch right next to the gate to open it.
Note: If you have confidence in your female characters, you can send them all the way to the extraction point (Exit A), and attack the raiders there from behind.
Before heading for the fourth gate (#12), you should detour south to the library (#9). There you'll
meet Phillip the librarian, who will ask you to retrieve his
spectacles. To get to them, you'll
have to pass through the fourth gate, clear or avoid a minefield (#13), and then pick up the
spectacles from a chest (#15), all while dodging or killing a bunch of raiders. When you return the
spectacles to Phillip (by giving it to him through barter), he'll reward you with a copy of
Maddock's Tricks & Traps (unless you already bartered the book from him), and you'll also receive 450 experience points.
For the fourth gate (#12), you'll have to enter the courthouse (#11), fight your way to the second
floor, and then flip the switch on the balcony there. Past the fourth gate, you'll run into a small
minefield (#13). These are the same mines as in Rock Falls, so if you were able to disable them
there, then you should be able to disable them here as well. But if you have trouble, complete the librarian's quest (#9) first so you can get the traps book and improve your skill level in the area.
Past the minefield, you'll have to deal with one last gate (#16), plus several more raiders. One raider next to the extraction point (Exit A) will have a
rocket launcher (with a single rocket), but the rest will only have
scorpios and
AK47s, and you should easily be able to defeat raiders with those weapons if you have
hunting rifles. Once you've cleared out the raiders, moved the Hummer to the extraction point, and moved your entire squad to the extraction point as well, then the mission will end and you'll receive 2200 experience points.
Note: To keep the Hummer, you'll need to have at least one squad member inside it when you leave the area.
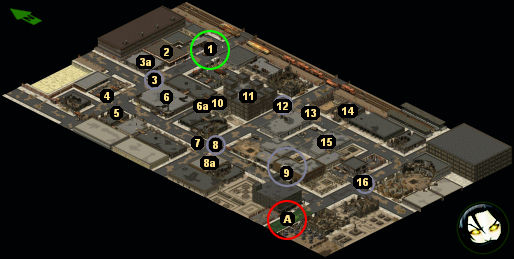
1 - Starting Point
You'll find Pilot Christian and the Hummer here.
2 - Building
You'll find a set of shelves with a
tool kit in it here. You can use the toolkit to repair the Hummer if it gets damaged, assuming that you have somebody competent with the repair skill.
3 - Locked Gate
To open the gate (#3), you'll need to flip the switch in the building to the north (#3a). You can also
find a chest containing a pair of
simpaks in the building with the switch.
4 - Dogs
Here you'll find four dogs munching on a dead civilian. If you defeat the dogs, then you can loot three
stimpaks plus some drugs from the corpse of the civilian.
5 - Chest
The chest is difficult to get to. That's because you'll discover two raiders camped out next to it, both of whom will have their
AK47s prepped and ready to burst. If you kill the snipers on top of the Bowlarama to the east (#6), then the noise will cause the two raiders near the chest to look out towards the street, allowing you to sneak a squad member up the ladder undetected. Provided that the squad member has a decent shotgun or SMG (the
neostead combat shotgun is perfect for this), then dealing with the raiders on the roof should be straightforward, if occasionally painful.
Inside the chest you'll find three
stimpaks and a
house key. The
house key can be used to access the switch for the next gate (#7).
6 - Bowlarama
Inside the Bowlarama (#6) you'll find an ice chest with two sticks of
dynamite inside. On top of the Bowlarama, you'll find four snipers with
AK47s. If you need to climb up to deal with the snipers, you'll find the ladder just to the south (#6a).
7 - Locked Gate
The switch to open this gate is in a small locked shed right next to the gate. The key to the shed can be found on a roof to the northwest (#5).
8 - Locked Gate
You'll find this locked gate being guarded by a trio of raiders, including one raider with a
rocket launcher, and another with an assortment of grenades. All three raiders will have sandbags to protect them, but you can circle around them through the building to the south (#8a) -- if you have some female characters who can sneak (like Farsight). The characters need to be female, because the alley on the southern side of the building is only wide enough for female characters to pass. If you can catch the raiders from behind then they should be easy enough to kill.
9 - Library
Inside the library you'll meet Phillip the librarian. He'll ask you to retrieve his
spectacles. You can find them in a chest in a building just to the east (#15). When you return the
spectacles to Phillip, he'll give you a copy of
Maddock's Tricks & Traps (unless you already bartered it from him), and you'll also earn 450 experience points.
10 - Ice Chest
In this building you can loot an ice chest containing 20
molotov cocktails and a
tool kit.
11 - Courthouse
You'll find six raiders in the courthouse, plus the switch for the locked gate outside (#12).
12 - Locked Gate
You'll need to flip the switch on the second floor of the courthouse (#11) to open the gate.
13 - Minefield
14 - Building
You'll find a pair of raiders in this building. Each one will have a dozen
frag grenades.
15 - Building
You'll find a bunch of raiders in and around this building. Once you've defeated them, loot the chest inside to pick up the
spectacles requested by Phillip the librarian (#9).
16 - Final Gate
The switch to open the gate can be found on the western side.
Exits:
- Extraction point. You'll find a few raiders here, including another raider with a
rocket launcher. If you can sneak a couple of female characters in behind these raiders, then dealing with them should be pretty easy. In particular, the raider with the
rocket launcher will probably shoot himself if he fires towards the west rather than the east. The barricades blocking the exit can be destroyed using any sort of weapon.


