 Did we miss anything in this location? Is there something we didn't discover?
Let us know!
Objectives
Did we miss anything in this location? Is there something we didn't discover?
Let us know!
Objectives
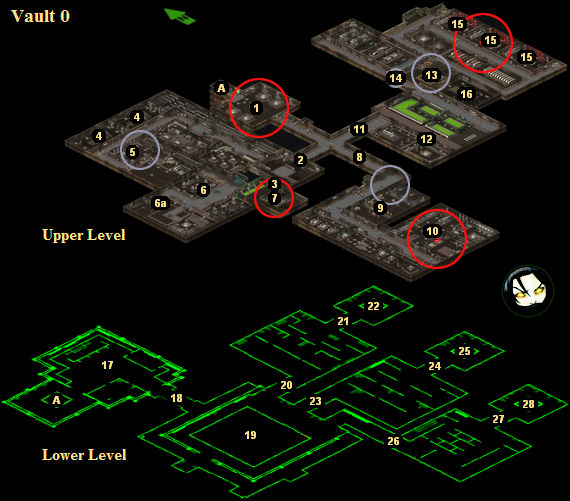
- Restore power to the three power generators (#15).
- Deal with the Calculator (#19).
Walkthrough
You'll start out in a safe room inside Vault 0 (#1). You'll meet five Brotherhood
soldiers here, and they'll all act as shopkeepers. Mostly the soldiers will sell you ammunition and drugs, but you can also get a
sunbeam gattling laser from them. If you can't afford their wares, don't worry. The soldiers might die during robot attacks, making their equipment available for free, and any equipment you loot from the robots will sell for way more with the soldiers than it would with the Brotherhood quartermaster, and so you'll quickly be able to generate a lot of money.
Also in the starting room, you'll have access to two computer terminals. The northern
terminal will allow you into the nearby elevator (Exit A) once you've restored power
to the vault, and the other terminal will restore your mini-map and open the door to
the south. Be careful when you use the second terminal, though; when the door opens, several robots will take the opportunity to charge at the room and try to kill you.
Note: You can become irradiated during this mission. So you should use
Rad-X on your squad before leaving the starting room.
Your first goal in the mission is to restore power to the vault so that you can use
the elevator (Exit A) to descend to the next level. You'll need to power up the generators (#15) in the power plant (#11) to do this. Of course, you won't be able to just walk into the power plant. First you'll have to fight your way through the security wing (#2) to reach a terminal (#7) that will unlock the cryogenics wing (#8). Then you'll have to fight your way to the back of the cryogenics wing. There you'll find a terminal and a
severed head (#10). Both will grant you access into the power plant.
When you descend to the lower level of the vault, you'll first have to fight a large group of robots (#17). This group will include the robot version of General Barnaky. If you have the
general's locket or
Barnaky's letter with you, then Barnaky will detect the items and switch to your side. If you don't have the items, then you'll have to kill Barnaky along with the rest of the robots.
You'll find the Calculator in a large, square room (#19). When you enter the room, walls will spring up around the Calculator, protecting it from harm. To gain access to the Calculator, you'll have to destroy the brains next to it. That will open a nearby door (#20), which will eventually give you access to another brain (#22). Destroying that brain will open a second door (#23), where you'll get to start over. Once you've destroyed the brains in all three rooms east of the Calculator (#22, #25, #28), the walls around the Calculator will come down.
Then when you approach the Calculator, it will talk to you and tell you that a single
new brain would fix its programming. After talking to it twice more, a 60-second timer
will start. If you force fire on the Calculator and destroy it, you'll get Ending 1.
If you talk to Barnaky and convince him to donate his brain, you'll get Ending 2. If
you click on the terminal near the Calculator to donate your brain, you'll get Ending 3
(if your karma is good) or Ending 4 (if your karma is evil). All four endings will use
the same initial cinematic sequence; only the dialogue and the drawings will be different.
Dealing with the Calculator will end the campaign. You won't be able to go back to a Brotherhood bunker or wander the wastelands for extra experience.
1 - Starting Point
In this room you'll find two computer terminals and five Brotherhood soldiers. The northern terminal will allow you into the elevator (Exit A) once you've restored power to the vault, and the other terminal will open the door to the south and restore your mini-map. Be careful with the second terminal; when the door opens, you'll be attacked by several robots.
The five soldiers in the room will act as shopkeepers, and they'll sell you things like
2mm EC ammunition,
Rad-X, and a
sunbeam gattling laser. If you can't afford or don't want to afford their wares, you can let them fend off the initial robot attack and hope that some of them get killed.
2 - Door to Security Wing
You'll be able to open this door when you reach it. In the room beyond, you'll have to
fight several robots. Even after the fight you might want to keep your squad in their
battle positions because several robots will patrol through the room, and it won't take
them long to find you.
3 - Locked Door
You won't be able to open this door manually. You'll have to operate the computer
terminal on the western side (#7) to get it open.
4 - Rooms
These rooms start out locked, and you'll only be able to enter them by using science on the computer terminal in between the doorways. Inside the rooms, you'll encounter a few patrolling humanoid bots plus four (locked) lockers. If you open the lockers then you'll find ammunition, medical supplies, and books.
5 - Storage Room
There are two ways to get inside this room. If your lockpicking skill is very high (we
only had success at 199%), then you'll be able to pick open the door and get in that way.
The better way is to use the terminal to the south (#6a). If you use the terminal, then
not only will it unlock the door, it will also disable the two turrets inside the room.
Inside the storage room, besides the two turrets, you'll also find four lockers. If
you search the lockers, you'll find books, weapons, medical supplies and ammunition,
including the very heavy but very effective
.50 cal depleted uranium ammunition.
6 - Room
You'll find several robots, including load lifters, in this room (#6). You'll have to be careful here because if you stop in the doorway, then the load lifters will run right up to the doorway to try and attack you, and if you destroy the load lifters there, then their debris will block the doorway, and you'll be stuck. So even if it causes you extra damage, you'll need to rush into the room when you attack it.
In the western end of the room you'll find a computer terminal (#6a). If you use science on the terminal, then it will unlock the storage room to the north (#5) and disable the two turrets inside.
7 - Computer Terminal
When you use science on this terminal, it will open the door to the east (#3) and also unlock the door to the cryogenics wing (#8).
8 - Door to Cryogenics Wing
This door will start out locked. To open it, you'll need to fight your way to a
terminal (#7) in the security wing (#2) and use science on it. Inside the cryogenics
wing you'll encounter a whole mess of security bots.
9 - Locked Room
Inside this room you'll find several robots and a pair of turrets. For some reason, the
turrets didn't attack us -- which is nice because that allowed us to grab over 5000
rounds of
.50 cal ammunition from each one. You can also search a dead ghoul, a dead raider
and a locker in the room, but they won't have much in the way of loot.
10 - Room
You'll find a few things of interest in this room. First off, you'll encounter a
humanoid bot with a
vindicator minigun plus a few Vault 0 citizens. The bot will be against you, but
the civilians will be neutral, so you'll have to be careful when you attack the robot.
If you accidentally hit any of the civilians, then they'll all turn against you, and
you'll have to kill them, which will put a serious dent into your reputation. So make sure your squad members are using rifles rather than machine guns when they enter the room.
Note: Oddly, killing the humanoid bot will lower your reputation as well. If you're concerned about your reputation, then put a tough character into sentry mode, and have it toss a couple of pulse grenades near the bot. As long as you don't attack the bot directly, you won't receive a reputation penalty when it dies.
Also in the room you'll find a computer terminal. If you use science on the terminal, then it will open the door leading to the power plant (#11). On the floor next to the terminal you'll find the body of a Vault 0 citizen. It'll contain a
severed head, which you can use on the dental scanner next to the door leading to
the power plant. The scanner will then open the door, giving you an alternative way to
enter the power plant if your science skill isn't high enough to use the terminal.
Finally, you can rummage through four (locked) lockers in the room. Inside, you'll find some miscellaneous items, including a
Big Book of Science.
11 - Door to Power Plant
There are two ways to open this door. The first way is to use science on the terminal (#10) in the cryogencis wing (#8). The second way is to use the
severed head (#10) from the cryogenics wing on the dental scanner next to the door. You won't gain any experience if you use the terminal, but if you use the
severed head, you'll gain 23,975 experience points. Luckily, you can use the
severed head even after you've opened the door with the terminal.
12 - Force Barrier
You can open the force barrier by using the computer terminal right next to it. But be careful! You'll encounter four humanoid bots on the other side of the barrier, and they'll attack you as soon as you've used the terminal.
13 - Terminals
You'll find two terminals and two humanoid bots here. If you use science on both of the terminals, you'll power down the interior defense generators, and you'll open the nearby force barrier (#14).
14 - Force Barrier
You'll need to use science on the two terminals to the east (#13) to lower the force barrier.
15 - Power Nodes
In each of these three spots you'll find two power generators and a computer terminal.
To turn on the power generators, you'll need to use science on the terminals. Each time
you're successful, the room with the power generators will glow red. Then when you've turned on all of the generators, you'll earn 191,800 experience points, and the elevator in the vault (Exit A) will start working.
Note: In the (locked) locker next to the southernmost power generators, you can find some
.50 cal DU ammunition.
16 - Room
You'll find a bunch of scurry bots in this room. They might scurry out while you're fighting the robots next to the power nodes (#15). To get into the room, you'll need to crawl. If you do, then inside the room you'll find a pair of (locked) lockers containing some
Rad-X and not much else of interest.
17 - Big Battle
When you open the door to this room, eight robots will open fire on you, including the robot version of General Barnaky. If you can survive the initial salvo from the robots, then you should be all right. To make the battle easier, you might want to position your squad next to the door so that they can only see half of the room (and only half of the room can see them). Then repeat for the other half.
General Barnaky is a big, bad robot, but he'll only use melee attacks against you, and so you'll be able to attack him for a while before he can get within melee range of your squad. Better yet, if you're carrying the
general's locket or
Barnaky's letter, then once Barnaky gets close enough to you, and once he's been damaged enough, he'll stop and switch to your side. The only problem with this is if you're using continuous turn-based mode. If one of your squad members is in the middle of attacking Barnaky when he switches to your side, then he'll switch back to being an enemy, and you'll have to kill him. So if you don't use a turn-based mode normally, you might want to switch to it (by pressing the enter key) when you see Barnaky approaching. If Barnaky survives the battle, he'll walk over to the Calculator (#19).
18 - Turrets
You'll have to deal with four turrets here.
19 - Calculator
When you enter the room with the Calculator, alarms will go off and walls will pop up
around the Calculator, protecting it from harm. To gain access to the Calculator, you'll
need to destroy all of the brains in the level. If you destroy the five brains next to
the Calculator, the door at #20 will open, which will allow you to access the terminal
at #21, which will allow you to destroy the brain at #22. When that brain is down, the
door at #23 will open, and you'll be able to repeat the process. Once you've also
destroyed the brains at #25 and #28, the walls around the Calculator will come down.
Note: If you don't want to kill the brains -- and the robots guarding them -- you can just force fire at the Calculator before entering the room.
Another note: If you attack the brains directly, you'll lose a lot of reputation. But if you force fire near the brains and kill them that way (for example, if you have a burst mode weapon, you can fire beyond a brain to hit it), then you won't lose any reputation.
When you return to the Calculator, it will talk to you and tell you that a single new
brain would fix its programming. After talking to it twice more, a 60-second timer will
start. If you force fire on the Calculator and destroy it, you'll get Ending 1. If you
talk to Barnaky and convince him to donate his brain, you'll get Ending 2. If you click
on the terminal near the Calculator to donate your brain, you'll get Ending 3 (if your
karma is good) or Ending 4 (if your karma is evil). All four endings will use the same
initial cinematic sequence; only the dialogue and the drawings will be different.
20 - Door
This door will open once you've destroyed the brains next to the Calculator (#19).
21 - Terminal / Force Barrier
To lower the force barrier, just use the terminal next to it.
22 - Brain
23 - Door
This door will open once you've destroyed the brain at #22.
24 - Terminal / Force Barrier
To lower the force barrier, just use the terminal next to it.
25 - Brain
26 - Door
This door will open once you've destroyed the brain at #25.
27 - Terminal / Force Barrier
To lower the force barrier, just use the terminal next to it.
28 - Brain
Exits:
- Elevator. You won't be able to use the elevator until you've started up the power
generators (#15). When you use the elevator, it'll be a one-way trip, so make sure that you've looted everything that you'll need before heading down.


