 Did we miss anything in this section? Is there something we didn't discover?
Let us know!
Overview
Did we miss anything in this section? Is there something we didn't discover?
Let us know!
Overview
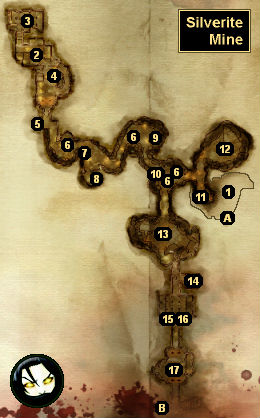
Shortly after entering the mine (via Exit A), you and your companions will get captured by the Architect, and he'll imprison you and confiscate all of your equipment. You
should be able to get your equipment back (by defeating experimental subjects and looting a chest near the end), but as of version 1.04 this sequence is buggy, and it's possible for you to permanently lose some of your gear. That means you should save your game before entering the mine (and not just a quicksave).
You'll be able to tell if the sequence is working correctly by checking your inventory after your capture. If you and your companions are all wearing basic Clothing, and your inventory is empty, then everything is fine, and you should proceed. But if your main character is wearing some normal equipment and you have potions and other items in your inventory, then the sequence is broken, and anything missing from your main character will be gone for good.
The bug occurs when the experimental subjects (#6) attempt to wear the equipment from you and your companions, and fail. The experimental subjects for your companions will spawn no matter what, and so nothing can go wrong with their equipment, but if the bug occurs then the experimental subject for your main character won't spawn, and so any equipment it should have will be gone from the game.
Since the bug involves restrictive items, to prevent it, you and your companions should remove all items that are restricted by character or class (such as Nathaniel's
Worn Golden Ring). If you still get the bug even after this, then your best bet is simply to strip down your main character. That way, when your main character's experimental subject doesn't spawn, it won't make any difference, and you'll eventually find all of your inventory items in the chest next to Armaas (#16).
1 - Scroll
Examining the scroll will give you the Notes codex entry for
A Miner's Letter.
2 - Prison
After your capture, you'll find yourself locked in a prison cell. However, when you regain consciousness, Velanna's sister Seranni will show up and free you. If you're persuasive with Seranni, then she'll also give you the
Architect's Key, which you'll need for a chest in the Architect's room (#14). When you leave your cell, a group of wimpy darkspawn will attack you, and you'll find a
Holding Cell Key on one of their corpses. This key will allow you to enter the other cells in the prison.
3 - Architect's Lab
You'll discover four things of interest inside the lab:
- Books (on the floor near the entrance). Among the books you'll find a
Masterpiece Frost Rune Tracing, a
Paragon Frost Rune Tracing, and
Phylacteries: A History Written in Blood.
- Journal Page (on a table along the western wall). Examining the page will give you the Notes codex entry for
The Architect's Journal.
- Experiment Notes (on a table along the northern wall). Examining the notes will give you the Notes codex entry for
The Architect's Notes.
- Experiment Controls (in the center of the room). The controls are part of a puzzle. Your goal is to extinguish the two flaming globes on the eastern side of the room. The left control will rotate the flames clockwise. The right control will reverse (either lighting or extinguishing) the two globes in the back row. Starting in the initial position (with the front right and back left globes burning), a solution to the puzzle is: LRLR. When you complete the puzzle, you'll be able to enter the eastern side of the room (via one of the prison cells at #2), where you'll find a chest containing
Dragonspite, a
Blackblade Tunic, and more.
4 - Ballista
You can use the ballista here to badly damage the group of darkspawn below you. You won't get any xp for this, but the battle will probably be tough otherwise.
5 - Secret Room
Inside this secret room (which you should discover when you get close enough to it) you'll find a
Blackblade Helm, a
Masterpiece Hale Rune Tracing, a
Paragon Hale Rune Tracing, and more.
6 - Experimental Subjects
Each of these subjects should drop the gear from one of the characters in your party.
7 - Stones
Inside this pile of stones you'll find a
Shiny Malachite.
8 - Keenan
Keenan will give you the quest
Last Wishes.
9 - Soldier Corspe
On the corpse here you'll find a
Spyglass and more.
10 - Silverite Deposit
Inside the deposit you'll find
Silverite Ore, which you'll need for the quest
Elemental Requirements.
11 - Lyrium Deposit
Inside the deposit you'll find
Lyrium Sand, which you'll need for the quest
Bombs Away!
12 - Dragonling Pen
Inside the pen you'll encounter a "red" hurlock dragon-tamer, a "yellow" drake, and a few dragonlings. After the battle, when you loot the corpses and containers in the room, you'll find a
Leg-Crusher,
Keenan's Wedding Ring (which you'll need for the quest
Last Wishes), a
Fresh Dragon Egg (which you'll need for the quest
Worked to the Bone), and more.
13 - Darkspawn Necromancer
When you enter the room, a "yellow" darkspawn necromancer will create three animated dead and then retreat onto a ledge. When you give chase to the necromancer, a large group of darkspawn, including a "yellow" drake, will come to his rescue. None of the darkspawn involved in the battle will drop anything noteworthy when they die.
14 - Architect's Room
Inside this room you'll discover three things of interest:
15 - Armaas
Armaas is a merchant, and he'll sell you a few items (mostly Poison-Making items). You can kill him if you want, but if you don't then you'll be able to invite him to trade at
Vigil's Keep, which will update the quest
Trade Must Flow.
16 - Chest
Inside this chest you'll find all of your confiscated inventory items.
17 - Dragon Thrall Battle
When you enter this chamber, you'll be attacked by a pair of "red" dragon thralls while the Architect watches from above. The thralls will do typical dragon things (breathe fire, buffet their wings, and so forth), but the battle against them should not be too taxing. Just make sure your party focuses on one thrall at a time.
After the battle, the Architect will leave (with Seranni), and Velanna will offer to join the Grey Wardens. If you accept her, then she'll become a permanent companion, but Justice will strongly disapprove. Finally, when you loot the dragon thrall corpses, you'll find
Shock Treatment,
The Slippery Ferret's Gloves, and a
Landsmeet Shield.
Note: When the battle starts up, the door to the north will close and lock, and you'll never be able to return to the rest of the Silverite Mine. So make sure you've explored it thoroughly before proceeding.
Exits:
- Mine entrance.
- Mine exit.


