 Did we miss anything in this section? Is there something we didn't discover?
Let us know!
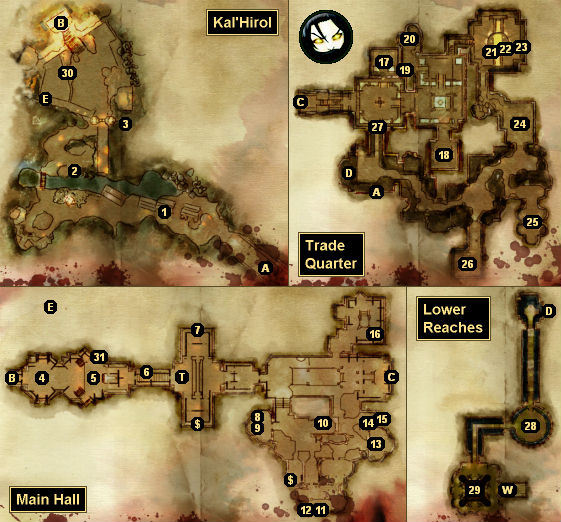
Overview
1 - Jukka
Did we miss anything in this section? Is there something we didn't discover?
Let us know!
Overview
1 - Jukka
When you reach this spot, a dying dwarf named Jukka will warn you that the broodmothers are breeding, and that they've created an army.
2 - Ancient Dwarven Crate
Inside this crate you'll find
Ancient Boots, which you'll later (at #22) be able to convert into
Greaves of Hirol's Defense.
3 - Crate
Inside this crate you'll find a
Whetstone.
4 - Trap Room
You'll discover several pressure plates in this room, each one connected to a fireball trap. So be careful fighting the darkspawn in the room (you might want to switch your party to ranged combat and have them hold their ground), and get your rogue to disarm the traps. If you decide to just blunder through the room, then the good news is that the traps will probably hurt the darkspawn more than they hurt you. You can also bypass the room if you have Sigrun in your party, since her presence will make the side entrance (Exit E) available.
5 - Golem Master
When you kill the golem master, you'll find two
Flawless Rubies and a
Golem Control Rod on its corpse. You'll need a
Flawless Ruby for the quest
Heart of the Forest, and you can use the
Golem Control Rod to wake up the inert golem (#6). Killing the golem master will also cause any remaining stone golems to keel over dead.
6 - Inert Golem
If you have the
Golem Control Rod (from #5), then clicking on the golem will cause it to charge into the next room and attack all of the darkspawn there.
7 - Scrolls
In this pile of scrolls you'll find a
Masterpiece Paralyze Rune Tracing and a
Paragon Paralyze Rune Tracing.
8 - Scrolls
In this pile of scrolls you'll find a
Masterpiece Cold Iron Rune Tracing and a
Paragon Cold Iron Rune Tracing.
9 - Pile of Bones
In this pile of bones you'll find a
Cracked Breastplate, which you'll later (at #22) be able to convert into a
Breastplate of Hirol's Defense.
10 - Note
Examining this note will give you the Notes codex entry for
A Scout's Report.
11 - Scrolls
In this pile of scrolls you'll find
Gravity Trap Plans.
12 - Moldy Journal
Examining this journal will give you the Books and Songs codex entry for
Dailan's Journal.
13 - Lyrium-Infused Skeleton
On the skeleton you'll find
Lyrium Sand, which you'll need for the quest
Bombs Away!
14 - Chest
Inside this chest you'll find a
Masterpiece Immunity Rune Tracing, a
Paragon Immunity Rune Tracing, and a
Lyrium Ring.
15 - Wall Carving
Examining the carving will give you the Culture and History codex entry for
The Fortress of Kal'Hirol.
16 - Darkspawn Battle
You'll encounter a group of darkspawn here, including a "yellow" hurlock emissary and a "yellow" hurlock alpha. The emissary will drop a
Shattered Maul and a
Staff of Vigor when it dies. If you take the maul to the forge (#22) then you'll be able to convert it into
Valos Atredum.
17 - Hirol's Chamber
You'll discover three things of interest in this chamber:
- Hirol's sarcophagus. Inside you'll find a
Girdle of Kal'Hirol, but when you loot it, the three "yellow" steel golems in the chamber will wake up and attack you.
- Scrolls. Among the scrolls you'll find an
Elemental Rune Tracing.
- Wall carving. If you examine the carving then you'll gain the Culture and History codex entry for
The Paragon Hirol.
18 - Dailan's Chamber
You'll discover three things of interest in this chamber:
- Commemorative marker. When you click on the marker, you'll pick it up, and you'll gain the quest "Memories of the Stone." To complete the quest, you'll just need to show the marker to Dworkin at
Vigil's Keep. You won't get a reward for this, but completing the quest will generate an entry in the epilogue.
- Dailan's corpse. On the corpse you'll find the shield
Partha and a
Broken Sword. If you take the sword to the forge (#22) then you'll be able to convert it into
Kallak.
- Scrolls. Among the scrolls you'll find a
Greater Stamina Draught Recipe.
19 - Pile of Bones
Inside the pile you'll find
Engraved Silver Bracers.
20 - Lyrium Deposit
Inside the deposit you'll find
Lyrium Sand, which you'll need for the quest
Bombs Away!
21 - Iron Deposit
Inside the deposit you'll find
Iron Ore, which you'll need for the quest
Elemental Requirements.
22 - Forge
The repair equipment here will allow you to fix up some of the broken items you might have found scattered around the thaig, including the
Damaged Axe nearby. Here's what you can create:
Breastplate of Hirol's Defense (from the
Cracked Breastplate at #9),
Greaves of Hirol's Defense (from the
Ancient Boots at #2),
Heirsplitter (from the
Damaged Axe),
Kallak (from the
Broken Sword at #18), and
Valos Atredum (from the
Shattered Maul at #16).
23 - Scrolls
Among the scrolls you'll find a
Masterpiece Flame Rune Tracing and a
Paragon Flame Rune Tracing.
24 - Prison
You'll find Steafan locked in a cell here. He'll try to convince you to free him, and he'll offer you a
Masterpiece Flame Rune for your trouble. If you agree to this deal, then you'll also receive 500 xp, and you'll still be able to choose between freeing him, killing him, or letting him rot in his cage. Justice, Nathaniel and Sigrun will disapprove of you killing him.
25 - Tomb
You'll find five runestones in this tomb. Each runestone will display a symbol and also have a symbol above it. Your goal is to make these symbols match up. To change the symbols on the runestones, you'll need to activate two of them, which will cause them to swap their symbols. Once you've solved the puzzle, the sarcophagus in the center of the tomb will open, and inside of it you'll find
Gauntlets of Hirol's Defense,
Nature's Blessing, and more.
26 - Treasury
Inside this room you'll find five chests containing a
Masterpiece Stout Rune Tracing, a
Paragon Stout Rune Tracing, a
Helm of Hirol's Defense, a
Flawless Emerald, a
Carved Greenstone, and more.
27 - Locked Door
To open this door, you'll have to circle around to its southern side and pull the lever that you'll find there.
28 - Inferno Golem and the Lost
When you enter this room, you'll be attacked by an Inferno Golem and a darkspawn called the Lost. The golem is a big melee boss, and it will cause patches of fire to appear in the room, and the Lost is a spellcaster with a specialty in fire. Obviously, it's a good idea to build up your fire resistance before attempting the fight
(
Immunity Runes are very helpful), but otherwise you should keep your tank on the golem while the rest of your party disrupts and takes down the Lost. You should also keep a careful eye on your party, and move characters out of the way whenever they end up in a patch of fire.
After the battle, when you loot the corpses, you'll find a
Staff of the Lost, a
Battlemage's Cinch, a
Flawless Ruby, an
Inferno Golem Shell, and more. Picking up the
Inferno Golem Shell will trigger the quest
Golem's Might.
29 - Breeding Pit
Inside this room, you'll encounter a trio of broodmothers. They'll be at the bottom of a pit, but they'll be able to attack you with their tentacles, and no matter how many these tentacles you kill, they'll just keep on spawning. To defeat the broodmothers, you'll need to dodge their attacks and break two of the four chains in the room. That will drop a huge structure onto the broodmothers, killing them.
Note: If Sigrun is in your party, then after killing the broodmothers, you'll be able to invite her to join the Grey Wardens.
30 - Secret Door
If you have Sigrun in your party, then you'll detect a hidden switch next to the door. Flipping the switch will open the door.
31 - Doorway
This doorway will only become available if you enter Kal'Hirol via the side entrance (Exit E).
Exits:
- Exit to
Knotwood Hills.
- Doorway between the Kal'Hirol entrance and the Main Hall.
- Doorway between the Main Hall and the Trade Quarter.
- Doorway between the Trade Quarter and the Lower Reaches.
- Doorway between the Kal'Hirol entrance and the Main Hall. If you use this entrance (only available if you have Sigrun in your party), then you'll be able to avoid the trap room (#4) in the Main Hall.
- World exit.


