 Did we miss anything in this section? Is there something we didn't discover?
Let us know!
Background
Did we miss anything in this section? Is there something we didn't discover?
Let us know!
Background
You'll receive this quest after completing either
The Assault on Amaranthine or
The Siege of Vigil's Keep.
Walkthrough
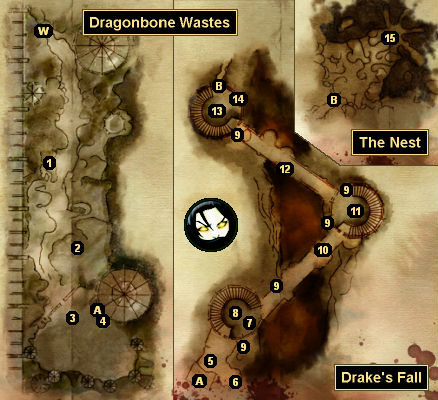
For this quest you'll need to kill the Mother (#15), which will involve you fighting your way through the Dragonbone Wastes and Drake's Fall, and perhaps completing the quest
Crystals of the Imperium. Along the way you'll run into the Architect again (#11), and he'll explain that he did not intend to fight the Grey Wardens; he just needed some of their blood to prevent his darkspawn from succumbing to the call of the Old Gods. He'll also reveal that he'd like to help you defeat the Mother.
That means you'll have to make a decision:
- If you ally yourself with the Architect, then you'll avoid a fight with him, and he'll make available his Architect's Pyre ability when you face the Mother. However, if you have Justice or Sigrun in your party, then they won't be happy with your decision, and if you're not persuasive, then you'll have to fight them.
- If you decide not to work with the Architect, then you'll have to fight him and his partner Utha. The Architect is a "red" caster with a specialty in fire magic (including a "cataclysm" spell that will rain down fire on your entire party), and Utha is a "yellow" melee warrior. For best results you should send one melee character to deal with Utha while everybody else gangs up on the Architect, and uses healing spells and poultices as necessary. After the battle, you'll find
Doge's Dodger on Utha's corpse, and a
Belt of the Architect and
Robes of the Architect on the Architect's corpse.
Past the Architect, when you enter the Nest (via Exit B), you'll encounter the Mother (#15). If you sided with the Architect, then the Mother will reveal that the Architect caused the last Blight, which the Architect won't deny. But either way, you'll still have to fight the Mother.
The Mother will attack you with typical broodmother abilities (such as a never-ending supply of tentacles), but she'll be more powerful than the broodmothers you've faced before. The best way to deal with the Mother is to focus on her completely and ignore her tentacles. That's because each time you kill a tentacle, the Mother will summon several childer grubs to attack you, and their numbers can add up (and their overwhelm attacks can get annoying) if you're not careful. If you ignore the tentacles, then you'll only have to deal with one wave of grubs when the Mother reaches half health.
You might also have some special abilities available to you, depending on what you did with the Architect and the towers in Drake's Fall. If you activated all three towers and agreed to work with the Architect, then you'll have two area-effect fire damage abilities, an area-effect stun ability, and a healing ability at your disposal. These abilities are mostly useful to counteract the childer grubs than they are to deal with the Mother (if your party has decent resistances, then the fire abilities will kill the grubs while doing little damage to you), so save them for if you get into trouble. The healing ability can revive unconscious characters.
When you kill the Mother, the campaign will come to an end, and you'll get to learn the fate of Amaranthine and your companions.
1 - Pile of Bones
Inside the pile you'll find
Fadewalker.
2 - Note
If you examine the note, then you'll gain the Culture and History codex entry for
Drake's Fall.
3 - High Dragon
At this spot you'll encounter a "red" high dragon. Try to keep your party spread out so the dragon's breath attacks don't hit multiple characters, but otherwise just whack away at the dragon until it dies. You won't find anything on its corpse.
4 - Pile of Bones
Inside the pile you'll find
Quicksilver.
5 - Seranni
If you have Valenna in your party, then you'll meet Seranni here. Seranni will try to convince you that the Architect's darkspawn are just like the Dalish, searching for their place in the world. No matter what you say to Seranni, she'll end up leaving, but if you try to attack her, then you'll lose 10 approval with Velanna.
6 - Chest
Inside this chest you'll find a
Crystal.
7 - Armored Ogre
At this spot you'll encounter a "yellow" armored ogre, which will drop a
Crystal when it dies.
8 - Tower of Flame
At the base of this tower you'll find four sockets in the floor. If you fill these sockets with
Crystals (found all throughout the area), then you'll gain the Tower of Flame ability when you face the Mother (#15). Also in the tower, you'll find two flesh pods containing a
Crystal and the amulet
Will of the Unyielding.
9 - Flesh Pods
Inside each of these flesh pods you'll find a
Crystal.
10 - Disciple Alpha
At this spot you'll encounter a "yellow" disciple alpha, which will drop a
Crystal when it dies.
11 - Tower of Trauma
At the base of this tower you'll find four sockets in the floor. If you fill these sockets with
Crystals (found all throughout the area), then you'll gain the Tower of Trauma ability when you face the Mother (#15). You'll also meet with the Architect in this tower.
12 - Flesh Pod
Inside this flesh pod you'll find
Vestments of Urthemiel.
13 - Tower of Healing
At the base of this tower you'll find four sockets in the floor. If you fill these sockets with
Crystals (found all throughout the area), then you'll gain the Tower of Healing ability when you face the Mother (#15). You'll also find a flesh pod containing a
Crystal in the tower.
14 - Locked Chest
Inside the chest you'll find a
Crystal.
15 - The Mother
Exits:
- Entrance to Drake's Fall.
- Entrance to the Nest.
- World exit.


