 Did we miss anything in this location? Is there something we didn't discover? Let us know!
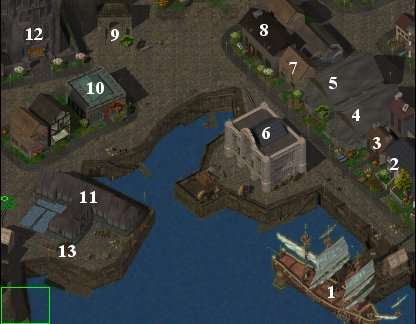
All sailors coming to the Gate first see the docks of the city. The docks buzz with activity at all hours of the day. There are many warehouses around, a tavern where you'll find sailors, a gambling and prostitution den(the Low Lantern) as well as the Harbor Master's Building. Also worth noticing are the Iron Throne headquarters and the Water Queen's House. This part of town is rather pleasant and a lot of local commoners can be found around.
1- LOW LANTERN:
A boat which serves as a gambling and prostitution place for the local folks. There are many people inside but the space is rather tight, making movement a bit complicated at times. You'll find quite some treasures inside, making it a place worth visiting. There are also a few chests worth plundering, but be careful as the guards will be summoned most of the time. If you wish to do so, first visit the lantern without opening any of them, just do all the quests inside. Then, get your party out and leave a thief with a good stealth inside. Start by the bottom level, open all chests, steal their contents, hide in shadows and go to the next level without being seen by the guards. It may take a few attempts but it is well worth it.
1st Level:
Lobar: The owner of the place, Lobar wishes you to enjoy your stay. There is a chest in his room which contains 112 gp. and a scroll of Protection from Fire. The other scroll is cursed.
Bartender:
Rooms: Peasant and Merchant rooms.
Shop: No.
Drinks: Yes.
Steal: No.
Gamesman: Offers you the chance to gamble your hard earned (or stolen�) money. I tried the game 10 times and lost each time. Not really worth it�
2nd Level:
Desreta and Vay-ya: Two psychos who think that life is not worth living and who invite you to share some entropy pleasures with them. You can either tell them to get lost, in which case they will. If you accept their invitation, be prepared for a fight. Desreta is worth 1600 Exp. and she carries a Long Sword +1 and the Gauntlets of Ogre Power(strength 18/00). She is a rough cookie who can do quite some damage. Vay-ya is a mage worth 2000 Exp. She casts such things as Improved Invisibility and Confusion, which is a bit annoying. She carries a Wand of Fire, Dagger +1, Clairvoyance scroll, Dispel Magic scroll and a bit of gold.
Chest: There is a chest on this level which contains a Long Sword +1 and a bit of gold.
3rd Level:
Yago: The mage who cursed Coran's daughter. You can kill him for 1400 Exp., a Knave's Robe and Yago's Book of Curses. You may also make him hand over the book but it is not the most rewarding solution. Once you have the book bring it back to Brielbara at the Splurging Sturgeon (North-Eastern part of BG) for your reward. Coran also chooses to stay with you if you had him in your party.
Chest: In Yago's room there is a chest containing the following scrolls: Sleep, Blur, Melf's Acid Arrow and Fireball.
4th Level:
Barrels: There is a bit of gold and some gems to be found.
2- HOUSE:
Ghorak the Cursed: An ancient Priest of Tymora who killed his brother Kereph for a reason which remains unknown(probably jealousy). He has been cursed by Tymora ever since. He tells you that the only way to cure him is to find his brother's skull behind a painting in the Three Old Kegs(Northern part of BG) and to bring it to Agnasia in The Lady's Hall(Western part of BG). You don't need to come back to him since you get no more rewards than Agnasia gives you, but you'll see him cured if you do so (you have to talk with him first).
Chest: There is an Antidote in the chest on the 1st floor. The guards won't be summoned.
3- HOUSE:
Larriaz: A sirine who has been captured by a family of fishermen and held ashore for too long. To get her revenge, she killed the whole family and decided to stay in the house since she was going to die anyway. You can either leave or kill her for 30 Exp. and a Pearl. There is nothing of interest inside the house.
4- WAREHOUSE:
Noralee: A merchant of weapons and armor who lost her gauntlets while disembarking some armors at the docks. She asks you to bring them back to her. In fact, these gauntlets are the Gauntlets of Weapon Skill and can be found in a crate at location (13). In my opinion you should keep them, but if you decide to bring them back to her you get 1000 Exp., +1 Reputation and 2 Potions of Infravision. Then she leaves, so decide if you want the gauntlets first (you cannot pickpocket the gauntlets).
Desk: There are 2 Potions of Healing on the desk in the back of the warehouse.
Barrel: There is a Potion of Defense and a Potion of Stone Form in a barrel. Be careful as the guards will be summoned. Some other treasures can be found around the warehouse.
5- WAREHOUSE:
Nivek: Tells you how Gorpel Hind and his band of adventurers, the Merry Fools, captured a Basilisk a few days ago and intended to bring it to the carnival in Waterdeep. Unfortunately, the Basilisk escaped and created a whole mess in the warehouse.
Greater Basilisk: Be careful as his gaze can petrify you. The Potion of Mirrored Eyes or a scroll of Protection from Petrification greatly help in the fight. Note that if your PC is turned to stone it is considered the same as death and you'll have to reload the game. Once you killed him you get 7000 Exp. Search his corpse for a Sphene Gem, needed by G'Axir the Seer at the Blade and Stars (South-Eastern part of BG). Then return to Nadarin in the South-Eastern part of BG for your reward.
6- HARBOR MASTER'S BUILDING:
Harbormaster: A few tips about Baldur's Gate but nothing of terribly useful. You'll need to bring Duke Eltan to the Harbormaster later in Chapter 7.
7- HOUSE:
Cordyr: A thief who'll ask you to kill Sil and her sirines at the Lighthouse (see that section for more details) if your party has a low-medium reputation. Gives you a scroll of Haste for doing so.
8- JOPALIN'S TAVERN:
You'll find a lot of drunk sailors in here, no quests though.
Bartender:
Rooms: the 4 types of rooms are available.
Shop: No.
Drinks: Yes.
Steal: No.
9- ENTILLIS FULSOM:
One of Elminster's friends. If you have Jaheira and Khalid in your party he admits being a member of the Harpers. He also urges you to do Scar's and Duke Eltan's quests.
10- FIVE OGRE MAGES:
Yes, that's a big 5! It appears that the price on your head is now 10000 gp.! Quite a price for a head. The fight can be quite hard if you don't buy some Arrows of Slaying(kill ogre mages on touch, no saves) from the Sorcerous Sundries. Each one of the Ogre Mages is worth 650 Exp. and you can loot them for some treasures: Laeral's Tear Necklace, Diamond, Fireball scroll and some other gems. Search the house for a Burning Hands scroll and a bit of gold.
11- WATER QUEEN'S HOUSE:
Priestess of Umberlee: You can ask to see the High Priestess Jalantha Mistmyr, but you'll have to donate 50 gp. in order to see her (if you offer 25 gp., you'll end up paying 100 gp.). You can also ask to see Tenya if you helped her against the fishermen.
Lothander's quest: If you are on Lothander's quest, then the diviner at the market place(see Central Part of Baldur's Gate for more details) has told that only the High Priestess Jalantha Mistmyr can help you with this matter. Jalantha doesn't give the scroll required to remove Lothander's geas for free(she's evil after all�), however, and asks that you bring her the Tome of Wisdom from The Lady's House (see Western part of BG for more details). Once you do so, there are 2 ways of ending this quest:
Good way: Tell Jalantha that you don't trust her and she'll give you the scroll. You can then give her the Tome of Wisdom and leave.
Evil way: Tell Jalantha that you don't trust her and she gives you the scroll. Then tell her that you don't have the book. She attacks you but she's rather easy to dispatch. You get 6000 Exp., Leather +1, Sphene Gem and Casson's body for doing so. You also get to keep the Tome of Wisdom(actually the right name is Tome of Understanding and it gives you +1 Wisdom, permanent). The other priestess then attack you but cast no spells and are easy to kill. You can also recuperate your initial donation! Note that you loose no reputation for doing so.
Varci's quest: If you have been given the mission of retrieving Casson's body (see Western part of BG for more details) you can do so at the Water Queen's house. There are 3 ways of doing this quest:
If you helped Tenya against the fishermen: Ask the Priestess of Umberlee to speak with Tenya. Then ask Tenya for Casson's body as a payment for her debt. She *gladly* gives it to you and tells you to consider her debt repaid.
If you didn't help Tenya against the fishermen: You can either pay Jalantha Mistmyr 2000 gp. to recuperate the body or kill her during Lothander's quest (see above) to get it for free.
12- IRON THRONE HEADQUARTERS:
Basement:
Guard: He attacks you no matter what but is easy to dispatch.
Chest #1: 100 gp., Potion of Genius, Potion of Insulation, Cursed Antidote and Potion of Storm Giant Strength.
Chest #2: 255 gp., Protection from Acid and Protection from Cold scrolls.
Door: There is an entrance to the sewers in the basement.
1st Floor:
Triadore: A merchant working for the Iron Throne who tells you that strange things are going on. If you give him 300 gp. he accepts to stay a bit longer and tells you that there are 6 of Sarevok's acolytes on the 5th floor: 2 mages, 2 clerics and 2 fighters. They appear to have their own agenda and don't care that much for the Iron Throne.
Guard: Lets you pass if you answer anything but that you are here to destroy the Iron Throne(no worth paying him since you can pass for free�). If you do the later he attacks and you'll also have to kill the other 2 merchants on the level but you lose no reputation in the process.
2nd Floor:
Dra'tan: A guard who lets you pass if you tell him that you have an important message for Sarevok's acolytes on the 5th floor(choices: 2-2-2). He also tells you that some of the people in the building might be shapeshifters. If you say otherwise he attacks with 3 Guards and 4 Archers. Be careful as the archers are quite skilled.
3rd Floor:
Nortuary: An inspector from the Iron Throne headquarters in Sembia who wishes to know where he can find Rieltar. He seems really angry because "Rieltar's damn son, Sarevok, seems to think he's in charge here." Just tell him that he can find Rieltar upstairs and he'll be on his way.
Guard: Just tell him that you're merchants from Sembia and he'll let you pass.
Emissary Tar: An emissary sent by the Grand Dukes to negotiate the price of the iron with the Iron Throne. She asks you where she can find the nearest stairs and you might as well tell her because nothing will stop her!
4th Floor:
Merchants: Question them to discover that Rieltar and Brunos are in Candlekeep on important business.
Destus Gurn: The Assistant Chief Accountant of the Iron Throne. He mistakes you for Emissary Tar and gives you a briefing about the meeting you'll have upstairs with Thaldorn and 6 of Sarevok's "advisors".
Shelves: Search the shelves around this floor for the following scrolls: Hold Person, Stinking Cloud, Flame Arrow, Know Alignment, Shield and Protection from Petrification(keep for later in the Candlekeep crypt�).
5th Floor:
Aasim, Diyab, Zhalimar Cloudwulfe, Naaman, Alai, Gardush and Doppleganger: A very tough encounter will await you on this level! Be well prepared before you access it (i.e. Haste, Remove Fear, Protection from Normal Missiles, Mirrored Image, Bless, Chant, Aid, Protection from Evil, Draw Upon Holly Might, etc�). I also find it easier to do the fight if you take the stairs on the right on level 4. Once you have accessed this level, summon some monster right away (Wand of Monster Summoning) before the dialog begins. You'll then discover that the real Emissary Tar was here before you, but in fact she changes into a dopplegangers and attacks you with the rest of her friends. Aasim and Diyab are both clerics, Zhalimar and Gardush are fighters while Naaman and Alai are mages. What follows shouldn't be that hard if you have cast enough protection spells on your party(otherwise it is VERY hard, trust me!). Just deal with the spell casters first using missile weapons and then take care of the fighter. They are worth 12420 Exp. all in all and they have quite some loot: Halberd +2, 2 Plate Mails, War Hammer +1, Mace +1, Wand of Heavens, Ring of Free Action, Wand of Lightning, Bracers of Defense AC7, Potion of Stone Giant Strength, Oil of Fiery Burning, Potion of Perception, Antidote and the following scrolls: Confusion, Dimension Door, Know Alignment, Vocalize, Dispel Magic, Fireball and Protection from Normal Missiles.
Thaldorn: One of the Iron Throne leaders. He is so wimpy that he doesn't even help his friends in the fight and prefers to hide in an adjacent room. You can question him on the location of the other leaders and he'll tell you that they are in Candlekeep. He also tells you that any evidence linking the Iron Throne to the recent troubles in the region can be found on Rieltar himself(which is wrong, you'll find out later�). If you tell him that you have to kill him because he knows too much he begs you in the most pathetic way you'll ever see. Just go on and kill him (to teach him a lesson) for 975 Exp., 350 gp., Studded Leather +1, Short Sword +1 and a Potion of Agility.
Body of Emissary Tar: Looks as though Emissary Tar met her fate on this level of the tower. The 6 acolytes of Sarevok probably wanted to send a doppelganger instead to obtain good prices from the Grand Dukes for the iron they want to sell.
Desk: There is a desk in one of the rooms containing a Lightning Bolt scroll, a Hold Person scroll and 2 letters. They reveal that Brunos and Rieltar are in Candlekeep to meet Tuth and forge and alliance with his organization(whichever it may be). You also find out that Sarevok will not be at the meeting and that he is lying to his own father (told him that you were dead and that you were working for the Zhents).
Roof:
Nothing of interest here but you probably recognize the setting of the initial movie (in which Sarevok kills one of the Bhaal spawns and throws him over the fence to the bottom of the tower).
13- CRATE:
There are some Gantlets of Weapon Skill inside. You can either keep them or bring them back to Noralee at location (4).
14- DARK MOON MONKS:
If you have spoken with Rasaad and got him to reveal his past, you will encounter some Dark Moon Monks here while he is in your party. They will attack, but aside from a few protecton spells, they are very weak. When they are dead, Rasaad will explain that those who attacked him and his brother Gamaz must have actually been Dark Moon Monks, not Shadow Thieves. When they are dead, collect the Dark Moon Note and read it to learn about Sorren, a Dark Moon member hanging out at the Blade and Stars tavern, in the city's southeast district.


