 Did we miss anything in this location? Is there something we didn't discover? Let us know!
STORY:
Did we miss anything in this location? Is there something we didn't discover? Let us know!
STORY:
Congratulations, you've made it past the warders and down to Dungeon Level 2 of Durlag's Tower. Now you have to discover the secrets to opening the many doors that block your progress through this area. As with the previous levels, this one is heavily trapped. While you may find a mechanism that opens one door, but be forewarned that it may close another door. Also sleeping on this level or going back up to the upper levels will reset some of the doors and they will have to be reopened. For minimal frustration tries to do this level all at once. Careful combat strategies will keep your party healthy and there are plentiful healing potions stashed about. It's a good idea to keep the party AI turned off while doing this level so they don't rush into trapped areas in pursuit of enemies. Hopefully you brought one or two high level thieves with high detect trap abilities.
QUESTS "AT-A-GLANCE":
- Solve the Sparring Chamber puzzle
- Open all the doors
- Find the Level 3 Wardstone
- Find the Stairs to Level 3
ITEMS "AT-A-GLANCE":
- Please refer to below locations for the items you can find on this level. The list is too extensive to detail all the items here.
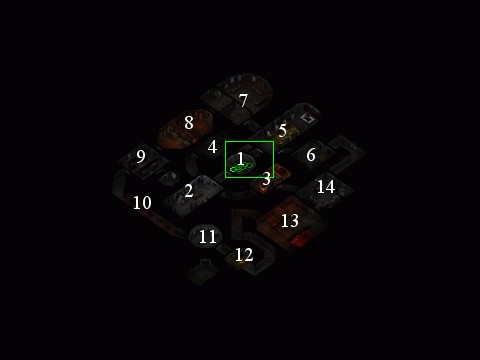
LOCATIONS:
1- ENTRY ROOM:
As you come down the stairs from the previous level search the floor for books. There are four �dusty' books that you can read. You might want to take notes as to the contents of these books as some of them contain important information and clues that you will need later. (You will be tested on your knowledge and understanding of what happened to Durlag at some point). Once you've read the books you can discard them. In case you don't want to take notes, the four books read as follows:
- �Too young to fight, except to fall; Here died my son, young Fuernebol'.
- �Islanne, my wife, I love you still. �Twas just your form they made me kill'.
- Moved ne'er by rage and ne'er by anger; Cold is the trait'rous doppelganger'.
- �Oh Kiel, Clan-prince of this dark tower; You made your death your finest hour'.
2- STATUE ROOM:
Now head southwest into a room with a number of statues and two secret doors. Two of the statues can be rotated. Activate the lower statue by rotating it to open the door to a bedroom that leads off the round room where you entered. You will get a message that says: The halls resonate with the sound of grinding stone. A door has opened somewhere nearby". While here also check out the pedestal at the far end of the room for loot, be careful its trapped and locked but contains a pearl, 346 gold pieces, four potions of healing, an antidote potion, a scroll of Greater Malison and five scrolls of Haste. Now head back to the NE and find the bedroom you just opened (we'll activate the other statue to open the Practice Chamber room later).
3- BEDROOM:
Colored Rune Stones: In this room you will find three colored rune stones. As you enter the room two more secret doors should be outlined in red. Neither will open at this juncture. In the center of the room there is a seating area with a chest. Open it and retrieve the red rune stone. As soon as you do this a secret door opens to the SW that leads back to the statue room. A figure appears in the corridor behind the secret door, now open, who is identified as Durlag Trollkiller. Don't be fooled. Durlag is long dead, so this must be a doppelganger. Get ready for a fight because as soon as the figure finishes his dialog he transforms into a greater doppelganger and launches a fireball into the room. Pummel this cretin and retrieve a diamond off its corpse. Be prepared for more doppelgangers in disguise on this level. Now you can enter the secret passage and pick up another book off the floor that reads:
�Foul mimic of the mortal man; �T was in my shape they killed Islanne'.
Now on either side of the bed you will find chests each containing another colored rune stone, one orange and one green. When you pick up the orange rune stone you should hear the Practice Chamber Room door open. If not, we can open it with the other gargoyle.
Also in the room is a locked closet containing an Adventurer's Robe, scrolls of Domination, Spirit Armor, Remove Curse and Monster Summoning II, Darts of Wounding, Darts +1 and Bullets +2.
4- SPARRING CHAMBER ROOM:
Getting In and Disarming the Traps: The doors to this chamber are opposite those of the bedroom leading off the round entry room. Do not enter at this time as the floor has seven closely packed traps and another doppelganger is waiting to ambush you. Rather, take your party back to the gargoyle room where the secret passage door should now be open as well. If not, you can open the main door by rotating the upper gargoyle, but notice when you do this that the doors to the bedroom simultaneously close. If you can, send someone part way up the secret passage to trigger the doppelganger (in the form of Durlag once again) into starting his dialog. Don't go to far or you will start hitting traps. As the Durlag doppelganger begins to speak retreat back into the gargoyle room. Once the dialog is completed, the greater doppelganger will assume his true shape and cast a stinking cloud into the chamber. Let that wear off and now get ready to paste him with your whole party by luring him out of the chamber into the entry way or down the secret passage. Loot his corpse for a Tchazar gem. Once he is out of the way you can send in your thief to disarm all the traps. There is also another �dusty' book on floor in this secret passage that reads:
�Soft walks the trait'rous doppelganger; Into my dear son's practice chamber'
The Sparring Dummies: First notice that the three practice dummies have red circles under them. Your party will automatically attack them if the AI is on. So turn off the AI for the time being. Now, with the traps cleared, you can loot the three dummies. You can barely make out that the dummies are colored the same as the three rune stones you picked up in the bedroom. From left to right the three dummies are orange, red and green. Place the corresponding rune stones into each dummy's inventory. Loot them while you're at it. The orange dummy on the left contains a Potion of Master Thievery, 19 Arrows+1, 5 Poison Arrows, 11 Fire Arrows, 12 Ice Arrows and 6 Arrows+2. The red dummy in the center contains scrolls of Otiluke's Resilient Sphere, Protection from Lightning, Champions Strength and Defensive Harmony. The green dummy on the right contains 8 Potions of Healing and 2 Potions of Heroism. Now have one party member attack the center dummy until you get the message:
"The halls resonate with the sound of grinding stone. A door has opened somewhere nearby".
The door to the upper chamber is now open. Go back into the entry room and next to the stairs looking NE you will see that you can now enter the Throne Room. You're making good progress. Don't just rush your party into this new room just yet.
5- THRONE ROOM:
No traps on the floors in here but other dangers await you. There a secret locked doors to the upper left and lower right of the entrance door. Have your fastest character enter the room alone while the rest of your party stays back in the Entry Room area. Move your character to the end of the long hall where the throne sits on a dais. You will see an unidentified helm on the dais. Pick up the helm and run your character back out into the Entry Room with the rest of your party. Don't stop for anything. As soon as you pick up the helm the first of three �Durlags' appears and recites the following dialog which contains important information for later:
�Kiel, my firstborn, why so stern all the time?
Come down from that throne and revel with your family for a spell'.
Then you will get the old message:
The halls resonate with the sound of grinding stone. A door has opened somewhere nearby". You will get this message twice in succession as the two side doors open up. Now another �Durlag' enters the room via a dimension door spell and you get the message: You are filled with a sudden sense of dread as the room fills with the sound of shifting stone. A door sealed itself shut nearby.' That was the entry door closing and hopefully you made it out to the Entry Room by now. More messages of the halls resonating with the sounds of opening/shutting doors and a third �Durlag' enters via a dimension door spell and gives you this dialog: �Thsss. Dwarfmeat, if you wish to fight then let us fight and be done with ye!' The three �Durlags' now shapeshift into Greater Doppelgangers and cast two Stinking Cloud and one Cloud Kill spell into the room. You can reopen the door to see the doppelgangers taking damage from their own area affect spells. Now might be a good time to ready your party for a fight and perhaps have your mage cast a few area affect spells of his own into the room. Try to lure out the doppelgangers and kill them one at a time. Keep the party AI off so they don't rush into the poisonous gases. Loot the doppelganger bodies for another Tchazar gem, a Ziose gem and a Bloodstone amulet. Now you should find the two secret doors on either side of the main entrance open. The bottom right door leads to a room with a wall covered in switches and the upper left door to a torture chamber. Now is a good time to identify the helm and discover that it is none other than Kiel's Helm (Protects Against Critical Hit, Protects Against all forms of Panic and Boosts Morale). If Khalid is in your party he might benefit from this helm.
6- SWITCH ROOM:
We'll do this room first. Have your thief disarm any traps in here and then start manipulating the switches on the wall until all the doors throughout this maze-like level are open. The door in the NE corner leads around a big circle that comes back out into the Throne Room from the Torture Chamber. You can do this circular passage in either direction. But we're going to clear the Torture Chamber out first since it's nearby. So back into the Throne Room and up into the Torture Chamber � but carefully.
7- TORTURE ROOM:
Traps are everywhere and some loot is laying on the ground. First thoroughly scour the room for traps and disarm them. There's a couple of particularly nasty traps that cause lightning to bounce around the room. Have your thief(s) enter the room carefully and spot the loot sitting on the floor. Around the loot are three traps. Disarm them and retrieve the loot which consists of a �dusty' book that reads �Taste My Fear' and an unidentified goblet. When you pick up the goblet DO NOT drink from it as you will learn that it is cursed once you identify it. It is Durlag's Goblet that is also inscribe �Taste My Fear' (Heals 5 hps but causes imbiber to run at the first sign of trouble and lasts for 12 hours). You don't need the cup so you can discard it if you like. Just beyond the two circular cages are two more traps. Take care of them and turn left to face the north. Two more traps await you between the torture wheels and another cage. Take care of those and move up and face left again by the third cage. Three more traps lie between here and the door. Take care of those and you can advance into the next room, which we shall call the Teleportation Room.
8- TELEPORTATION ROOM:
As you enter this room you will notice some rune carved into the floor and a wall dividing the room in two halves. There is �dusty' book on the floor. Get your party ready for a fight with two greater doppelgangers as soon as you pick up and read the book that reads' Face My Demons'. These dops are wearing pate mil and armed with flails and bucklers. One has a Tchazar gem and the other a Lightning scroll. Now locate the pot in the center of the divider, disarm the trap on it and retrieve the Teleportation Ward stone. Notice that the runes on the floor are now glowing bright orange. Gather your party and click on the floor runes and be teleported to the other side of the wall.
9- LEVEL 3 KEY ROOM:
Carefully send in your thief and find and disarm the huge trap in the center of the room. Retrieve the dusty book that reads �Seek no Exit'. You do not need to carry any of these books around with your so just dump them after you've examined them. Around the room are four trapped sconces each containing a Potion of Healing. On the north wall is a statue containing 9 Bolts+1, 20 Bolts of Lightning and 11 Bolts of Biting. On the south wall is a door that opens up into an alcove with a statue. Both the floor and statue are trapped. Once disarmed you can retrieve the �dusty' book off the floor that reads: �Know no Refuge'. Now disarm the statue and retrieve the Level 3 Ward stone. At this point you can either continue in this direction or backtrack to the Switch Room or the Bed Room (the secret door is now opened and leads into a Storage Room as does the passage from the Switch Room). For now we will press on in the current direction we are heading as we are nearing our objective. We'll clear out the alternate path later for the experience and loot.
10- LONG PASSAGE:
Now continuing on the path to the SW you are entering a long passageway with alcoves along one side. Don't go in very far at this point. These alcoves harbor a number of ghasts and the floor has some nasty traps at the far end that shoot fireballs from the wall where you're now standing towards the other end of the passage. This is a good thing because we're going to let those fireballs take out some of the ghasts for us. Near your feet should be a �dusty' book that reads �Feel No Warmth'. Read it and ditch it. Position your party for combat and slowly send your thief down the passage until the first to ghasts are lured out. Retreat and let your party take care of the ghasts where it's safe. You did remember to keep the party AI off, right? Repeat this technique of slowly creeping down the passage until more ghasts spot you. Soon some ghasts from the far end of the passage will spot you and head your way. They will trigger the traps and the fireballs should take care of them. The traps are not deactivated by the ghasts triggering them. Now send it your thief with his detect traps activated. If you spot more ghasts retreat immediately or the fireballs might hit the thief. There should be five ghasts (650 xps each) in all. Locate and disarm the two traps at the far end of the hall. One is located at fifth alcove and the other at the far end of the passage just before the stairs. You can bring the party down the passage now but don't go rushing to the stairs. Not only are they trapped but also they are fake.
11- STAIRS TO LEVEL 3:
Just beyond the fake stairs lies Kiel's Crypt and three Dwarven Doom Guards (2000 xps each). First have your thief disarm the fake stairs. Give them a try if you like, you just end right back where you started. Pick up the �dusty' book near the stairs that reads �Dance with the Dead' . We can presume that that is a warning of the fight with the doom guards waiting nearby. On the south wall of the fake stair room is a warded door, this is your objective but its not the time to mess with that now. You've got the guards to take care of first.
12- KIEL'S CRYPT:
Keeping your party behind in the passage have one party member slowly approach the crypt entrance until one doom guard spots you. Lead the guard back to the party and whack him dead. These are tough little critters and the cramped quarters of the crypt isn't a good place to be fighting them. Repeat until you've killed all three. Now you can loot the crypt. There is a �dusty' book on the floor that reads �Here fell Kiel the Legion-Killer'. Disarm the trapped locker at the foot of the bed and take the loot, an unidentified buckler and Morningstar, 3 healing potions and 432 gold pieces. When identified the buckler turns out to be Kiel's Buckler (AC Bonus 1, +1 Dexterity while equipped). A very nice item for a dart/sling-using thief to have. The Morningstar is Kiel's Morningstar, which happens to be cursed (2D4+3, THACO+3, berserker fury). In the locked chest next to the bed are Potions of Hill Giant Strength and Frost Giant Strength. We're done here and at this point you can either use the Level 3 Ward stone to open the door to the real stairs leading down or clear out the last remaining area for the experience and loot. Doing this will also lead you to a shortcut back to the Bed Room where you might want to stash most of your miscellaneous loot like gems and such so you can come back for them later. There's plenty more loot lying below and you'll want to keep as many inventory slots open as possible.
13- BRIDGE ROOM:
Take the winding passage to the right of the crypt to get to the Bridge Room. In case you haven't learned by now don't rush your party in here. Turn off the party AI and keep them back behind the big bend in the passage. Now send one party member over to the door of the Bridge Room. Here you'll see three bridges spanning a lava pit. Guarding this room are three greater doppelgangers in the forms of Kiel, Islanne and Fuernebol. The room is trapped as usual and two of these dops are big magic casters while the third is an archer. As soon as one spots you and starts to cast a spell, retreat back behind the bend. You can get them to waste a lot of their spells this way. Hopefully at least one will follow you into the passage and back to your party where you can kill him. The dops keep changing names but it isn't important. If you kill Islanne and head back only to see her there again it just means the dops have assumed new identities. Once you've lured them all out and killed them all you can loot the bodies for a Garnet Gem, Traveler's Robe, Scroll of Vampiric Touch, Chainmail, Composite Long Bow, Bloodstone Amulet. The magic casting dops tend to use a lot of Shadow Door, Resist Fear, Detect Invisibility, and Sleep spells. Now have your thief(s) find and disarm any traps on the floors and bridges. In the top corner of this room is a small trapped nook high on the wall that contains 1157 gold, Protection from Evil 10' Radius and Chaotic Commands scrolls. You have just about come full circle. Now open the door on the NE wall and you are looking into the Storage Room.
14- STORAGE ROOM:
Nothing much in here other than 6 traps on the floor, a shortcut to the Bedroom and a passage (trapped) leading back to the Switch Room. Disarm the traps, head into the Bedroom if you like and stash any unneeded supplies either here or in the Statue Room Pedestal. You can carry your loot out at this point, as you do not need to open any of the doors to proceed once you return. Simply pick either of the secret doors in Room 5, and you can access the rest of this level.
If you don't want to leave just yet, then stash your loot and head back to the fake stairs, unlock the warded door and go down the real stairs to Dungeon Level 3.


