 Did we miss anything in this location? Is there something we didn't discover? Let us know!
Overview
Did we miss anything in this location? Is there something we didn't discover? Let us know!
Overview
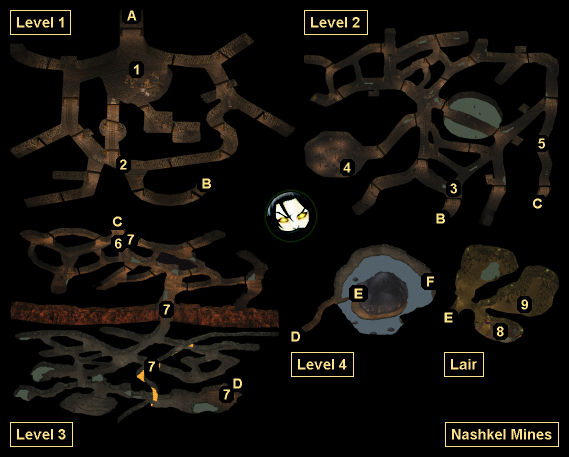
The Nashkel Mines are potentially dangerous since they have been overrun by kobolds. Though they are easy to fight, kobolds come in great numbers and their arrows sometimes strike true and cause serious damage to your party. In the lower levels, watch out for traps and kobold commandos, who launch Arrows of Fire.
1 - Named Miners
You'll meet lots of named miners on Level 1 of the mines (at this location and elsewhere). They'll tell you about the demons -- or maybe dragons or ghosts -- in the mines, and also about how much fun it is to be a miner.
2 - Miner Dink
At this spot you'll run into Miner Dink, who will ask you to deliver Kylee's Dagger to Kylee on Level 2 (#4).
3 - Miner Beldin
Right after entering Level 2, Miner Beldin will come running up to you screaming for help against "yipping demons." As soon as he's said his piece, four kobolds will appear and attack you. If Beldin survives, then he'll just run away.
4 - Miner Kylee
If you give Kylee his dagger (from #2), then you'll receive 200 xp.
5 - Kobolds
When you kill the kobolds here, you'll discover that two of them have Vials of Mysterious Fluid, which is what they've been using to contaminate the ore.
6 - Joseph's Corpse
You'll discover Joseph's corpse here. Nearby to the north you'll find Joseph's Greenstone Ring, which you should deliver to his wife in
Nashkel.
7 - Traps
You'll encounter several traps in Level 3 of the mines, so keep your eyes peeled for them.
8 - Mulahey's Chamber
When you get close to this chamber, Mulahey will rush out upset that Tazok must have sent mercenaries to kill him. He'll also admit to being the person responsible for the ore contamination. No matter what you say, he'll summon kobolds and skeletons to help him, and then he'll attack you.
The kobolds and skeletons will appear outside the chamber, so you can place one tank-like character at the entrance to block them out, which will allow the rest of your party to focus on Mulahey. With five against one, things won't go well for Mulahey, and eventually he'll try to surrender. Don't accept. If you do, then he'll just summon more kobolds and skeletons and attack you again.
When Mulahey dies, you'll earn 650 xp, and you'll find
Boots of Grounding, a
Ring of Holiness, Mulahey's Holy Symbol, and two letters on his corpse. You'll also find Xan's (#9)
Moonblade +3, a
Potion of Absorption, two
Potions of Healing, a
Short Sword +1, several scrolls, and 790 gp in Mulahey's chest. You'll need the holy symbol so you can prove to Mayor Ghastkill in
Nashkel that you've solved the problem in the mines.
Note: Depending on the version of the game you're playing, Mulahey's letters might be in his chest rather than on his corpse.
When you read Mulahey's letters, you'll learn that Mulahey was working for Tazok, and that one of Tazok's men, Tranzig, can be found in
Beregost at Feldepost's Inn. Clearing out the mines will also cause an assassin named Nimbul to show up in
Nashkel by the inn, and Elminster to make an appearance in the southeastern part of
Beregost.
9 - Xan
Xan will tell you that he was captured by Mulahey when he came to investigate the mines, and he'll offer to join your party.
Exits
- Exit to the
Nashkel Mines (Outside).
- Passage between Levels 1 and 2.
- Passage between Levels 2 and 3.
- Passage between Levels 3 and 4.
- Entrance to Mulahey's Lair.
- One-way exit to wilderness zone
AR5000 (located east of
Nashkel).


