 Did we miss anything in this location? Is there something we didn't discover? Let us know!
Overview
Did we miss anything in this location? Is there something we didn't discover? Let us know!
Overview
The Firewine Bridge is an ancient elven outpost that fell over 300 years ago, probably to an evil power, but the exact reason has been lost to time. Villains and heroes have fought ever since at this site and in the ruins beneath it, but both have found their doom in this accursed place. Even the river has stopped flowing beneath the bridge.
The Firewine Ruins are perhaps the biggest pain in the butt of all the Sword Coast: the corridors are really tight, making party control difficult and requiring lots of micromanagement, kobold commandos inhabit the ruins by the hundreds, there are numerous traps, often in your way, and the respawn rate is really high. And if this was not enough, there is another thing to consider: there is
nothing of value in this dungeon -- no treasure, no nothing! If this dungeon drives you insane, at least you won't be the only one.
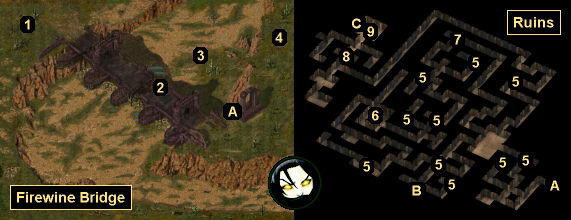
1 - Bentan
At this spot you'll meet Bentan, "most devout follower of the great, broken god Ilmater." The less you want to know about Ilmater, the more he'll tell you.
2 - Poe
You'll meet Poe the bard here. He'll recite his ode of "The Knights of Days Hence," which is about seven knights who entered the ruins below to vanquish the evil residing there -- but who were betrayed by one of their own, who wanted the gold they found all for himself. The knights swore to enter together and fall together, and so they still haunt the ruins, waiting for their betrayer to return. You'll meet the knights in the ruins (#6).
3 - Carsa
When you approach Carsa here, she'll start ranting about a jar and somebody whispering to her. If you ask her to calm down and explain herself, then she'll reveal that her party found the jar in the Firewine Ruins and subsequently went crazy -- and that now she's the only survivor, and a voice from the jar is demanding that she say a certain name. If you insist (and continue to insist) that she hand over the jar, then she'll eventually say the name -- Kahrk -- and drop dead. You'll then have to fight Kahrk.
Kahrk is an ogre mage, and he'll start out with the spells Minor Globe of Invulnerability, Protection from Normal Missiles, and Shield active, and he'll immediately cast Mirror Image, giving him pretty good defenses -- if you attack him right away. An easier approach is to retreat after he's cast Mirror Image (which is when he'll turn hostile). He'll be forced to stand in place when he casts spells, so you should be able to get out of his line of sight quickly (perhaps after taking a stray lightning bolt). Then you can wait for his buffs to expire, which will give you a much better chance in the battle.
You'll earn 3500 xp for killing Kahrk, but you won't find much in the way of loot -- just some random gold or gems on Kahrk's corpse plus a
Knave's Robe and a scroll of
Protection from Fire on Carsa's corspe.
4 - Meilum
At this spot you'll meet Meilum, the self-proclaimed best swordsman in the Sword Coast. If you insult him or challenge him to a duel, then he'll turn hostile and attack you -- and probably go down pretty quickly. You'll earn 1200 xp when Meilum dies, and you'll find
Gauntlets of Weapon Expertise and a
Long Sword +1 on his corpse.
5 - Traps
You'll find traps at these locations.
6 - Ghost Knights
These are the knights from Poe's story on the surface (#2). To help them out, you'll need to kill the undead knight who betrayed them (#7) and then deliver his Ancient Armor to them. If you do this, then you'll receive 1500 xp.
EE / TOSC Note: You can also take the Ancient Armor to the Ghost of Ulcaster in Ulcaster. If you give the ghost the Ancient Armor plus the Idol of Kozah (from
AR4100), then he'll give you the easter egg long sword
The Vampire's Revenge +1.
7 - Undead Knight
When you approach this spot, an undead knight will come up to you and ask you to "strike me down" and "take the armor back." This is the knight from Poe's story (#2) who betrayed his fellows (#6). When you loot his corpse you'll find Ancient Armor. If you take that armor to his ghost companions, then you'll receive 1500 xp.
8 - Lendarn and Three Ogrillons
At this spot you'll run into the mage Lendarn and three ogrillons -- plus possibly some random kobold commandos. They'll attack you on sight. Lendarn is by far the most dangerous of the group (as he'll cast Ligtning Bolt and more) so target him first and try to knock him out of the fight as quickly as possible.
For defeating the quartet, you'll earn 1925 xp total, and you'll find a
Mage Robe of Electrical Resistance plus scrolls of
Cloudkill,
Ghoul Touch,
Fireball, and
Lightning Bolt on Lendarn's corpse.
9 - Ogre Mage
This ogre mage is the one who has been orchestrating the kobold attacks on
Gullykin. When he spots you, he'll throw a couple of taunts your way, and then he'll attack. The ogre mage isn't too difficult on his own, but some kobold commandos and ogrillons (#8) might join in, making things more complicated. But focus on the mage as much as you can to disrupt his spells.
You'll earn 650 xp when the ogre mage dies, and then you'll earn a further 250 gp from Mayor Luckyfoot in
Gullykin when you let him know that you've ended the threat to his village.
Exits
- Entrance to the Firewine Ruins.
- Exit to the temple in
Gullykin.
- Exit to Jenkal's home in
Gullykin.


