 Did we miss anything in this location? Is there something we didn't discover? Let us know!
Overview
Did we miss anything in this location? Is there something we didn't discover? Let us know!
Overview
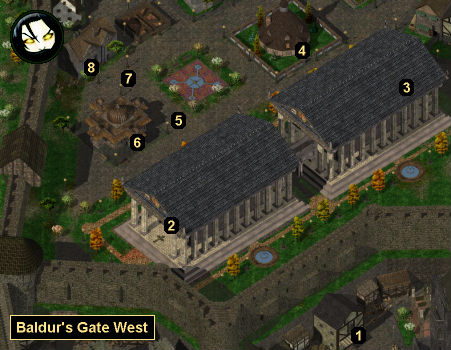
This part of the city shelters an unusual number of temples, the most imposing being the Hall of Wonders, a structure built by the worshippers of Gond, god of artifacts and inventions. All day curious gnomes wander about and the priests of the temple fend them off. Also, rich visitors are able to order copies of Gond's inventions, although the building time and the cost are astronomical.
1 - Fenten's House
Inside this house you'll meet Fenten. He'll tell you that because of the iron shortage,
Ankheg Plate Mail is in high demand, and he'll offer you 250 gp for all of the Ankheg Shells that you can bring him.
The quirk to Fenten's offer is that when he pays you 250 gp, he'll take all of the shells you have in your inventory. So to maximize your profit, you should drop all of the shells except for one each time you talk to him. That way you'll earn 250 gp per shell.
Note: You'll encounter lots of ankhegs in the farmlands south of Baldur's Gate
(
AR1400).
2 - Hall of Wonders
This building is a museum dedicated to Gond, and it will be very different depending on whether you visit it during the day or at night.
During the day, you'll be stopped at the door by Be'land, who will ask you for a 1 gp entrance fee. If you say you can't afford it, then he'll let you in for free. Inside the main part of the museum, Brathlen will give you a tour. You'll just need to talk to him each time he stops. You'll also encounter lots of tourists and guards, making thievery difficult.
But during the night, the museum will be all but deserted. In fact, the only person you'll meet is a fellow thief named Alora (CG, Halfling Female, Thief). If you agree to keep watch for her and subsequently talk to her twice more, then she'll offer to join you. If you attack her, then she'll call the guards and run away. Regardless, with nobody around in the museum, you'll be able to steal some nice things, including a Rogue Stone (worth 2500 gp), a Star Sapphire (worth 1000 gp), and a Telescope (which you'll need for Brevlik's quest in
Baldur's Gate East).
3 - High House of Wonders
This building is a temple dedicated to Gond. Inside you'll meet two people of interest:
- Forthel August (at the entrance). He's a bard who will ask you for stories that he can embellish and use as his own. If you demand payment, then he'll offer you 200 gp for each story. However, none of your stories will excite him, and he won't ask you for a second. Worse, if you try to tell him about the Iron Throne, then he'll call the story "poppycock," and he won't pay you for it.
- Priest of Gond (wandering). He'll provide regular priest services.
4 - Ragefast's Home
Note: The mage Ramazith is connected to what you'll discover in Ragefast's home. So you might want to visit him first (in
Baldur's Gate North).
When you enter Ragefast's house, you'll see Ragefast with Abela the Nymph, and it will quickly become obvious that Ragefast is obsessed the nymph, but the nymph will wither away and die if she's forced to stay with him. This will give you two ways to proceed:
- You can convince Ragefast to let Abela go. To do this, you'll need to be non-threatening, and you'll need to not mention Ramazith (if you accepted his quest earlier). You'll also need a Wisdom score of at least 7, which can be tricky because the game will choose the character closest to Ragefast to do the talking when you enter his home. So if necessary, leave any low Wisdom characters (like Minsc) outside. The correct dialogue options are 2-2-1 followed by the line that begins "This Abela" (which can be option 2 or 3 depending on your status with Ramazith).
If you're convincing with your dialogue, then Ragefast will set Abela free, and she'll give you a Lock of Nymph's Hair before teleporting away. You'll also receive 2000 xp. You'll then be able to take the nymph hair to Halbazzer Drin in Sorcerous Sundries (in
Baldur's Gate East) and receive a
Nymph Cloak in return.
- You can attack Ragefast. He's a powerful mage, but with six against one you shouldn't have too much trouble. You'll earn 2000 xp when Ragefast dies, and you'll find a
Knave's Robe,
The Protector +1 (aka an
Amulet of Protection +1), and a
Wand of Paralyzation on his corpse.
- You'll then have to choose what to do with Abela:
- You can free her. This will earn you a
Nymph Cloak and 2000 xp.
- If you're on Ramazith's quest, then you can take her to him (in
Baldur's Gate North). Abela will turn into an inventory item (with weight 90) for the trip. You'll still be able to free Abela if you follow this path, but you won't receive a
Nymph Cloak or a Lock of Nymph's Hair. Instead, Ramazith will give you
Bracers of Defense AC 7.
5 - Dun
Dun will introduce himself as an ex-merchant. If you ask him what that means, then he'll explain how he gambled too much and lost everything. Dun might also mention that something isn't right with the Seven Suns and the Merchants' League (both located in
Baldur's Gate Southwest).
6 - The Lady's Hall
The Lady's Hall is a temple dedicated to Tymora. Inside you'll meet Chanthalas Ulbright, who will perform regular priest duties, and Agnasia, who is involved in Ghorak's quest (from
Baldur's Gate South).
7 - Varci Roaringhorn
At this spot you'll meet Varci Roaringhorn. He'll invite you to speak with his guardian about "a matter of life or death," and, if you accept, then he'll lead you to a nearby house (#8).
8 - Tremain Belde'ar's Home
Inside this home you'll meet Tremain Belde'ar, a Lord Priest of Tymora. He'll tell you that his son Casson and his ward Varci decided to sneak into the Water Queen's House and play some pranks, only they were discovered, and while Varci escaped, Casson was caught and executed. So Tremain will ask you to fetch his son's body so he can resurrect it.
You'll find the Water Queen's House in
Baldur's Gate South. Inside, you'll have three options for how to acquire Casson's body:
- If you helped Tenya deal with the fishermen (in
AR0900), then you can request her presence. If you ask her for the body of the "fool," then she'll give it to you. If you beg her for the body, then she'll still give it to you, but all of the priestesses in the temple will turn hostile and attack you.
- You can pay High Priestess Jalantha 2000 gp for the body.
- You can kill Jalantha (and the other priestesses in the temple) for the body.
When you return to Tremain, you'll have to talk to him twice. This will cause him to resurrect -- and chew out -- his son. Tremain and Casson will then leave, but when you talk to Varci again, he'll give you your reward: a
Shield of the Falling Stars, 2000 gp, and 5000 xp.


