 Did we miss anything in this location? Is there something we didn't discover? Let us know!
Overview
Did we miss anything in this location? Is there something we didn't discover? Let us know!
Overview
Note: This map will only become available if you add Rasaad to your party and progress through his quest.
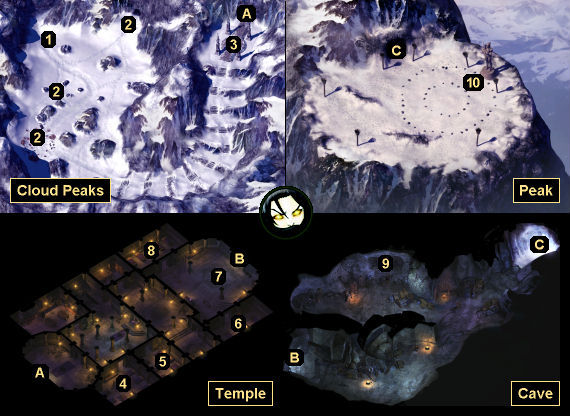
1 - Dark Moon Applicants
When you approach this spot, you'll witness a handful of Dark Moon Applicants getting the bad news that they've failed their trials and are thus unworthy of living. Luckily for them, your arrival will distract the Dark Moon Monks who were planning to kill them, and they'll help you to defeat the monks. Afterwards, you'll get three options for how to deal with the applicants:
- You can demand payment from them. They'll give you an
Oil of Fiery Burning and 500 gp.
- You can let them go. They'll give you an
Oil of Fiery Burning.
- You can for them to escort you to the temple (Exit A). They'll follow behind you and help out in combat.
2 - Ice Trolls
In these spots you'll encounter Ice Trolls. Once you've done enough damage to them, they'll fall down, but they won't die. To kill them, you'll need to hit them with some fire damage while they're prone. The easiest way to do this is to use
Arrows of Fire against them. You'll earn 1400 xp for each Ice Troll you kill.
3 - Gamaz
When you reach this spot, you'll see some Dark Moon Initiates will passed their trials -- being addressed by Rasaad's brother Gamaz. Awkward. No matter what you say to them, the initiates will attack you while Gamaz flees into the temple (Exit A).
4 - Barracks
Inside a trapped chest in this barracks, you'll find a
Dagger +1.
5 - Barracks
Inside a chest in this barracks, you'll find a
Potion of Invisibility.
6 - Sleeping Quarters
Inside the chests in this room you'll find an
Antidote and an
Oil of Speed.
7 - Gamaz
You'll run into Gamaz again here. As before, no matter what you say to him, he'll sic some initiates and monks on you, and he'll flee.
8 - Barracks
Inside the chests in this barracks, you'll find a
Big-Fisted Belt and a
Protection from Petrification scroll.
9 - Riddle Cages
When you get close to the cages here, Bassano and Jasper Banff, the two prisoners inside, will begin talking to you. They'll tell you that the cages are trapped. If you open the wrong one, then you'll trigger an explosion that will kill the prisoners and damage you. But if you open the right one, then the prisoners will go free. To figure out which cage is right and which one is wrong, you'll be allowed to ask the prisoners a question. One of the prisoners will lie while the other will tell the truth.
This is a fairly famous logic problem. The correct question to ask is, "Which cage will the other prisoner tell me is safe to open." Whichever cage they tell you is the wrong one. If you open the right cage, then the prisoners will escape, but you won't receive any sort of reward. If you open the wrong cage, then the prisoners will die, and you'll find a
Dagger +1 and
Leather Armor +1 on Bassano's corpse.
10 - Gamaz
At this spot you'll encounter Gamaz for the third and final time. He'll attack you no matter what you say, and of course he'll order his minions to help him. You'll start out surrounded by monks and initiates, but just take them out one at a time, and then deal with Gamaz. You won't earn any xp when Gamaz dies, but you'll find
Glimmering Bands and 1000 gp on his corpse.
Exits
- Temple entrance.
- Cave entrance.
- Passage to the peak.


