 Did we miss anything in this location? Is there something we didn't discover? Let us know!
Overview
Did we miss anything in this location? Is there something we didn't discover? Let us know!
Overview
This forested area is inhabited by basilisks, which can turn you to stone if they successfully gaze at you. That means you should come prepared with Potions of Mirrored Eyes (available at High Hedge), spells and scrolls of Protection from Petrification, and Stone to Flesh Scrolls (available at the Temple).
The easiest way to deal with basilisks is to have one protected character stand in front of your party. Then while the basilisks try to gaze at him or her, the rest of your party can pelt the basilisks with ranged attacks. If you keep your characters far away from the basilisks, then they'll usually stick to their gazes, which you should be able to defend against. But if you get too close, then they'll switch to melee, which can be more dangerous (especially if you're using Korax, #2, as your bait character).
If your main character is turned to stone, then the game will consider that to be a death, and you'll have to load your last save. So you shouldn't use your main character to distract the basilisks.
2 - Shar-Teel
Shar-Teel (CE, Human Female, Fighter) will challenge your best male champion to a duel. If she wins, then you'll have to pay her 20 gp. If she loses, then she'll offer to join your party. Shar-Teel is a decent enough fighter (just with low constitution), and she fits in well with an evil party.
Note: Having Shar-Teel in your party will help you deal with Angelo later in Chapter 7, since she is his daughter.
1 - Korax the Ghoul
Korax is a ghoul who wants to be your friend! You can use him as basilisk bait since he is immune to petrification. Just have him stand between your party and the basilisks, and the basilisks will waste their gazes on him while your party hits the basilisks with ranged attacks.
Unfortunately, you won't be able to use Korax for the entire map. He'll act as though he has been dire charmed, and so eventually he'll turn against you, and you'll have to kill him (for 175 xp and no Reputation loss).
3 - Statue
When you use a
Stone to Flesh Scroll on the statue here, it will turn into Tamah the adventurer. She'll be a little confused about what happened to her but she'll be thankful for you help. If you demand a reward, then she'll give you her (long abandoned and now uninhabitable) house in
AR4200, and you'll lose a point of Reputation. If you don't ask for a reward, then you'll earn a point of Reputation and 200 xp.
4 - Mutamin
You'll meet a crazy gnome named Mutamin here. He'll tell you that he's been using his basilisks to create the "artwork" that you might have noticed around him. No matter what you say to Mutamin, he'll decide that you'd look nice in his collection, and he and his greater basilisk will attack you.
You should treat this battle about the same as the other basilisk battles on the map. That is, you should use one protected character to distract the greater basilisk while the rest of your party first gangs up on Mutamin and then hits the basilisk with ranged attacks. You'll earn 8200 xp total for the battle, and you'll find an
Adventurer's Robe, two
Potions of Healing, and scrolls of
Horror and
Stinking Cloud on Mutamin's corpse.
5 - Baerin, Kirian, Lindin, and Peter
You'll meet a quartet of tough but rude adventurers here. If you decide to teach them a lesson, then you should target the mage Kirian first, the cleric Peter second, the archer Baerin third, and the fighter Lindin last. All told, you'll earn 3000 xp for the battle, and you'll find up to 40
Arrows +1,
Bracers of Defense AC 7, a
Golden Girdle of Urnst, two
Long Swords +1, a
Morning Star +1, an
Oil of Fiery Burning, a
Potion of Absorption, a
Potion of Explosions, a
Potion of Invisibility, and scrolls of
Charm Person,
Infravision, and
Protection from Evil.
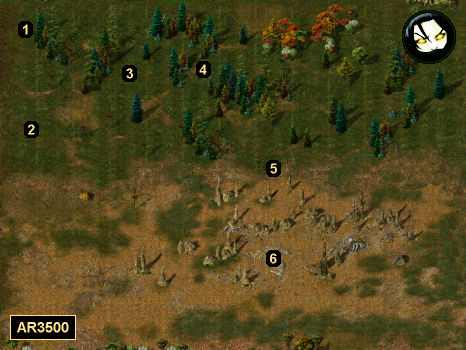
6 - Basilisks
Around the bones here, you'll encounter some basilisks, including a greater basilisk.


