Did we miss anything in this location? Is there something we didn't discover? Let us know!
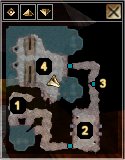
Inner Sanctum |
1 � INNER SANCTUM
After using the cave exit from the Guardian Lair you will be brought here and you can no longer return back or use the Stone of Recall, so equip your character will anything that you might need before you reach the Inner Sanctum. In several containers in this area you will find a couple of Heal potions and it would be wise to keep them for your battle with Morag.
2 � MORAG'S CHOSEN
The elite group of Morag's Chosen led by an Old One Cleric can be found here. When you enter this room, the projection of Morag will be addressing her chosen ones with the final orders before the awaking of the race once again. After a while however Morag will notice you and disappear but not before sending her group of Chosen ones against you. The Chosen ones are hard to kill and there are many so keep as many as possible away from you unless you can withstand the damage. Also when a chosen dies the Old One Cleric will summon another and will keep doing it until the Cleric is dead. This means that you will need to directed your attack first to the Cleric and keep him from summoning any more Chosen Ones. When you defeat the group the Cleric will drop a key. Pick up the key and proceed to the gate at area #3 to unlock it.
3 � LOCKED GATE
Use the key you have taken from the Old One Cleric at area #2 and unlock the gate here and the way to the last room where you will at last confront Morag in the final fight.
4 � MORAG THE QUEEN OF THE OLD ONES
As soon as you enter the last room, the projection of Morag will address you one last time. After a heated conversation the final battle will begin. Morag's projection will fade away and two reptilians called Morag's Hand will immediately attack you along with the real Morag.
However, you will have to do a few certain things before you can actually damage Morag. Quickly move to the centre of the room and bash the statue near the Blade Barrier. Doing go dispels the blade barrier and you can now access the area where the high clerics of Morag grant her immunity to everything through their dark rituals. Some egg-sacs nearby will spawn a few Old One Minions and Morag will keep throwing at you some very nasty high level spells. Watch out for the death magic spells and her chain lightings and make use of your Heal potions to buy some time and make Morag vulnerable. As you will find out as soon as you reach the area with the High Clerics, each of the high priests grants protection to Morag from a specific type of damage. However every priest is vulnerable to the type of damage that offers protection to Morag, for example the priest called Protection from the Sword protects Morag from any type of damage dealt with swords but he is also vulnerable to it. Choose one or more priests and destroy them with the type of damage they protect Morag thus making Morag also vulnerable to these types of damage. You can then go up against Morag and release your wraith and anger on her. There is however another thing that you will need to bypass before you start dealing damage to the Queen and this is her damage reduction from the premonition spell.
When the Queen Morag is finally brought to her doom and the fight is over the Source Stone will start collapsing but two portals will appear soon after. Use any of the portals and you will be transferred to the Astral Pocket where Haedraline will be waiting for you for the epilogue of the game.
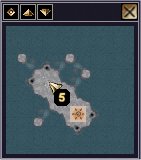
Astral Pocket |
5 � HAEDRALINE
After using one of the portals from the Inner Sanctum you will be brought here to the Astral Pocket. The Astral Pocket was created from Haedraline in a last attempt to provide you exit from the source stone. Speak with Haedraline when you arrive and will explain everything to you as well as congratulate you for defeating her Queen. Once you are done talking use the exit nearby and sit back and enjoy the end.
Congratulations you have won the game and are now the hero of Neverwinter!


