Did we miss anything in this location? Is there something we didn't discover? Let us know!
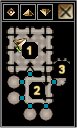
Host Tower Level Nine |
1 � HOST TOWER TELEPORTER
By using the Portal Stones on the pillar you can access different levels of the Tower.
2 � ARKLEM
Arklem the former Archmage Arcane is trapped here in this room. You will find out that in order to gain back the control of the Tower he transformed himself into a Lich. An advice given to him by his advisor Nymphithys you met down to the 5th Level of the tower. After a quick talk he will ask you to help him free himself by destroying all for blazers located at the small cells around this area. This is your only choice since only he holds the key to unlock the way to Maugrim but you can ask him several question first. You will then learn that Maugrim works under the rule of his mistress and he is in search for the four Words of Power. The Words of Power according to Arklem are some ancient but very powerful artifacts. He will also inform you that Lady Aribeth might be here with Maugrim as well.
When you destroy all the blazers talk with Arklem again and he will open the door to his sanctum which is where you will find Maugrim at the moment.
However, after breaking each blazer you will have to fight a creature as well. Here is what you can expect to fight:
- First blazer: Attacked be a skeleton devourer
- Second blazer: Attacked by a Greater Fire Elemental
- Third Blazer: Attacked by a Bone Golem
- Fourth Blazer: Attacked by a Death Slaad
3 � PORTAL TO THE PINNACLE
Use the portal to get to the Pinnacle of the Host Tower. Keep in mind that once you use the portal you cannot go back to the rest of the Tower and you will have to use the Stone of Recall to return back to Luskan after you are done.
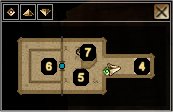
Host Tower Pinnacle |
4 � PORTAL DESTINATION
After using the portal from area #3 you will be transferred here.
5 � AARIN'S SPY
A dead body lays here and from a note on it, it is indicated that the body was once a spy of Aarin charged to protect Lady Aribeth from any danger but apparently he has failed to do so. There is also another Stone of Recall on the body. You will need the Stone to return back to the temple of Tyr if you misplaced yours since there is no other way to exit this area.
6 � LADY ARIBETH, MAUGRIM AND MORAG
When you arrive to this area you will be caught in the middle of some kind of a ritual. Lady Aribeth, Maugrim and Morag the mistress of Maugrim are all located here. You will then witness Aribeth vow to have her revenge on Neverwinter and become a fallen Paladin and a Blackguard. The now Fallen Paladin will be charged to be the leader of Morag's Army against Neverwinter. There is nothing you can do to prevent this but at some point Morag will noticed you and teleport away with both Maugrim and Aribeth leaving behind only several lizardfolk that will of course attack you soon after. The lizardfolk are led by a big lizard called Gorgoth and you should be prepared for another hard fight. When you finally defeat them all, search the area for some random loot from the crates nearby. However before you teleport to the Temple of Tyr and report to Aarin do not forget to search Maugrim's Sanctum at area #7.
NOTE: There is a known bug about this area that causes the NPCs not to respond once you get near the gate which prevents you from completing the Chapter. If this is the case you might want to try a workaround Bioware posted at their NWN Known Issues page
here.
7 � MAUGRIM'S LAIR
The stairs down from here will take you to Maugrim's Lair. The Lair is no more that a small room protected by a stone Golem. Inside the room you will find a couple magic items and Maugrim's Journal. The Journal contains much information about the goals of the Cult, the purpose of the Wailing Death, the High Captains and Lady Aribeth. Return to the Temple of Tyr after you are done.


