 Did we miss anything? Is there something we didn't discover? Let us know!
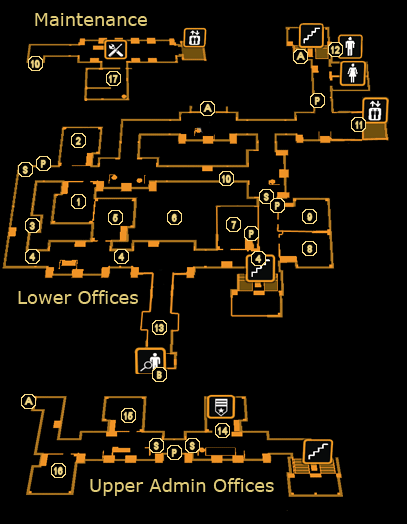
The Admin Offices are pretty simple layout-wise, and serve more as a transition between various areas. You'll have to pass through them a number of times during The Missing Link. What makes them interesting is, aside from the number of rooms to explore, all of the vents and alternate routes to get around, which opens some interesting potential for stealth play. There are a handful of enemies out on patrol, including Spec-Ops Sneakers, who have cloaking abilities, so watch out for them in a firefight.
1 - Spec-Ops Office & Rocket Launcher Part
Hack the level 2 panel, smash through the weak wall, or use the ventilation duct from Army Operations (2) to get in, and you'll receive +200 XP. The computer requires a level 2 hack, and contains more background information on Rifleman Bank. Beyond that, you'll find a Pocket Secretary under the desk which contains the code to the Communications Office, "1550", a
CyberBoost ProEnergy Pack,
Painkillers and a Credit Chip in the desk drawer, and a
10mm Pistol on a table. On that same table, you'll also come across the
Scope Assembly for Rocket Launcher that Quinn wants (17).
2 - Army Operations
The front door to Army Operations should be unlocked. There isn't much inside save for a level 2 computer to hack, which gives some information on the plot and hints at the black-ops taking place at Rifleman Bank. The vent on the wall can be reached by crouch-jumping from the nearby computer console, or by carrying a box or crate in from the hallway outside, and leads to the Spec-Ops Office (1).
3 - Maintenance Hatch
You can open this maintenance hatch by hacking the level 3 panel on the wall nearby, or using the code "5768". Follow the duct inside and it will take you to the hidden room at (6), for +200 XP.
4 - Laser Grids & Guard
There's a couple of laser grids here that you won't be able to shut down conventionally, but the guards have transmitters on them that shut down the lasers when they pass nearby. Either incapacitate the nearby guards and drag their bodies over, or distract them with thrown objects to bring the lasers down temporarily. The middle grid is malfunctioning, so you might be able to slip through unnoticed if you time your movement. Once you reach the hidden room at (6), you'll be able to disable the lasers from a panel in there.
5 - Communications Security Office
You'll be able to reach this office by hacking the level 2 panel outside, using the code "1550", or by smashing down the weak wall from the Spec-Ops Office (1). Search the room for a Credit Chip and
Silencer (finally!), then turn your attention to the level 4 computer to learn some more background information and to read some inter-office banter.
6 - Hidden Room
If you take one of the ducts from the hatch at (3), Burke's Office (15) or Keitner's Office (16), you'll end up in a hidden server room, rewarding +200 XP. The unlocked security hub will make your life a lot easier by allowing you to disable the Security Cameras upstairs, and the lasers at (4) using the dedicated panel on the wall. There's also a Scholar eBook for a +200 XP boost, and a couple of Beers on the floor.
7 - Operations Security Office
The door to this office should open for you without hassle. If you're passing by in the hallway and haven't alerted the guards yet, keep an eye on the window as a guard inside will occasionally stop to look out. The weapons locker in the room contains two
Machine Pistols and two
Painkiller bottles, and there's a couple of Beers on the nearby desk. The standard computer requires a level 1 hack and contains some interesting ASCII artwork in one of its e-mails, while the security hub is unlocked and will allow you to disable the Security Cameras on this floor. You'll also find a
Data Storage Device on the same desk, which you'll be able to use later on. Last, the vent will take you to the logistics office at (9).
8 - Protection Service Division & Stash
This office is unlocked, though it's mostly empty. There's a
CyberBoost ProEnergy Bar and some
10mm Pistol Ammo in the drawer, and the computer makes mention of Tong and the Harvesters back in Hengsha. There's also a Pocket Secretary hidden on top of the server tower containing the code to shut down the lasers at (4), "1355", though it's only effective from the hidden room at (6). Otherwise, you'll find a weak wall to break through leading to the adjacent room (9). The vent, meanwhile, will take you to a hidden stash underneath a stairwell containing a
CyberBoost ProEnergy Jar, a Credit Chip, and some
Nuke Virus Software, plus a +200 XP reward.
9 - Logistics Office
Getting into the logistics office is easy, requiring you either hack the level 1 panel on the door, smash the wall in the nearby office at (8), or crawl through the vent from the operations office at (7). The desk drawer contains
Stun Gun Darts and a Credit Chip, and there's a copy of "The Sleepwalking World" on the nearby shelf, along with a Pocket Secretary with the code to the hatch at (3), "5768" - check behind one of the boxes. Last, hack the level 2 computer to learn about the black market aboard Rifleman Bank, including someone called "Q" who seems to be involved. Three guesses as to who it is.
10 - Vent & Maintenance Shaft
This vent leads to a lengthy shaft which goes between the maintenance level and the main level. Getting inside will provide +100 XP, along with the chance to avoid using the elevator at (11) if you so desire. Inside the shaft you'll find a Credit Chip,
Damage Upgrade and a Beer.
11 - Elevator
This elevator will take you to and from the maintenance level. You'll need to head down to maintenance to talk to Quinn at least once or twice, and this is the only way to reach him save for the maintenance shaft at (10).
12 - Washrooms & Stash
The women's room is empty, but check the men's room for a vent that takes you underneath the nearby stairway. You'll gain +200 XP, and there's some
Typhoon Ammo, a
CyberBoost ProEnergy Bar, and a Pocket Secretary with the code "5768" on it, which is a copy of the message at (9).
13 - Biometric Scanner
This biometric scanner is the same as the one you came across earlier, except this time it will work for you correctly, thanks to Keitner's help. Pass through it and you'll find the door to the Detention Camp (B).
14 - Burke's Office
Burke's Office is pretty easy to get into. You can either hack the level 1 door, or use the vent shaft from the hidden room at (6). After admiring the interesting decor of your weekly antagonist, check the drawer for a Credit Chip, the bookshelf for some
Stop! Worm Software and a Credit Chip, and the desk near his photo wall for an eBook and some Whiskey. His computer can be hacked to find information about Burke's connection to the Tyrants, the mercenary team hunting Jensen during the original campaign, and some talk about the black ops going on at Rifleman Bank.
If you read Burke's computer, you may also notice a hint about a concealed safe, but there isn't any obvious indication of where it is. To find it, crouch down and check underneath his desk to find a button on the underside. Press it and you'll get a +300 XP bonus, and a painting on the wall will open to reveal 300 Credits, two packs of
Revolver Ammo, and
Burke's Revolver, a black-and-gold custom-made piece worthy of only the most distinguished (or vain) sharpshooter. This also deprives Burke of his favourite gun during a later encounter, though he'll switch over to a
Machine Pistol instead.
Last, you'll find a bag on the computer desk labeled
Burke's Spare Retinal Prostheses - you'll need it during the course of the DLC, so you'd might as well grab it early if you can to spare yourself some backtracking. You'll get some different dialogue depending on when you grab it, but not much else changes otherwise.
15 - Keitner's Office
Keitner's office is a bit more... conventional than Burke's. Hack the level 3 door panel to get in, or crawl through the vent from Burke's office or down in the hidden room at (6). Plunder the locker for some
Machine Pistol Ammo and check both under the desk and on top of the server rack for two Credit Chips. Keitner's desk drawer has some
Stun Gun Darts in it as well, and her computer, requiring a level 3 hack, contains some background on her investigation into Burke and the black ops project. Last, check underneath her desk for a
Damage Upgrade tucked in the corner.
16 - Belltower Alpha
This office is surprisingly sparse despite its interesting name. Search the desks and the drawers for
Stun Gun Darts and a Credit Chip, then turn your attention to the computer, level 1, for more inter-station chatter.
17 - Quinn
Assuming you've already received the objective to visit the Detention Camp, you'll encounter Quinn here in his makeshift shop. Speak to him (+2400 XP), and you'll find his reaction to you changes quite a bit depending on whether you've gone mostly lethal, non-lethal or entirely stealthy - you'll even have some different dialogue options depending on this.
Eventually though, you'll get to talking about equipment... while you'll need to pay Quinn for anything you need, if you replaced the broken battery of Stasis Pod 73 back in the Forward Cargo Hold, Quinn will acknowledge the deed and give you a substantial discount on his wares. If you keep talking with him he'll drop a few hints that he's more than a simple engineer, but he'll brush you aside for now. If you have the CASIE augmentation, you can appeal to his personality (he's an alpha, so the "appease" option works), in which case he'll open his "special stock" to you - check his store for a couple new weapon upgrades and two more Praxis Kits.
Quinn will also propose a side-quest to you - collect the
Rocket Launcher parts scattered around the base, and he'll assemble them for you. You've probably already come across one or two if you've been exploring thoroughly, and you'll have the chance to hand them over if you already have them. You'll find two of them in the Loading Bays 1 & 2 area, and one in the Admin Offices at (1). Once you've returned all of them, you'll get +2400 XP and a
Rocket Launcher with a built-in
Heat Targeting System upgrade, though you might want to ditch it or sell it back to Quinn due to its size and the lack of ammo available.
Quinn's stock is as follows, standard prices:
- Ammunition: Revolver Ammo (2x, 125 Credits), 10mm Pistol Ammo (3x, 25 Credits), Machine Pistol Ammo (4x, 120 Credits), Shotgun Cartridges (3x, 100 Credits), Stun Gun Darts (2x, 50 Credits), Combat Rifle Ammo (2x, 100 Credits), Typhoon Ammo (5x, 100 Credits), Rockets (2x, 150 Credits), Heavy Rifle Ammo (4x, 250 Credits, requires CASIE persuasion)
- Consumable: Beer (three types, 5x each, 10 Credits), Hypostim (2x, 100 Credits), CyberBoost ProEnergy Jar (2x, 250 Credits), CyberBoost ProEnercy Pack (3x, 100 Credits)
- Weapon Upgrade: Laser Targeting System (1x, 500 Credits), Target-Seeking System (1x, 1500 Credits, requires CASIE persuasion), Silencer (1x, 500 Credits, requires CASIE persuasion)
- Miscellaneous: Praxis Kit (1x, 5000 Credits) (3x with CASIE persuasion)
Note that you probably won't have enough money to buy all the Praxis Kits unless you received Quinn's discount. They're probably your most valuable resource here even with the limited ammo available to you. It might be prudent to sell the Rocket Launcher you get from Quinn if you want to get all of them, as you'll get 2000 Credits for the piece.
Last, when you return to Quinn with the Burke's Spare Retinal Prostheses, he'll automatically fix it up for you. You'll receive +1750 and a [Modified] Burke's Spare Retinal Prostheses. Note that this is the last time you'll be able to speak with Quinn and access his shop, so now's a good time to load up on whatever you need, including any remaining Praxis Kits. With that, it's time to head back to the Interrogation Wing to get deeper into the facility.
A - Exit to Loading Bays 1 & 2
B - Exit to Detention Camp
P - Alarm Panel
S - Security Camera


