 Did we miss anything? Is there something we didn't discover? Let us know!
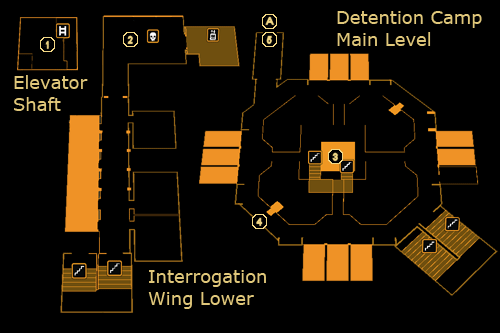
As you take the elevator to the Interrogation Wing, you'll exchange words with Keitner again. Halfway up, however, the elevator will halt - turns out that Burke must have been listening in on your transmissions. Looks like you'll need to hurry and deal with Burke before he causes major problems for you and your mission. Note that this part of the guide won't be covering every detail on the previous locations - to see the full area walkthroughs, please view their respective sections.
1 - Elevator Shaft
Escaping the elevator is easy - just press the button to release the emergency ladder and climb up. You'll have to engage in some simple platforming to work your way up the elevator shaft, including hopping on some pipes and shelves, but you should manage even without the Jump Enhancement. When you get to the top near the exit vent, however, you'll need the Jump Enhancement to reach the ledge above - doing so will earn you +300 XP and a
Praxis Kit. Proceed out through the vent and back to the morgue in the Interrogation Wing.
2 - Morgue
You'll come out of the vent above the morgue's ceiling, with three Belltower soldiers below. Head to the vent in the corner to find a
Gas Grenade and
EMP Grenade, the former of which is very suitable for taking the three soldiers out all at once. When you're ready to go, hop down through the vent and dispose of the troops as you see fit - fortunately for you, their backs are turned towards the elevator, so you can just slip past if you wish. Proceed onward through the biometric scanner and to the Detention Camp.
3 - Detention Camp
As you go through the biometric scanner, you'll come across a severely wounded Keitner. She'll explain that Burke is trying to cover up the Illuminati project by flooding both the Detention Camp and Underwater Facility with toxic gas. She'll explain that the flow of the gas can be redirected by using a terminal below the prison tower, and then die from her injuries. Check the ammo case near the door for some
Typhoon Ammo and two
Gas Grenades, as well as two
Mine Templates, then move on.
To stop Burke, you'll need to rush to the central tower and climb down the ladder to the computer console below. Doing so may be difficult or easy depending on how you cleared the Detention Camp earlier. There will be two spec-ops soldiers on each level of the Detention Camp, including snipers and sneakers, so you'll need to be careful and use cover, or the maintenance shafts in the open cells if you have the means to smash through the walls. There are six soldiers in total to dispose of, and you have ten minutes before the prisoners and Kavanagh die.
When you reach the computer console, your "friend" from the cargo ship will contact you and explain that, due to the way the system is set up, you won't be able to save everybody - you can only redirect the flow of the gas, meaning either Kavanagh or the prisoners die. Either option results in +3000 XP total, but if you choose to kill Kavanagh, your mysterious ally will be upset with your choice, cursing your empathy towards the prisoners. A few dialogue details will change later on depending on your choice, but otherwise there's no gameplay difference.
Once you're done, you'll need to climb up the ladder and use the computer to shut down the security lockdown (+1000 XP if you saved Kavanagh), then head on to Loading Bay 3, through the
Admin Offices, in order to escape from Rifleman Bank for good.
That said, there is a way to save everybody, though it requires the Jump Enhancement augmentation. See (4) for more details.
4 - Hidden Room & Gas Distribution System
You may have already visited this hidden room back during your initial tour of the Detention Camp. To reach it, you'll need to move or destroy the heavy crate in front of the vent at this location, then use your Jump Enhancement to reach a second vent above in the maintenance shaft. Climb in for a +400 XP bonus if you haven't already been here. Look for the gas distribution system, and destroy its tank with any gun you have on you. This will disrupt the flow of the gas entirely and allow both the prisoners and Dr. Kavanagh to survive. You'll receive a total of +4000 XP for this route, as well as the All of the Above achievement.
Once you're done, you'll need to climb back to the central tower and use the main computer to shut down the security lockdown (+1000 XP), then head to Loading Bay 3, through the
Admin Offices, to take care of Burke.
5 - Biometric Scanner
Burke will interrupt your escape as you go through the biometric scanner. His speech to you will vary based on the choice you made with the prisoners and Kavanagh, but otherwise it will end up with him "inviting" you to fight him in Loading Bay 3. You'll receive +1750 XP when he's done. Continue onward to the
Admin Offices (B).
A - Exit to Admin Offices (Return)


