 Did we miss anything in this location? Is there something we didn't discover? Let us know!
Background
Did we miss anything in this location? Is there something we didn't discover? Let us know!
Background
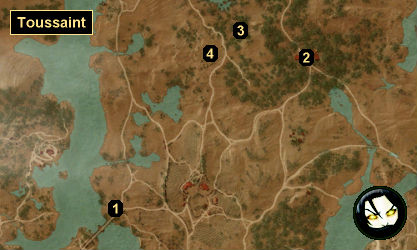
You'll trigger this quest by reading the note "Contract for a Witcher / Witchers: Caravan Escort," which you can find on several notice boards in Toussaint, including the one at Plegmund's Bridge in
Toussaint North (#1).
Walkthrough
From the note, you'll learn that the Coopers' Guild is looking for an armed escort to protect two merchants from something called the "Great White Terror." However, when you go to the camp of the merchants (#2), you'll find the place in a shambles and one of the merchants dead. Examining the scene with your witcher senses will reveal that the attack was perpetrated by a basilisk, although one with strange paw prints.
While you're at the scene, you'll meet Count Borhis di Salvaress. He'll explain that he's the owner of the basilisk, which is the last of its subspecies. He'll also try to convince you that the basilisk, named Iocaste, isn't a threat to those who don't provoke it, and that he's posted signs all over the region to keep people out of its territory -- for all the good it did the two merchants involved in the contract.
When you ask Borhis where the basilisk is nesting, he won't tell you. So to track down the beast, you'll need to search the scene again. You'll find the broken barrels of tannin that attracted the basilisk to the merchants, plus scales indicating that the basilisk is silver and vulnerable to fire, and scorch marks indicating that the basilisk is venomous. The tannin will give you a scent that you can follow.
Between the scent from the tannin and splattered blood from the missing merchant, you'll track the basilisk to the north and west where you'll first find the missing merchant's body (#3) and then run into a hunting party at the basilisk's nest (#4). The hunting party will introduce itself as the Reavers, hired by the Coopers' Guild to deal with the basilisk.
At this point, you'll have to make a decision:
- If you join with the Reavers, then they'll give you some tannin to pour on the nest. This will attract the basilisk to you. You and the Reavers -- well, mostly you -- will then need to kill it. We found the battle to be a little easier with the Reavers using their crossbows.
Golden Oriole potions will protect you from the basilisk's venom. Otherwise, you should be able to kill the basilisk however you want. When the beast dies, it'll drop a
Silver Basilisk Trophy and a leveled version of the Squire's Steel Sword. The Reavers will also pay you 400 crowns for your help.
- If you tell the Reavers that they're not to kill the basilisk, then they won't argue with you. Borhis will pay them off, and you'll end up with 350 crowns. Afterwards, Borhis will offer you an extra reward. If you take it, then you'll receive 50 crowns and 50 xp. If you refuse it, then you won't get anything extra.
Either way, you'll also receive 200 xp for completing the quest.
Note: If you kill the basilisk, then you'll earn the Valor virtue for the quest
There Can Be Only One. If you spare the basilisk, then you'll earn the Compassion virtue. If you spare the basilisk and refuse Borhis' extra reward, then you'll earn the Generosity virtue.
1 - Plegmund's Bridge
2 - Trading Post
3 - Merchant's Body
4 - Basilisk Nest


