 Did we miss anything in this location? Is there something we didn't discover? Let us know!
Walkthrough
Did we miss anything in this location? Is there something we didn't discover? Let us know!
Walkthrough
For this quest, you'll need to meet with the Unseen Elder in his cave south of
Beauclair. Depending on what you said at the end of the previous quest, Regis will either sail with you to the cave, or he'll meet you there. If he sails with you, then he'll mention that guests are supposed to bring the Elder "a stone symbolizing peace," but that unfortunately he doesn't have one. This will become important soon.
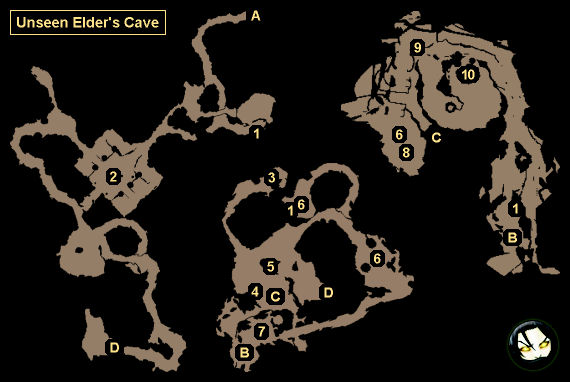
When you reach the cave entrance (Exit A), you'll need to use the Magic Key that Orianna gave you to open the way. Then inside, you'll quickly meet the Unseen Elder (#2), but he won't be very hospitable. No matter what you say to him, he'll immobilize Regis and toss you into a deeper part of the cave (#3). You'll be leaking health, and your weapons and healing potions will be scattered, so you'll quickly need to grab stuff until you find a healing potion, and then quaff it. This will keep you alive and also earn you 300 xp. If you take too long, then you'll die and have to load your game.
When you wake up, you should gather the rest of your gear (if necessary) and head south. You'll come to the camp of a mage who teleported into the cave (#4). You'll also notice a waterfall next to the camp, only the water will be flowing upwards rather than down.
To figure out what the mage was up to, you'll need to follow his tracks. Along the way, you'll pass by several things of interest:
- A raised walkway that you won't be able to reach -- yet (#5).
- Protofleders (#6).
- The mage's broken megascope (#7).
- A one-way gravity flip (Exit B), which will cause you to walk on the ceiling.
- The corpse of the mage (#8). When you loot the corpse, you'll pick up a Crumpled Letter, which will indicate that the mage had an appropriate gift for the Elder. You'll discover this
Offering for the Unseen Elder on the other side of the chamber next to the broken bridge. Picking it up will earn you 200 xp. Also, right next to the dead mage you'll find a leveled version of the silver sword Cantata.
With offering in hand, you'll just need to figure out how to get back to the Unseen Elder. To do this, you'll need to jump to the central part of the upside down map (#9). Once across, you'll come to a pile of crumbling rocks (#10). If you use Aard on the rocks, then they'll "fall" upwards and land right next to the raised walkway (#5), giving you a way to climb up. This will earn you 200 xp.
To get back to the raised walkway, you'll need to jump into the nearby upward-flowing water (Exit C). This one-way trip will flip gravity again and drop you near the mage's camp (#4). From there, you'll just need to climb up to the raised walkway (#5), and then walk to the Unseen Elder.
When you reach the Unseen Elder (#2), he'll accept your offering, and he'll be a little more welcoming -- but he'll quickly grow tired if you drag things out. So avoid unnecessary questions, and when the Elder asks you why he should help you, argue that Dettlaff's actions will bring unwanted attention to the Elder. If you ask too many questions, or if you supply too many bad reasons, then the Elder will kill you and you'll have to load your game.
At the end of your conversation, the Elder will agree to help you with your plan. That is, when you reach Tesham Mutna, he'll force Dettlaff to travel there and face you. You'll then automatically travel to Tesham Mutna, which will complete this quest and earn you 800 xp, and trigger the next quest
Tesham Mutna.
1 - Chests
Inside these three chests, you'll find leveled versions of Hen Gaidth Armor, Hen Gaidth Boots, Hen Gaidth Gauntlets, Hen Gaidth Mask, Hen Gaidth Trousers, and Hen Gaidth Steel Sword. There isn't a silver sword in the set.
2 - Unseen Elder
3 - Landing Place
4 - Mage's Camp
5 - Raised Walkway
6 - Protofleders
7 - Megascope
8 - Dead Mage
9 - Jumping Point
10 - Crumbling Rocks
Exits
- Cave entrance.
- One-way gravity flip.
- One-way gravity flip.
- Passage.


