 Did we miss anything in this location? Is there something we didn't discover? Let us know!
Walkthrough
Did we miss anything in this location? Is there something we didn't discover? Let us know!
Walkthrough
You'll arrive in Toussaint along with the knights Milton de Peyrac-Peyran and Palmerin de Launfal. As you're passing by the Dulcinea Windmill (#1), you'll spot another knight battling a giant named Golyat. The knight won't be faring very well, so of course you and your companions will dismount and help out.
The fight against the giant should be relatively easy, just because the three knights will be able to do the job on their own, albeit slowly. So you can help as much or as little as you want. When the giant dies, you'll earn 450 xp, and you'll automatically pick up the
Golyat Trophy. You can also loot Golyat for a
Greater Red Mutagen and more.
With the giant defeated, you'll learn that the knight you helped is Guillaume de Launfal, who was attempting to perform a heroic deed to impress his paramour. You'll also learn that the Beast of Toussaint has struck again. Milton will agree to take you to the scene of the crime while the Launfals head elsewhere.
Milton will lead you south to a small dock (#3). However, when you get there, nobody will be around, so you'll decide to search the scene using your witcher senses. You'll find boot prints from the royal guardsmen, and when you follow them, you'll get attacked by a few level 35 scurvers -- which will explode when they're about to die, so be sure to retreat when necessary.
When you reach the spot where the body was discovered, you'll detect lots of blood, a mangled net, scraps of expensive cloth, and marks in the sand indicating that the guardsmen took the body away using a boat. Since the body was apparently found in the net, you'll decide to dive down into the water to see if the guardsmen missed anything. You'll find lots of debris underwater, but only one thing of importance -- a
Handkerchief Monogrammed DLC. When you show the handkerchief to Milton, he'll recognize it as belonging to somebody named de la Croix.
To figure out where the body ended up, you'll need to follow Milton north to the nearby Cockatrice Inn (#2). When you go inside, you'll meet the fisherman who found the body, and he'll inform you that the guardsmen took it to Corvo Bianco Vineyard, which was recently auctioned off to the ducal chancellery, and which is now acting as a morgue. While you're listening to the story, you'll notice a woman spying on you. Milton will say that it's probably Linnice, the innkeeper's daughter. Afterwards, Milton will inform you that he has other matters to attend to, so he'll leave you to examine the corpse on your own.
At Corvo Bianco (#4), you'll discover that the guardsmen are dead, and when you go down into the cellar where they put the body, you'll encounter the woman from the inn -- only she won't be Linnice but instead a bruxa. Bruxae are vampires, so
Vampire Oil and
Black Blood will make the battle much easier. Otherwise, you'll just have to be careful during the fight because the bruxa can turn invisible and then hit you with a combination of strikes to do major damage. When the bruxa eventually dies, you'll earn 500 xp, and you'll find a
Greater Blue Mutagen on her corpse.
When you examine the murder victim, you'll notice some curious things: an
Unusual Severed Hand that doesn't belong to the victim, a
Pouch Filled with Florens stuck in the victim's throat, and evidence that the Beast used long, sharp claws to kill the victim, which means the Beast isn't a bruxa. Your examination will raise more questions than it answers, so you'll decide to see the duchess so you can learn more about the other victims.
To meet with the duchess, you'll need to talk with Palmerin at the Tourney Grounds (#5). You'll either find him in his tent (if it's nighttime) or by the arena (if it's daytime). Either way, you'll end up walking to the arena, where you'll discover that Guillaume is about to face off against a shaelmaar. You'll stop to watch, but Guillaume will fare about as well against the shaelmaar as he did against Golyat, and so you and Palmerin will jump in and help him out. Of course, the knights won't do much of anything, so the fight will be up to you.
The shaelmaar is a relict, and it's sort of like a giant armadillo with a thick shell covering its back. It'll start out with two attacks -- it'll curl up into a ball and try to roll into you, or it'll send rocks flying at you -- and then later it'll gain the ability to spin around like a top, damaging everything close by. For the most part, these attacks should not be too difficult to avoid.
If you use a regular melee strategy against the shaelmaar -- with lots of dodging and attacking -- then you won't do much damage, and you'll have a long fight on your hands. To deal more damage against the shaelmaar, you'll need to take advantage of its rolling attack. If you stand next to the wall of the arena and dodge out of the way when the shaelmaar rolls at you, then it'll crash into the wall and become stunned. This will give you some free shots at its vulnerable belly. You should only need to repeat this strategy a handful of times to win the battle.
Once you've done enough damage to the shaelmaar, it'll collapse into a heap, and you'll earn 300 xp. You'll then have to decide if you want to kill it or not. You won't get to loot the shaelmaar either way, but if you let it live, then you'll earn the Compassion virtue for the quest
There Can Be Only One (even if you haven't started it yet).
With the arena battle completed, the duchess will come down to see you. She'll give you the deed to Corvo Bianco Vineyard (#4), and you'll also earn 100 xp. The duchess will then introduce you to Damien de la Tour, the captain of her personal guard. Damien will tell you what he's uncovered about the Beast, and you'll learn that all of the victims have been killed by a clawed creature, and that they've all been retired knights who failed at one or more of the five chivalric virtues.
At the end of your conversation with Damien, you'll deduce that the next victim is likely to be your traveling companion Milton de Peyrac-Peyran, who is playing the Hare in the annual Hare Hunt in the palace gardens. This will prompt the duchess to suddenly remember that Milton and the three victims were part of a "knightly team" long ago, and dealt with "delicate matters" for her father. The duchess will then grab the first horse she sees and race off to the gardens, and you'll have to follow along behind her.
When you reach the gardens, the duchess will describe how the Hare Hunt works. She'll tell you that the hunters must find three things -- a golden fish, a phoenix egg, and a unicorn horn -- where each item will give the hunters a clue about the whereabouts of the Hare. She'll then decide that you should find the fish and the horn while she tracks down the egg:
- Golden Fish. For this item you'll need to jump into Lovers' Cove (#7) and look around with your witcher senses on. You'll spot several things floating in the water. Most will be Candy or Toffee, but one will be the golden fish. When you get close to it, a cut scene will start up, and you'll end up with the
Key from the Golden Fish. This will earn you 50 xp.
- Unicorn Horn. The first time you approach the unicorn (#6), it'll run off. To get it to like you better, you'll need to pillage some food from nearby picnickers. You'll find a
Basket of Carrots, two
Fragrant Cakes, and a
Ripe Apple. Only the carrots and the apple will work. You'll just need to equip the bribe as a tool. Then when you approach the unicorn with your offering, it'll come to you, and you'll end up with the
Clue from the Horn of a Unicorn. This will earn you 150 xp.
Note: After befriending the unicorn, it'll allow you to use it as a mount.
With your two items procured, you'll need to head over to the duchess (#8), where you'll be just in time to see her claim the phoenix egg. You'll then put your clues together to form a riddle: "I begin like a groan hollowed out with ease, then end like a mouse with a head of hard cheese." The correct answer is "greenhouse." If you get it right, then you'll receive the Wisdom virtue for the quest
There Can Be Only One, and you'll earn 200 xp. If you get the answer wrong, then the duchess will figure it out, and you'll only earn 100 xp.
Either way, you'll head right over to the greenhouse, where you'll discover Milton dead (#9). But you'll spot the Beast, and you'll pursue him to a warehouse on the docks. This will conclude the quest and earn you 1000 xp.
Note: If you return to the greenhouse right away, then you'll find Milton's
Hare Mask on the ground there.
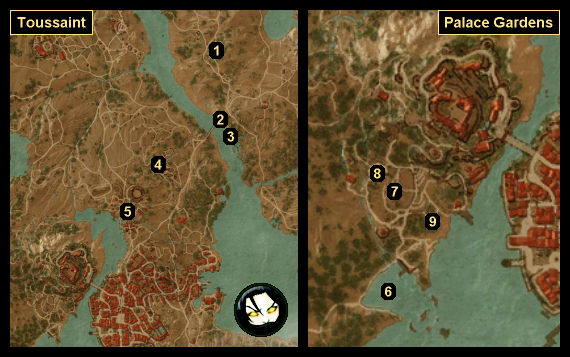
1 - Dulcinea Windmill
2 - Cockatrice Inn
3 - Dock
4 - Corvo Bianco Vineyard
5 - Tourney Grounds
6 - Unicorn
7 - Golden Fish
8 - Duchess
9 - Greenhouse


