 Did we miss anything in this location? Is there something we didn't discover? Let us know!
Walkthrough
Did we miss anything in this location? Is there something we didn't discover? Let us know!
Walkthrough
During the previous quest
(The Night of Long Fangs), you learned that as children the duchess and Syanna used to visit an illusionary world called the Land of a Thousand Fables, and you speculated that maybe that's where Syanna is now. To reach that world, you'll need to search the palace playroom. You'll find a Golden Key hidden behind a painting. It'll unlock a wardrobe where you'll find the book The Land of a Thousand Fables. Opening the book and saying "expecto ludum" will take you to the illusion.
When you arrive at the Land of a Thousand Fables (#1), you'll find yourself on a yellow-brick road in the middle of a mushroom forest. Regis won't be with you. You'll need to follow the road, but it'll loop around, and it won't be displayed on the mini-map, making it easy to get lost. But in general you should head west, where you'll eventually come to village where the Wicked Witch lives.
Note: If you get hopelessly lost, then just jump into the river by the grigg village (#2) or the bridges (#3, #4), and head upstream. You'll quickly come to a stair-step waterfall. If you climb the steps and continue following the river upstream, then you'll pass by the witch's village.
At the witch's village (#5), you'll witness Syanna arguing with the Wicked Witch. This will earn you 250 xp. The Wicked Witch won't be happy with your interruption, and she'll decide to eat you. She'll then start flying around on her broom throwing soup on you. She'll also summon an archespore or a panther -- or both, eventually -- to distract you.
The Wicked Witch is relatively easy as far as high-level bosses go. Her soup won't actually damage you, so you don't need to avoid it, and archespores and panthers shouldn't be very challenging. The trick for the witch is to knock her off her broom. You'll be able to do this when she swoops down to attack you. Just wait for her to start her dive, and then hit her with a sign (Aard is a good choice), a crossbow bolt, or your silver sword.
When the witch falls off her broom, she'll be stunned for a bit, allowing you to hit her, but her broom will defend her. If you kill the broom, then the witch won't be able to fly anymore, but she's much more dangerous when she's on the ground than when she's in the air, so you might want to leave the broom alone. When the witch comes to her senses, she'll try to smash you with her soup pot. If she hits you, then you'll be stunned, and she'll get back on her broom and start flying around again. This is actually the best way to go, because each time you knock the witch out of the air, you should be able to damage her for about a third of her health while she's stunned (especially if you use
Relict Oil on your silver sword). Fighting the witch strictly on the ground when she's awake is much tougher, and you'll take more damage.
When you kill the witch, Syanna will loot a key from her corpse, and she'll use it to free Jack ("of beanstalk fame") from her house. Syanna will then ask Jack about his beans. Jack will claim that they've been hidden in the world, but that Joss (the boy who cried wolf) might know where they are. You'll then learn from Syanna that the only way to exit from the world is to grow Jack's beanstalk and escape through the cloud giant's castle in the sky.
To reach Joss, you'll need to follow the road north and then west out of the witch's village. Along the way, you'll get attacked by a group of evil pixies. Pixies are easy, but they'll try to swarm you, so as long as you can keep yourself from being surrounded, you should be okay. You'll get ambushed by pixies a few times while you're in the "Fablesphere," so stay prepared. Before you reach Joss, you'll also come upon a pair of unicorns, with one even named Roach (#6). If you like mounted travel, then you can use the unicorns just like horses if you want.
When you come to Joss (#7), he'll be under attack from four level 46 wolves. After dispatching the threat, you'll learn that Joss lies about everything, so while you'll be able to ask him about the beans, you'll get vague and only semi-helpful answers. Syanna will then suggest that you visit with some of the world's inhabitants to see if they can provide you with better clues. This conversation will earn you 500 xp.
Here are some of the fairy tale creatures you can meet:
- Goldilocks and the Three Bears (#8). You'll find Goldilocks dead and the three level 46 bears sleeping. If you loot any of the Magic Food from the bears' table, then the bears will wake up and attack you. The bears are tougher than you might expect, and the
Magic Food isn't especially useful, so you might want to leave this fairy tale alone.
- The Musicians of Blaviken (aka The Bremen Town Musicians) (#9). The four animals stacked here will disappear if you get too close to them.
-
[Red Bean] The Big Bad Wolf (#10). When you talk to the wolf, you'll learn that he got tired of losing all the time, and that he eventually killed Little Red Riding Hood and the hunter and stuffed their bodies into the nearby well. He'll also tell you that he knows where the
Red Bean is, but that without his fairytale being active, he's under no obligation to tell you.
To make the wolf talk, you'll need to jump into the well and loot
Little Red Riding Hood's Hood from the two corpses down there. You'll then need to swim out of the well, which will put you in the lake to the north. When you return to Syanna, you'll give her the hood so she can play Little Red Riding Hood. You'll get to be the hunter.
You'll then play out the fairytale. When you get to the point where Syanna comments on the wolf's teeth, the wolf will attack you. You'll have Syanna helping you out in the battle, so it should not be too bad. When the wolf dies, you'll find the
Red Bean in its stomach along with
Bottle Caps, a
Corkscrew, and a
Fake Tooth, which are marked as quest items but aren't actually used for anything.
- Redbeard's Camp (#11) and Balbina the Goose's House (#12). Redbeard and Balbina are involved in the quest
Duck, Duck, Goosed.
- The Dragon of Vizima (aka the Wawel Dragon) (#13). You won't be able to do anything with the dead dragon here other than look at it.
-
[Blue Bean] The Three Little Pigs (#14). When you reach the houses of the three little pigs, you'll find that the straw and wood ones are already down, and that only the brick one remains. However, when you walk up to the brick house, you'll discover that there isn't any way to interact with it. So to meet the pigs, you'll need to use Aard on the house, which will blow it to smithereens -- and reveal three level 47 pigs, who won't be happy about your actions.
The pigs are about as difficult as the boars from the main part of the DLC -- that is, difficult. So have
Beast Oil ready, and try to stay away from them. If the pigs surround you, then you'll take a lot of damage. So dodge in and hit a pig, back away, and then close in on the lead pig approaching you and repeat. Killing the pigs isn't technically required, but you'll need to be outside combat to loot the
Blue Bean, which you'll find on a plate where the stone house once stood.
- Thumbelina (#15). If you get too close to Thumbelina, then you'll accidentally step on her and kill her.
- Pot of Gold (#16). When you approach the pot of gold at the end of the rainbow here, it'll transform into a level 49 panther. The panther will drop a
Gold Ball when it dies.
- Snowy Village (#17). You'll encounter two things of interest in this village:
- The Little Flint Girl will sell you a lot of the "magic" items that you can find while in the illusion
(Magic Food,
Magic Mushrooms, and so forth). These items will disappear when you leave the illusion, so don't bother buying them. You'll also notice the girl wearing one of Syanna's ribbons, which was designed to protect her from evil. If you buy or win the ribbon for Syanna, then you'll earn the Generosity virtue for the quest
There Can Be Only One. You'll also need the ribbon for the "good" ending for the DLC.
- The notice board will give you the quest
Duck, Duck, Goosed.
-
[Yellow Bean] Longlocks (aka Rapunzel) (#19). To reach the top of the tower here, you won't be able to use Longlocks' hair. Instead, you'll have to do some jumping and climbing. When you reach the top, you'll discover that Longlocks is dead -- hung by her own hair -- and that she's turned into a wraith. You'll then have to defeat the wraith and the skeletons that she summons. After the battle, you'll find the
Yellow Bean on Longlocks' bed.
To exit the tower, you can either climb all the way back down, or you can just jump off the balcony into the water below.
Accumulating the three magic beans will earn you 800 xp. You'll then need to plant them in a field (#18). When you do, the beanstalk will quickly shoot up into the air, and you'll automatically climb it. At the top, you'll find yourself right outside the cloud giant's castle -- and the cloud giant will come out to greet you.
The cloud giant is a big melee boss. He'll hit you hard, but he's slow, so you should be able to dodge around him. Still, Quen might be the way to go even though the bestiary entry for the giant recommends that you use Igni. If you have trouble with the battle, then be sure to use
Ogroid Oil on your silver sword, and also fight the giant next to the big piles of metal. If the giant hits one of the piles while it's electrified from the lighting strikes, then he'll become stunned for a short time, giving you a chance to deal some easy damage against him. The giant won't drop anything interesting when he dies.
After the battle, Syanna will try to seduce you. If you're agreeable, then you'll join the mile-high club, just in a different way than usual. Having sex with Syanna won't change anything about the ending of the DLC.
As you're crossing the bridge leading to the giant's castle, a will-o-the-wisp will show up. If you follow it down into a cave and light the fire there, then you'll gain a leveled version of the silver sword Gesheft. To get back to where you started, you'll have to return the way you came and then make a difficult jump back onto the bridge.
When you eventually enter the castle, Syanna will lead you to a well and tell you to jump in. Even though this sounds like a trap, it's the right thing to do. When you enter the well, you'll fall down to Toussaint. This will complete the quest and earn you 800 xp. You'll then automatically travel to the Tesham Mutna Ruins, which will trigger the quest
Tesham Mutna.
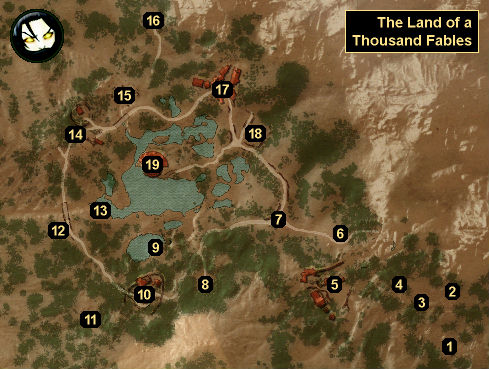
1 - Signpost
The sign here will mention that the illusions of this world will remain stable until 1252. Since the year is 1272, this is a warning that things will be weird.
2 - Grigg Village
You won't be able to do anything here. The griggs will simply flee into their homes, and you'll be too big to follow.
3 - Bridge
On this bridge, you'll encounter a level 47 archespore, and you'll find the corpse of a dwarf. The dwarf will have a
Poisoned Apple.
4 - Broken Bridge
If you can jump across the bridge here, then following the road to the west will take you right to the witch's village (#5).
5 - Wicked Witch's Village
6 - Unicorns
7 - Joss
8 - Goldilocks and the Three Bears
9 - The Musicians of Blaviken
10 - The Big Bad Wolf
11 - Redbeard's Camp
12 - Balbina the Goose's House
13 - Dragon of Vizima
14 - Three Little Pigs
15 - Thumbelina
16 - Pot of Gold
17 - Snowy Village
18 - Field
19 - Longlocks' Tower


