Did we miss anything in this location? Is there something we didn't discover? Let us know!
Zorvak'mur Outer Ring |
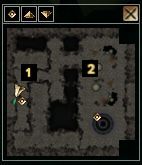
Zorvak'mur
1 - DUERGAR SLAVERS
A group of duergar foolishly try to capture you as a slave here, but not before telling you that the helmet you're about to loot off the leader's corpse will protect you from illithid mind control while you're here.
2 - QUIET VILLAGE
Walking through the village, you'll notice that all of its inhabitants are under mind control. You'll be approached by a mind flayer who asks your business and tries to get you to take your helmet off. If you're dumb enough to comply, you're going to have a really hard time with this diplomatic mission.
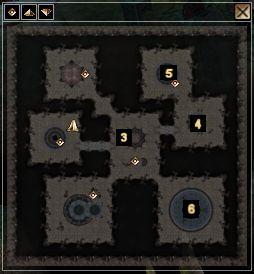
Zorvak'mur Inner Ring |
3 - SLAVER BAR
The slavers in this bar will tell you about the town. Apparently the two thing people come here to do are trade in slaves or watch them fight in the arena.
4 - THRALL AUCTION
You can get an easy 1000 xp if you buy the human thrall at the auction. You'll have to lie to her and tell her that you have a message for the Seer that she will have to carry. When you get back to the temple, you can tell her she is free. If you try to keep her as a thrall she will fight you and die, rather than be a slave.
5 - SPARTACUS
If plan to eradicate this group of illithids, make sure you stop by the slave pens and free their thralls. You'll need to kill the Warden and loot his Master Prison Key, then talk to Argosus, the leader of the thrall prisoners. Don't do this unless you've killed everyone upstairs, or the thralls won't last long. You get 5000 xp for letting the prisoners out of their cell and 250 xp for each prisoner that reaches freedom.
6 - TO THE ELDER BRAIN
If you are doing this quest the diplomatic way, just ask the venerator here to let you speak to the Elder brain about the Valsharess. You'll have to give up your helmet to do this, but no harm will come to you if you are polite. You will immediately enter the presence of the Elder Brain if you do things this way and you'll learn that he wants the mirror you got from the Avariel in exchange for the illithids abstention from the Valsharess's war. If you don't want to give up the mirror, but want to slaughter some mind flayers, it is possible to kill the guard here and then bulldoze your way through the palace to the Elder brain. You can get a bit more xp by hacking and slashing your way through, but some of the enemies (and most of the treasure boxes) are illusions.
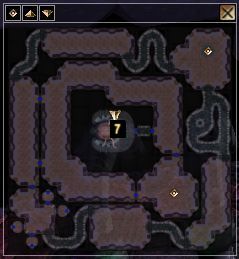
Elder Brain Chamber |
7 - ELDER BRAIN
Whether you face him as friend or foe, the Elder Brain will attempt to psyche you out by sending you to a fantasy world. If you want a really quick end to your problems, accept the fantasy as reality. The game will be over and the credits will roll because you will now be a blissfully ignorant slave of the illithid. Keep your grip on reality and you'll have a fight with a pit fiend and some other baddies before you can speak to the elder brain (or kill him). You get one last chance to patch things up by giving the Elder Brain the mirror. I ended up having to slaughter the illithid because I didn't want to give up the mirror before asking the Seer's advice. The Elder Brain let me go and told me if I wanted to give him the mirror to come back and speak to his guards. When I got back, I couldn't get in because I'd killed the only guard who could talk to me. The only way to get back in was to kill an illithid (thereby negating the deal). If you take this route (killing the Elder Brain), the Valsharess will still have illithid on her side during the last battle, but the Seer won't be too displeased. I actually didn't mind because the illithids' condescension was getting on my nerves and I felt like the opportunity to slaughter more of them was more fun than a diplomatic solution. Ah, these games bring out the best in us all . . .


