|
|
Did we miss anything in this location? Is there something we didn't discover? Let us know!
Ruins: Level Three |
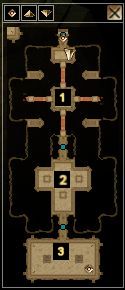
Ruins: Level Three
1 - MIRROR PUZZLE
This puzzle requires you to hit all four mirrors before getting zapped by an energy bolt.
2 - MYTHRIL GOLEMS
If you know the password to get through this area, you won't have to fight the two mythril golems.
3 - THE MASTER
The reason you have to fight two mythril golems is to make sure you are ready for the next fight. Say hello to your old buddy . . . the demilich. Yes, the maker decided his human body was too weak, so he traded it in for extreme magical powers (and jewels for eyes). If you can manage to beat him, and can cast arcane magic, you can use the golem creation machine. If you've been diligent about looting, you should already have the necessary parts (two legs, two arms, a torso, and a head). Open the golem creation machine by using the golem machine activator you looted off the demilich. Put the golem parts in and you will be able to cast spells on the four pillars at the corners of the machine ("use" the pillars, don't waste a spell by casting it directly) to enhance your golem. Once you've cast the four spells you want, a loyal shield servant will be created. If you talk to him, he has three spell slots that you can load for later use. The golem control amulet allows you to teleport your golem to you, should you ever be separated.
|
|
|


