Did we miss anything in this location? Is there something we didn't discover? Let us know!

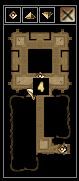
Ground Floor |
Cult Temple
1 - GROUND FLOOR
Before you get very far, Nathyrra will tell you that this is likely the place where the Valsharess has her undead minions. Level one has some cult knights and skeleton devourers to dispatch, but not much else.

First Floor |
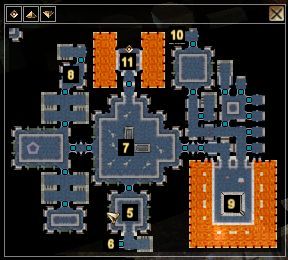
2 - FIRST FLOOR
Level two has an altar and a book that tells you about the cult. Use the black pearl you find in one of the side rooms on the altar and it will upgrade your weapon to drain ability levels. Apparently the lower cult members are upstairs and the elders live downstairs and demand blood sacrifices (sounds like vampires to me . . .). You have to head upstairs first, because the head priest has the key to the lower crypt.

Second Floor |
3 - SOLDARIS
The High Priest is pretty tough to beat because he'll cast time stop then run to a different room to heal himself. Buff up before you go in the room and make sure you're hasted and have damage reduction, since he'll cast Bigby's Crushing Hand on you.
Crypt Entrance |
4 - CRYPT ENTRANCE
You'll need the rope in this chest to get down into the pit, but you'll have to fight three bone golems to get it.
5 - PIT
When you get down into the pit, one of the priests greets you, thinking that you are the next sacrifice victim. After you have permanently convinced him otherwise, take the energy orb he's holding.
Lower Crypt |
6 - BREAKABLE CHEST
Run into this room and quickly bash the chest. Take the splinter of wood and use it as a stake on the body of the cult monk, which you'll find in a sarcophagus in the little alcove across from this room. Doing this gets you the key to the next room.
7 - VAMPIRE SLAYER
Use the energy orb on the pedestals in this room to focus the energy and open the doors. You'll have to do them in order, since you need to defeat the head enemy in each room to get the extra energy orbs needed to open the east and north doors. Bash anything wooden to get stakes so you can finish off the vampire monks after they retreat to their coffins.
8 - ELDER MONK
An elder monk is in this room. You'll have to take damage from the trap on her door to break it down so you can get to her tomb.
9 - TORTURED DEVA
Make your way to this room to find a deva being tortured. The cult members are using her blood to make golems. You can do this yoursef, at a cost of some points toward chaotic.
10 - SHADOW MASTER
Kill the shadow master, then go to this room to stake his corpse. You'll get his energy orb and the rod that will allow you to release the deva. If you save her, you can send her to help you fight the Valsharess.
11 - SOLDARIS REDUX
You have to fight Soldaris again before you enter the last room, but this time you can stake him once you've won.
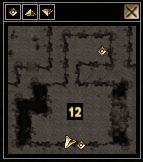
Vix'thra Cave |
12 - VIX'THRA
I must admit I was completely unprepared for the fight that comes up next. I figured the head of the cult would be a really powerful vampire, or maybe a lich. It turns out that the cult worships a dracolich. That's right, an undead dragon who is magically immune to pretty much everything, has the patented dragon breath weapon, and can fly. The best way to go about this fight is to run to the back of the room and destroy the phylactery that holds his essence. This will make it much easier to kill him as it will keep him from resurrecting himself. When you've won, you get to loot his massive dragon's hoard, which has piles and piles of gold, jewels, and enchanted weapons. As a bonus, the threat of the Valsharess is considerably lessened, now that you've destroyed her undead army.


