Did we miss anything in this location? Is there something we didn't discover? Let us know!
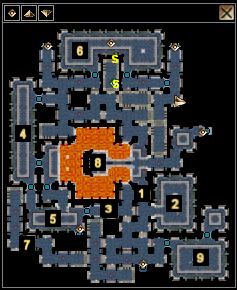
Undermountain: Level One (Central) |
Undermountain: Level One (Central)
1 - SHARWYN
A general caveat, before you make your way here: don't enter the circles of magic symbols. They do 15-25 points of magical damage. You'll find Sharwyn here and have the first chance to use the Rod of Resurrection that White Thesta gave you. You can let her join, or send here back to the surface.
2 - AMBUSH
Some Drow ambush you in this room, but they're pretty weak. The only complications to the fight are the cleric casting darkness and the cleric and mage becoming invisible all the time. A secret door in the north-east leads to a treasure room, but you have to have fairly decent Spot.
3 - PORTALS
The portals found around seem to warp you to each other randomly. If one of you brainiacs finds a pattern, e-mail me and I'll update this entry.
4 - DAELEN
Daelen Red Tiger is lying dead in this room. There are fourteen mirrors her, some of which contain items. If you take an item, the mirror will disappear. One of the mirrors will produce an evil copy of yourself, which you must defeat (you can also ask Daelen which one will do that if you want to avoid it).
5 - SKIRMISH
Harpies and ogres are having a skirmish in this room. Deal with the survivors and then loot the chests
6 - WAKE UP CALL
The Hall of the Sleeping Kings houses several undead sitting on thrones. One of them has an intelligent sword who asks you to take him with you because he is bored. If you do this, the dead kings will awaken and you'll have a fairly tough battle on your hands. Note that you can change him from a longsword to a different kind of sword by telling it that you don't have use for a longsword. My suggestion is to locate and open the secret door (S) first. If you don't mind using guerilla tactics (some people consider them to be "cheap"), you can pop out of the secret door, attack until you are almost dead, then pop back in the door to recover. If you don't want the combat xp, you can also grab the sword, then walk away whistling through the secret door. The sword starts out with a +4 enchantment bonus and +5 vampiric regeneration. Whether or not you take the sword, you need to take the blue rod from one of the piles of bones lying around. This won't wake the sleeping kings and you need the rod to solve the lever puzzle that keeps you from getting to the next level. You'll need four rods in all, so just pocket this one and move on.
7 - ANOTHER AMBUSH
You'll be ambushed by drow in this hall.
8 - LEVER PUZZLE
The lever puzzle here isn't that hard. You just keep placing rods and pulling levers until enough pillars are gone that you can cross the bridge. The pillars don't return if you pull a wrong lever or anything.
9 - GERIATRIC DRAGON
There's an old blue dragon in this hall. You should be able to take him on without much trouble by this point (but probably not without preparation). The room behind it has a chest, in which you'll find Halaster's magnifying glass, which you can use later to torture formians (if you're evil).


