Register Lost Password?  Cookie?
  The time now is 07:01 PM GMT -6.  
Banshee Network
 
Neverwinter Nights
Game Information
Recent News
NWN Walkthrough
SoU Walkthrough
HotU Walkthrough
KM Walkthrough
SG Walkthrough
WW Walkthrough
PotSC Walkthrough
Strategy Guides
Character Information
Classes
Races
Attributes
Alignments
Feats
Skills
Henchmen
Equipment
Armor
Weapons
Miscellaneous Items
Spells
Bard
Cleric
Druid
Paladin
Ranger
Sorcerer
Wizard
Interviews
HotU Interview
NWN Interview #1
NWN Interview #2
Argyle Interview
Articles
NWN Review
SoU Review
HotU Review
Daggerford Review
Wyvern Crown Review
Infinite Dungeons Review
PotSC Review
Kingmaker Review
ShadowGuard Review
Witch's Wake Review
SoU Preview
HotU Preview
E3 2003 Preview
E3 2002 Preview
Media
NWN Screenshots
SoU Screenshots
HotU Screenshots
NWN Wallpaper
Expansions Wallpaper
Game Resources
Downloads
NWN Forum
NWN Products
Buy NWN!
Buy NWN: SoU!
Buy NWN: HotU!
Buy NWN Gold!
Buy NWN Platinum!
Site Features
Submit News
News Archives
Join Our Staff
Forums
Community Blogs
Reviews
Previews
Interviews
Editorials
About GB
Advertise With Us!
Advertisement
 

Wizard's Tower
Did we miss anything in this location? Is there something we didn't discover? Let us know!
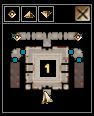


Level One
Wizard's Tower


1 - EASY PICKINGS

The vrocks and drow on this level won’t give you much trouble. Be advised that the entire Wizard's Tower is a wild magic zone, meaning that every time you cast a spell there is a chance that something strange will happen rather than the spells intended effect. I know one time I tried to cast stoneskin on myself and ended up turning myself into a chicken.
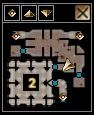

Level Two


2 - BALOR LORD

The balor lord on this level is very hard. My advice is to use stoneskin and try to deal as much damage as you can before he stops casting spells. Once he goes melee, he gets three attacks and all of them will take around 15-20 hit points off you.
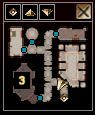

Level Three


3 - WIZARD’S APPRENTICE

The wizard’s apprentice is in this room. He’s nothing compared to the balor lord you just faced, and when you get him near death, he stops fighting and gives you his mirror shard. Note that if you escape to the Reaper's Domain during this fight, when you come back he will be dead and Sabal will have his shard.

HotU Walkthrough
Chapter One
Yawning Portal (Up)
Yawning Portal (Down)
Waterdeep
Undermountain Entry
Undermountain 1 (C)
Undermountain 1 (N)
Undermountain 1 (S)
Undermountain 2 (C)
Undermountain 2 (S)
Undermountain 2 (E)
Undermountain 2 (N)
Undermountain 3 (C)
Undermountain 3 (N)
Undermountain 3 (W)
Chapter Two
Temple of Lolth
LM City Core
Shaori's Fell
Wizard's Tower
The Castle
Maker's island
Ruins: Level One
Ruins: Level Two
Ruins: Level Three
Lith My'athar - West
Zorvak'mur
Eye Tyrant Chasm
Drearing's Deep
Cult Temple
Battle at the Gates
City Core Battle
Chapter Three
Cania
Wastes of Cania
Mimic's Chamber
The Long Death
Puzzle Room
Frost Giant Country
Waterdeep Battle
 
 
      Copyright ©2000-2008, GameBanshee.com