Did we miss anything in this location? Is there something we didn't discover? Let us know!
Puzzle Room |
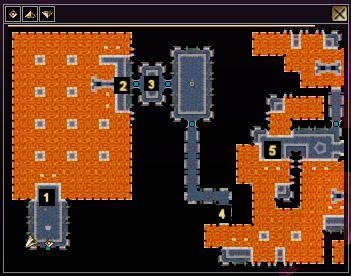
Puzzle Room
1 - LEVER PUZZLE
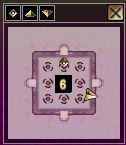
As though the game designers wanted to punish me for finding the gem puzzle annoying, they created this maddening series of rooms. When you first get in the Puzzle Room you'll have to fight a few puzzlers. Go to the edge of the platform you're on (where the floor lever is) and adjust the camera so you can see which blocks have two levers. Make your way to each of these blocks by waiting until the arrow on the block you're standing on points the direction you want to go, then pull the lever. When you get to a block with two levers, pull the one with two handles until a blue light shines over it. There are three of these in all. Once you've pulled all three, make your way to the platform directly across the room from where you started.
2 - STATUE PUZZLE
There are three statues here. You should already know from an earlier puzzle that you need to turn them toward the door. Do that and then run up the platform to the floor lever across from the door and pull it. The statues will blow the door open.
3 - Arrow Puzzle
Wearing the Sleeping Man's Ring in this area, you'll notice another rotating arrow. Whatever it's pointing to will become active. That is, if it's pointing to a chest, you can open that chest. Likewise, you can't open the door to the next area until the arrow is pointing to it.
4 - DEMON GRAPPLING
In this area, you'll need to use the grappling demon hand to move from platform to platform, until you eventually reach the area where the guardian is waiting.
5 - GATE GUARDIAN
Once you've killed the guardian (and good luck, by the way - I had a hard time damaging him even though I had high strength and charisma), use the portal that appears where his corpse was to exit the area.
The Knower of Places |
5 - THE KNOWER OF PLACES
You'll be warped into the realm of the Knower of Places. Ask her where the Knower of Names is being held and she will give you a fourth component of the sleeping man ring, which will open a door that leads to the deepest wastes of Cania.


