|
|
Did we miss anything in this location? Is there something we didn't discover? Let us know!
Outer Mimic's Chamber |
Mimic's Chamber
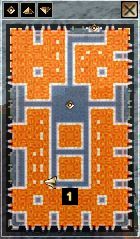
1 - RING MAZE
The mimic will take the armor you're wearing and run off. You'll have to navigate his maze by putting on and taking off the Sleeping Man's ring (or polymorphing). If there is a bar of light in your way, put the ring on and it will go away. If there is a bar in your way when the ring is on, just take it off to get it to go away. When you get to the center, you'll have to fight some strange creatures that mine gems. After you dispatch them, flip the two levers in the center of the maze, then put the ring on (or take it off) and flip the other two. This will open the door to the next room.

Inner Mimic's Chamber |
2 - GEM THROWER PUZZLE
The puzzle in this room is kind of annoying. You have to go around picking up piles of gems, then leave a trail of gem piles that leads to the center of the room. You're trying to lure the mimic next to the fire conductor, so you may need to kill the scavanger rats in the area, to keep them from stealing the gems from your trail. Once the mimic hops into the yellow ring around the fire conductor flip the lever and he'll go up in flames. You'll now have the demonic grappler (the hand of a demon), which will allow you to follow the arrows again when you get outside. The hand's owner will want to fight you for it first, though. When you've beaten him, head through the planar door, which will place you on a cliff.
|
|
|


