 Did we miss anything on this map? Is there something we didn't discover? Let us know!
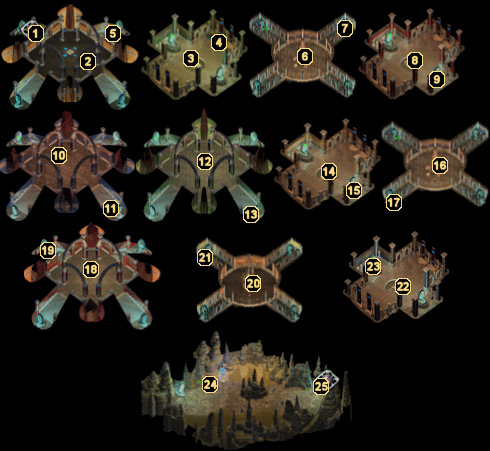
Note: The third floor of Watcher's Keep is comprised of many separate maps, as you can see above. The area codes are in order from left to right and top to bottom.
1 - Arrival
You'll emerge on the third floor of Watcher's Keep at this location.
2 - Insane Elf
Here you'll encounter a crazed elf named Yakman. He'll think your party is composed of demons and runs away to the south, but you can follow him through the same portal to area #3.
3 - Yakman/Tamorlin
You'll meet up with Yakman again in this room. Calm him down and then use someone with high charisma to glean some useful information out of him. He'll explain that this level is a series of portals and that only one portal leads to the next level of the dungeon. However, due to his clumsiness, the portal is now broken. Yakman offers you a rod that can be used to reactivate the portal, but you'll need to add three gems to it before it will work. In addition, Yakman no longer remembers how to get to the exit portal, but claims he wrote it in a journal... somewhere.
If you have the spell available, cast a Heal on Yakman. Doing so will cure his insanity, after which you'll receive 5000 experience points and learn that his real name is Tamorlin. After expressing his gratitude, Tamorlin will then leave Watcher's Keep via this level's entrance portal. Once he leaves, help yourself to the Bard's Gloves lying on the symbol in the middle of the room. You can bring them to Cespenar in the
Abyssal Fortress to have him forge you the
Wondrous Gloves.
4 - Campsite
After you've learned all you can from Yakman/Tamorlin, search his campsite (be wary of traps!) to find some
Studded Leather Armor +1, five
Darts of Stunning, the Scepter of Radiance needed to open the exit portal, and a journal that contains a cryptic poem detailing the way to the level's exit.
Here's quick translation of the poem:
- East
- East
- South
- South
- South
- South
- West
- North
- North
- North
Return to your original arrival room (area #1) and begin this pattern. Use the compass on the floor to determine the correct portal to take.
5 - Portal to Final Exit #1
This is the first of ten portals leading to the level's exit.
6 - The Purifier
The first thing you'll notice when entering this room is that a Balor and a few Cornugon are locked in battle over the Blood War. Let them inflict plenty of damage on each other, then chime in to finish them all off. Reading the inscription on the large stone in the middle of the room, you'll learn that only a Lawful Good character (like Keldorn) should mess with it. Click on the stone with such a character to earn the
Purifier +4 bastard sword.
7 - Portal to Final Exit #2
This is the second of ten portals leading to the level's exit.
8 - Tahazzar
A tanar'ri named Tahazzar confronts the party here. Indulge in a little dialogue with him, but you'll most likely end up in battle (unless your party is overly evil). I found the trick in this room to be killing the succubus as fast as possible, otherwise her charm can make this a difficult fight. When all of the creatures are finally brought down, search Tahazzar's remains to find his heart and the first of three gems needed for the Scepter of Radiance.
If your party is more good than evil, Tahazzar will instead offer to side with you to take down an enemy demon named Ka'rashur. If you choose this route, you can earn 20,000 experience and the Thieves' Hood, which can later be upgraded to a
more powerful version at Cespenar's Forge. Either way, before leaving the room to the south, search the trapped alcove toward the top of the room to find two
Potions of Superior Healing and ten
Arrows +3.
9 - Portal to Final Exit #3
This is the third of ten portals leading to the level's exit.
10 - Pit Fiends, Cornugons, and Velithuus
This is a dead room, meaning you cannot cast magic and therefore shouldn't waste your spells. There are a variety of demons to destory, however, so use your best melee and archery skills to take them down. Once all of the beasts are dead, move through the south portal.
11 - Portal to Final Exit #4
This is the fourth of ten portals leading to the level's exit.
12 - Succubus
Here you'll meet a Succubus and her Alu-Fiend sisters. She will offer to help you find the way off this floor, but you must give her a kiss. If you accept, she will bring you to the end of the level, but you'll end up energy drained and you won't have the gems for the scepter, so it won't do you any good anyway.
If you deny her, all of the women will attack your party. Their charm ability can be devastating, so use area effect spells to take them down quick. Unfortunately, there is no decent loot to mention, except for a single
Acid Arrow and a few potions.
13 - Portal to Final Exit #5
This is the fifth of ten portals leading to the level's exit.
14 - Ka'rashur
The demon Ka'rashur and his Baatezu await you in this chamber. If you've sided with the tanar'ri at area #8, then you'll want to wipe out all of the demons and bring Ka'rashur's heart back to Tahazzar.
Or, if your party is evil, you can side with Ka'rashur to instead kill Tahazzar for him. Once the deed is done, bring Tahazzar's heart back to Ka'rashur to receive 20,000 experience, a second Scepter Gem, and the Thieves' Hood, which can later be upgraded to a
more powerful version at Cespenar's Forge. As you may have already noticed, the Thieves' Hood can only be gained by siding with one of the demon factions.
If you decide to attack Ka'rashur and his minions anyway, you can earn yourself a nice chunk of experience, a
Long Sword +1, and a couple of high level scrolls. Before heading through the south portal, pick the lock or use a Knock spell on the container against the east wall to loot some
Studded Leather Armor +2, ten
Arrows +3, and a few other trinkets.
15 - Portal to Final Exit #6
This is the sixth of ten portals leading to the level's exit.
16 - Glabrezu
The two Glabrezu here will summon Fire Elementals and Ice Salamanders if you give them time, so attack them quickly. They have several other spells at their disposal, so concentrate on defeating them as quick as possible. Once they're finished off, take the west portal to continue on.
17 - Portal to Final Exit #7
This is the seventh of ten portals leading to the level's exit.
18 - Tieflings
A battle with Tieflings awaits you in this chamber, which just so happens to be surrounded by a Wild Magic aura (any spell cast has the chance to produce random effects). If you're careful of the spellcasting and backstabbing, the fight shouldn't be too difficult. After you've dealt with all of them, search their corpses to find four
Battle Axe +2 weapons, a
Dagger +2, a
Cleric's Staff +3, a
Wand of Spell Striking, a
Short Sword +2, and some
Leather Armor +3. Keep what you want, then head through the north portal.
19 - Portal to Final Exit #8
This is the eighth of ten portals leading to the level's exit.
20 - Cambion and Demon Knights
A single Cambion will confront your party when you first enter this room, but shortly thereafter four Demon Knights will teleport in as well. Each Demon Knight drops a
Two-Handed Sword +1 and the Cambion drops a
Bastard Sword +1, so grab the weapons if you're in need of more equipment to liquidate after the dark warriors fall.
21 - Portal to Final Exit #9
This is the ninth of ten portals leading to the level's exit.
22 - Demon Wraith
As soon as you enter this area, a Demon Wraith and its undead minions attacks your party. The room contains an assortment of deadly traps, though, so try to disarm as many as you can before you rush into battle. If you're able to destroy the Demon Wraith first, all of the other undead will be released from servitude and you won't have to fight them.
Once the room is free from any danger, search the many treasure piles that line the floor to find a
Spear +1, ten
Bolts +2, a
Dagger +2, a
Bastard Sword +1, a
Wand of Spell Striking, some
Plate Mail +1, and the White Dragon Scales needed to create the
White Dragon Scale armor at Cespenar's Forge.
23 - Portal to Final Exit #10
This is the tenth and final portal leading to the level's exit.
24 - Aesgareth and the Deck of Many Things
For making it to the final room of this level, your party will instantly receive 10,000 experience. A Cambion by the name of Aesgareth will introduce himself when you arrive and tell you that he has obtained one of the gems for the Scepter of Radiance. At this point, that should be the last gem that you need.
Aesgareth won't just had the gem over, though. He instead challenges you to a card game using a Deck of Many Things. Whoever survives or has the higher card after a pull from the deck wins. If you beat him, you can choose between the gem, the
Spectral Brand +4 scimitar, or a Scroll of Wish. If you don't, you'll lose your wager (the scepter, some vitality, or some strength). Obviously, the consequences at stake make this a very good time to save your game.
The first two deck pulls cannot be for the gem, nor do you have to wager the scepter. Regardless of whether or not you win or lose, Aesgareth requires that the third match be for the scepter or gem exclusively. Even if you lose this final match, Aesgareth will be kind enough to give you the gem after you provide him the means to exit the level. However, if you can't stand losing to the demon, you can instead refuse to hand over the scepter or otherwise attack his band of planewalkers. If you destroy the entire group, you'll net over 100,000 experience and can grab various treasures afterwards, including the
Deck of Many Things. You can also obtain the deck for yourself by pickpocketing it off Aesgareth, but you'll need a skill level of at least 150 to do so.
When the scepter is fully assembled, your party will receive 25,000 experience points and you'll be free to use the portal at area #25. If you'd like to tinker with the deck and want to know every card combination and possibility, see our
Strategy Guides section.
25 - Level Exit
Finally! Once you've obtained the Scepter of Radiance from area #4 and its three gems from areas #8, #14, and #24, you can head through this portal to continue on to
Watcher's Keep 4.


