 Did we miss anything on this map? Is there something we didn't discover? Let us know!
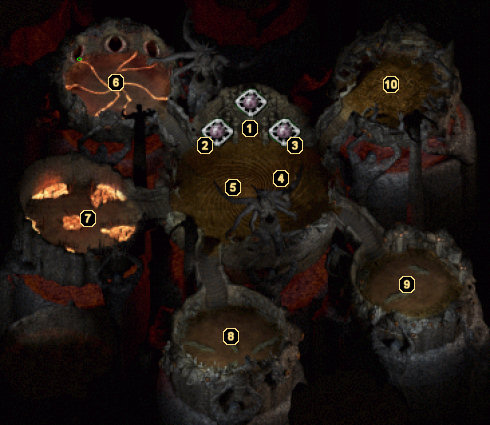
1 - Entrance and Exit
Did we miss anything on this map? Is there something we didn't discover? Let us know!
1 - Entrance and Exit
When you initially enter the Abyssal Fortress, you will speak with a Solar at this location, who will offer you a bit of advice about your power and then unlock the test at area #6. After the Solar leaves, your old nemesis from the original Baldur's Gate, Sarevok, will show up and ask that you resurrect him. As payment for his resurrection, Sarevok will vow to aid your cause and join your party. Whether or not you allow him to join is up to you, but I will say that it does not affect the game's final outcome.
In addition to the previous, area #1 offers an exit from the Abyssal Fortress. The exit will serve different purposes throughout the expansion, depending on how far into the Child of Bhaal storyline you are. For example, it will initially offer to bring you to
Saradush and
Watcher's Keep, but once Gromnir is defeated, you can continue to the outside areas as well to pursue Yaga-Shura. Once you have killed all five of the main Bhaalspawn, and have completed each of the tests (areas #6, #7, #8, #9, and #10), this exit will bring you to the
Throne of Bhaal.
2 - Spirit of Fate
Both areas #2 and #3 are the Spirit of Fate. Speaking with either one will lead you into a conversation where you can summon many of the NPCs from Shadows of Amn. Unfortunately, you cannot summon certain NPCs (such as Yoshimo), but if you are feeling a bit lonely, there are plenty of friends to be had.
3 - Spirit of Fate
Both areas #2 and #3 are the Spirit of Fate. Speaking with either one will lead you into a conversation where you can summon many of the NPCs from Shadows of Amn. Unfortunately, you cannot summon certain NPCs (such as Yoshimo), but if you are feeling a bit lonely, there are plenty of friends to be had.
4 - Cespenar's Forge
In this general vicinity, you will meet an Imp named Cespenar. Cespenar is essentially your "butler" and will help you construct powerful magic items... if you provide him with certain components. For a full list of what Cespenar can forge for you, as well as the components needed and their locations, check our
Cespenar's Forge section.
5 - Fortress Tests
As you destroy each of the four remaining Bhaalspawn (the fifth being Illasera, whom you killed at the very beginning of the expansion), you will be teleported here to meet with the Solar once again. Each of these meetings serves a different purpose. For example, when you've defeated Yaga-Shura, the Solar will conjure up Gorion's spirit to tell you of your past.
As each of these scenes are presented to you, a new test will be opened up (areas #7, #8, #9, and #10), which will need to be completed before the end of the expansion. Additionally, once all five Bhaalspawn have been defeated, this is where you'll learn of Melissan's true identity and her intentions. After this final scene with Melissan, the
Throne of Bhaal will be available for you to enter at area #1 if you have completed all of the Fortress' tests.
6 - First Test
This room holds your first test. Speak with the man in the center of the room and then prepare for battle. The openings in the walls will begin spawning creature after creature, until finally Jon Irenicus will spawn and use a
Wand of Frost on you. Take him out to reap the test's experience reward, then watch as the room changes form into something a bit more pleasing. Having completed this test, head back to the main chamber.
7 - Second Test
This room holds your second test. As you enter, a replica of *you* will appear and explain that they are an example of what you would have become if Gorion had stolen Sarevok from the Temple of Bhaal and raised him instead of you. Alongside this "replica" are some of Sarevok's henchman, including Tamoko, and you'll have to destroy all of them to complete the test. Once they're dead, this room will change just as the first test did, morphing the lava into water (which will heal any character standing in it) and restoring the color to the dismal walls. Having completed this test, head back to the main chamber.
8 - Third Test
This room holds your third test, which is a face-off between you and your "innocence". Your innocence is simply a version of your Slayer form and will provide a halfway decent fight. Once dead, the room will change as the others did, and you'll be free to return to the main chamber.
9 - Fourth Test
This room holds your fourth test. Cyric, the current Lord of Murder, will appear before your party and teleport everyone but you out of the room. He'll then have a talk with you to find out just how much of a threat you pose towards his throne, explaining that he cannot interfere because the rest of the gods, including Ao, have forbid him to meddle in the Bhaalspawn affairs.
At the end of the conversation, however, he will teleport your party members back in and release some of his favored followers on you. You'll have a small amount of time to prepare for the battle, and you'll want to use this opportunity. The Favored of Cyric, as they're called, are some very powerful assassins and can kill a party member who isn't at full health with one backstab. Once you've killed all four assassins, the room will change, and you'll be able to return to the main chamber.
10 - Fifth Test
This room holds your fifth and final test. This encounter is similar to the third test, but this time you'll be battling with a creature called the Ravager. It's much more powerful than your Innocence was, and will summon in some friends to aid its cause. Once dead, you'll gain 50,000 experience, the room will change to something more pleasant (as usual), and you'll be free to return to the main chamber and enter the
Throne of Bhaal.


