 Did we miss anything in this location? Is there something we didn't discover? Let us know!
Overview
Did we miss anything in this location? Is there something we didn't discover? Let us know!
Overview
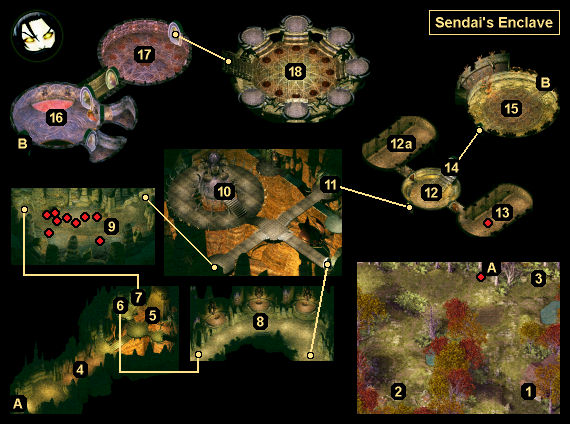
When you arrive outside the enclave, you'll find yourself in a peaceful forest. You won't spot any evidence of the enclave at all. To figure out what's going on, you'll need to talk to the local woodcutter (#1). He'll tell you that he's seen some "funny-looking elves" in the clearing to the west (#2). When you head over there, you'll get ambushed by two drow, a hive mother, and two umber hulk elders. The hive mother is by far the most dangerous of the group, so take her down first and then mop up the rest. You'll earn 96,000 xp for winning the battle.
When you return to the woodcutter, he'll mention that he's heard "strange voices" near his wife's grave to the north (#3). When you go there to investigate, you'll get ambushed by five drow and two gauths. This battle will earn you 42,500 xp.
Back at the woodcutter again (#1), he'll get tired of sending you into ambushes, and he'll reveal himself to be a drow warrior. At the same time, all of the creatures in the forest will turn into drow as well, and so you might have a big fight or a small fight on your hands depending on how many of them notice you. For best results, you should position your party south of the woodcutter. That way, you'll only have to deal with the drow right next to him (including a wizard), and you'll be able to approach the others on your own terms.
Note: If you don't want to deal with the ambushes, you can examine the graves (#3) before talking to the woodcutter and then ask him about them. He'll quickly get tired of you and attack. You can also just attack the forest creatures.
To clear out the forest, you'll have to kill twelve drow warriors and two drow wizards. This will earn you 87,000 xp. Killing the drow woodcutter will also cause the entrance to the enclave (Exit A) to become visible, which will earn each character in your party an additional 10,000 xp.
Inside
Inside the enclave, you'll have to deal with a bunch of Sendai's slaves and minions, including Odamaron (#10), Diaytha (#12), Captain Egeissag (#15), and Mythkyl (#17), but eventually you'll reach Sendai in her inner sanctum (#18). When you do, she'll tell that she's had time to prepare a "special surprise" for you, and then she'll attack.
When the fight starts up, Sendai will create seven statues of herself, one on each of the seven pedestals surrounding the chamber. She'll then take over one of them and attack you with it. When you defeat it, she'll switch to the next statue, and then the next, until she eventually inhabits all seven. Meanwhile, each time Sendai switches to a new statue, a pair of drow will enter the chamber and attack you.
So the fight will be lengthy, and you'll have to defeat Sendai eight times -- seven times as a statue and then once more in her true form. We'd recommend killing the drow minions as soon as they arrive and then focusing on Sendai's current form. It's also a good idea to put your squishy casters someplace safe, like on the pedestal for the first statue, once you've defeated it. Only Sendai controlling her true form and her mage statues should be dangerous. You can use the other parts of the battle to heal and re-buff, as necessary. You'll earn over 160,000 xp for defeating all of the statues and minions, and each character in your party will earn an additional 40,000 xp when Sendai dies.
At the conclusion of the battle, the Solar will summon you back to the
Pocket Plane and continue your education. This will earn each character in your party 10,000 xp. The Solar will then send you back to Sendai's inner sanctum (#18), where you'll find a convenient exit portal waiting for you. The portal will take you to back to the enclave entrance (Exit A). But before using it, be sure to loot Sendai's corpse for
Studded Leather of Thorns +6,
Wong Fei's Ioun Stone, and a
Wand of Cursing.
1 - Woodcutter's Cabin
Inside the cabin here, you'll find the
Rune of Clangeddin in a locked chest.
Cespenar in the
Pocket Plane can use the rune to upgrade the
Runehammer +4.
2 - Clearing
3 - Graves
4 - Welcoming Committee
As you make your way through this entrance tunnel, you'll get attacked by a variety of spore colonies, umber hulks, spiders, and drow. These battles will probably run together, meaning you should be prepared for a long fight. Try to kill the umber hulks first so they don't sow chaos in your party with their confusion attacks.
5 - Drow Barracks
Inside this chamber, you'll get attacked by a dozen drow, including a drow priestess and a kensai named Thelynn'ss. None of the drow should be challenging individually, but since you'll be facing so many at once, it's a good idea to buff up before facing them. You'll earn about 60,000 xp for winning the battle, and you'll find an
Amulet of Cheetah Speed and a Drow Guard's Key on Thelynn'ss's corpse. You'll need the key to unlock two nearby doors (#6, #7).
When you exit the barracks, you'll witness a cut scene where Sendai will learn of your presence and set up her defenses. This will earn each character in your party 5000 xp.
6 - Door to the North Tunnels
This door will start out locked. You'll need the Drow Guard's Key (#5) to open it.
7 - Door to the South Tunnels
This door will start out locked. You'll need the Drow Guard's Key (#5) to open it.
8 - North Tunnels
When you enter the North Tunnels, you'll get attacked by a collection of Sendai's slaves, including derros and orogs. Every so often, a slavemaster will appear and exhort the slaves to fight harder. As long as the slavemaster remains alive, new slaves will regularly spawn in the tunnels and attack you, and you won't make any progress. So before entering the tunnels, buff up with at least Haste, and then chase the slavemaster to the eastern side, where he'll finally stop and fight you (if you attack him before that, then he'll just regenerate).
Killing the slavemaster will earn you 9000 xp, and you'll either find two
Battles Axes of Mauletar +2 and
Plate of the Dark +1 (EE), or you'll find two
Battle Axes +2 and
Full Plate Mail +1 (original game). These are the same items, just with different names.
Note: If the slaves are easy for you to kill, then you can also hang back and kill them for a while. The derros in particular are worth 12,000 xp each.
9 - South Tunnels
Inside the South Tunnels, you'll get attacked by lots of spiders, including mutated spiders (worth 9000 xp), phase spiders (1400 xp), sword spiders (2000 xp), vortex spiders (2700 xp), and even the spider queen Lashar'ra (18,700 xp), who can heal herself and summon more spiders. Poison immunity items (like the
Periapt of Proof Against Poison and the
Ring of Gaxx) are a good idea here, but failing that be sure to have
Antidotes or poison-curing spells available.
You'll also encounter several web traps in the tunnels, but you can avoid them if you stay on the path.
10 - The Lich's Lair
You'll encounter the lich Odamaron in this chamber. He'll cast Protection from Magical Weapons right away, so keep hitting him with Pierce Magic (or your buff-removing favorite) until you can damage him, and then whack him until he's dead. You'll earn 22,000 xp for killing Odamaron, and you'll find a Drow Wardstone, the
Eye of Tyr, and the
Heart of the Damned on his corpse. The wardstone will allow you to unlock a nearby door (#11), and the other two items can be used by
Cespenar in the
Pocket Plane to upgrade
Gram the Sword of Grief +5 plus
Carsomyr +5 or
Purifier +4.
Note: If you charge right at Odamaron, then you'll cross over traps of Silence and Spellstrike. If this is a problem for you, then circle around him and attack him from the side.
If you loot the containers in Odamaron's chamber, then you'll also find a
Skull of the Lich, which
Cespenar in the
Pocket Plane can use to upgrade the
Spectral Brand +4.
When you exit this chamber, you'll witness another cut scene with Sendai. This time she'll sic the drow high priestess Diaytha on you. You'll meet Diaytha soon (#12). At the end of the cut scene, each character in your party will earn 5000 xp.
11 - Locked Door
You'll need a Drow Wardstone (#10) to open this door.
12 - Diaytha
When you arrive here (#12), Diaytha will challenge you to a duel -- only she'll demand that you prove yourself by defeating Ogremoch (#13) first. After completing this task, you'll find Diaytha in the room to the north (#12a). She'll have an abishai, a demon knight, a hive mother, and a vampire with her.
The easiest way to deal with this fight is to lure enemies out of the room and defeat them one or two at a time. Better yet, you can place some traps in the hallway leading up to the room, and let the traps do most of the work. The hive mother can't fit through the doorway, but if you have her all alone, then she shouldn't be as much of a challenge.
You'll earn 101,000 xp for winning the battle, and you'll find a
Darksteel Shield +4 on Diaytha's corpse. Killing Diaytha will also cause the exit door (#14) to open.
13 - Ogremoch, Prince of Earth
In this room, you'll encounter two greater earth elementals plus Ogremoch, Prince of Earth. Ogremoch will resist spells and ranged damage pretty well, but he won't stop melee damage at all. So charge at the three enemies with your fighters and take them down. You'll earn 76,000 xp for defeating them.
14 - Locked Door
This door will open once you've killed Diaytha (#12a).
15 - Arena
In this arena, you'll meet Captain Egeissag, a Spectator beholder (whom you might remember from the
City-of-Caverns), and a half dozen drow. Rather than attacking you, the Spectator will suggest that your main character fight Captain Egeissag in a duel. This will give you two choices:
- If you decline the duel, then you'll have to fight Egeissag and the drow with your entire party. The drow will be on platforms where you won't be able to hit them with melee attacks, so make sure you have enough spells and ranged weapons to deal with them. You'll earn 80,000 xp for winning the encounter this way.
- If you accept the duel, then you'll have to fight Egeissag with your main character alone; your companions and the other drow won't be able to participate. The duel will start right away, without giving you any time to prepare, so make sure you've buffed up your main character before entering the arena. Egeissag will use Smite (which can stun you for a round), but otherwise he shouldn't be too difficult to kill. You'll only earn 20,000 xp for winning the encounter this way.
After the battle, the Spectator will congratulate you, and he'll open up the exit door (Exit B) before departing. Right after this, you'll witness another cut scene of Sendai, and you'll see that she's getting desperate. She'll send her last minion, the mind flayer Mithykyl, to deal with you. Watching this cut scene will earn each character in your party 5,000 xp.
Before leaving the arena, don't forget to loot Egeissag's corpse for the
Bowstring of Gond.
Cespenar in the
Pocket Plane can use this item to upgrade the
Darkfire Bow +4,
Firetooth +4, or
Taralash +4.
16 - Illithid Chamber
In the main chamber here plus the two small cells connected to it, you'll encounter an ulitharid, an umber hulk, and two vampiric illithids. You'll earn 51,000 xp for defeating them. In the container in the main chamber, you'll find
Liquid Mercury, which
Cespenar in the
Pocket Plane can use to upgrade
Angurvadal +4.
17 - Mithykyl's Chamber
In this chamber, you'll encounter two ulitharids, an umber hulk, and the illithid leader Mithykyl. Charging in at them might be a bad idea given their stunning and intelligence-draining attacks. So instead, you should send in some summoned creatures first and then use your party to kill the enemies while they're distracted. You'll earn 61,000 xp for winning the battle.
18 - Sendai's Inner Sanctum
Exits
- Enclave entrance.
- Locked door. A Spectator beholder will open this door after you've defeated Captain Egeissag (#15).


