 Did we miss anything in this location? Is there something we didn't discover? Let us know!
Overview
Did we miss anything in this location? Is there something we didn't discover? Let us know!
Overview
When you head over to the monastery gates (Exit A), you'll meet Melissan's ally, Balthazar. He'll tell you that Melissan has already left the city, but he'll reveal where you can find Abazigal and Sendai, two of Yaga-Shura's remaining Bhaalspawn allies. This will add
Abazigal's Lair and
Sendai's Enclave to your world map. Balthazar will also invite you to rest and recuperate in the city, but he'll warn you not to interfere with his "activities," and he'll keep the monastery gates closed, blocking you from going inside.
As you explore the city, you'll learn that all is not well. Several people -- Like Chyil (#2) and Zakee Rafeha (#5) -- will tell you that the local monks used to help people out, but that now under Balthazar they seem to be preparing for war. Some will blame Melissan for this, saying she's the one who has been influencing Balthazar. Others will point out that Balthazar is a Bhaalspawn.
Eventually, you'll need to travel to
Abazigal's Lair and
Sendai's Enclave, where you'll find the two enemy Bhaalspawn. After defeating them, you'll have meetings with Elminster and the Solar from the
Pocket Plane, and you'll learn a few things -- most importantly, that Balthazar is the last of the "Five," the Bhaalspawn planning to fulfill Alaundo's dire prophecy.
To confront Balthazar, you'll have to figure out how to enter the
Amkethran Monastery. The main gates (Exit A) will remain locked, and even though all of the mercenaries in the city will now attack you on sight, none of them will drop a key for it. Instead, you'll have to sneak inside. There are two ways to do this:
- When you talked to Elminster earlier, he suggested that you should work with Saemon Havarian. You'll find Saemon inside the smugglers' cave (#8). He'll announce that the two of you have come out "pretty even" in your earlier dealings, and he'll have a new proposition for you.
Saemon will tell you that he has two ways into the monastery. One of them is to go through a locked casket in the Cave of the Dead. This is the option detailed below. The other way involves wearing a disguise and bluffing your way past the guards at the monastery gates. Saemon will need to come with you for this method, since only he knows the proper pass phrases.
When you're ready to go to the monastery, you'll need to talk to Saemon again. You'll automatically travel with him to the front gates (Exit A). The guard there will let you pass, and then Saemon will lead you into an ambush -- but only sort of, since he was supposed to drug you as well, but didn't. Saemon (as always) will flee at this point, and you'll have to fight a handful of guards, including two mages (who will both cast Time Stop). You'll earn 93,000 xp for winning the battle, and with the guards out of the way, you'll be able to enter the
Amkethran Monastery (Exit B).
- If you talk to Zakee Rafeha in the tavern (#5), then he'll tell you about a married couple named Faheed and Majira who have been asking about the monastery lately. You can also learn about the couple from Saemon Havarian (#8). When you go to their house (#11) and bring up the monastery, they'll admit that they want Balthazar dead, and that they recently bought a Graveyard Key that will unlock a secret way in. If you tell them that you plan to kill Balthazar, then they'll give you the key. Otherwise, you can attack them for it (this will earn you 24,000 xp total) or pickpocket it from Faheed.
The Graveyard Key will unlock a casket in the back of the Cave of the Dead (#7). You'll find several caskets there. The right one is roughly in the middle. It's the only one that can't be picked. You'll need to send at least one character up a rickety ladder to reach it. When you go through the casket, you'll end up in the
Amkethran Monastery.
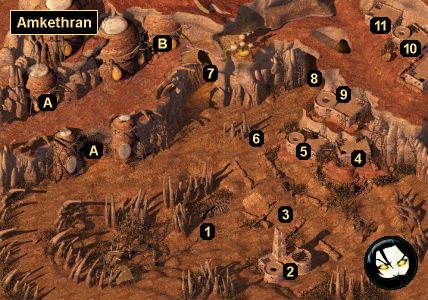
1 - Captain Erelon
During the day, Captain Erelon will be here teaching some mercenaries how to shoot their bows. If you pick a fight with Erelon, or just annoy him, then he'll order the mercenaries to target you, and the fight will be on. You'll earn 40,000 xp for wiping out the archery class, and you'll find the
Darkfire Bow +4 on Erelon's corpse.
2 - Temple of Waukeen
The first time you approach this temple, you'll see a priest of Waukeen berating one of Balthazar's monks. Their dispute will turn violent, and you'll have to decide what to do:
- If you just watch, then the monk will kill the priest easily, and you'll find an
Oaken Ring on the priest's corpse.
- If you attack the priest, then you'll get the same result as above, except you'll earn 1400 xp from the battle, and you'll lose a bunch of Reputation.
- If you attack the monk, then once you've done enough damage to him, a mage will gate in and rescue him. The mage will then warn you to stop interfering with Balthazar's business, and he'll depart with the monk. Afterwards, the priest will thank you for your help. He'll reward you with an
Oaken Ring, and each character in your party will earn 2000 xp. If you give the priest 1000 gp so he can buy food for the starving, then each character in your party will earn an additional 1000 xp, and you'll also earn a point of Reputation.
Note:
Cespenar in the
Pocket Plane can upgrade the
Oaken Ring into a
Heartwood Ring.
Meanwhile, inside the temple you'll meet Chyil. He'll provide you with regular temple services.
3 - Saemon Havarian
At this spot, you'll witness two mercenaries accuse Saemon of being a smuggler, and demand their equipment back. When Saemon spots you, he'll make it sound like you have their equipment, which will cause them to attack you. You'll earn 5000 xp for defeating the mercenaries, but Saemon will teleport away, just like always. You'll see Saemon again later in the smugglers' cave (#8).
4 - House
You'll find a ladder inside this house. It will allow you to climb up onto the roof and reach the upper part of the city (#9, #10, #11).
5 - The Zephir
Inside this tavern, you'll meet three people of interest:
- Marlowe. He'll tell you that he and his daughter are in "terrible peril," and he'll ask you to help him out, but he won't say what the problem is. Instead, he'll insist that you meet him at his house (#10).
- Strange Collector. If you have the
Mechanical Bird from
Neera's companion quest, then the collector will approach you and offer you 100,000 gp for it. If you agree to sell, then you'll receive the promised amount. But if you decline, then your main character will earn 100,000 xp, and you'll make Neera happy.
- Zakee Rafeha. He's the innkeeper, and he'll provide you with regular inn services, including selling you a
Silver Ioun Stone.
6 - Mayor Hasaad
At this spot, you'll witness Mayor Omar Hasaad trying to convince a pair of mercenaries not to execute his daughter Asana for attempted thievery. You'll have three choices for how to proceed:
- You can let the execution take place. This will cost you a point of Reputation.
- You can bribe the mercenaries. They'll ask you for 5000 gp, but if you have 16 Reputation or 15 Charisma, then you can reduce the amount to 3000 gp.
- You can kill the mercenaries. This will earn you 2500 xp.
If Asana survives the encounter, then Omar will give you the basic version of
Montolio's Cloak (which
Cespenar in the
Pocket Plane can upgrade) and 500 gp, and each character in your party will earn 5000 xp. You'll also receive a point of Reputation.
7 - Cave of the Dead
This cave will start out sealed by magic, and you won't be able to convince the monk guarding its entrance to let you in. You'll only be able to go inside during Marlowe's quest (#10).
8 - Smugglers' Cave
When you enter this cave, you'll be just in time to watch Balthazar's monks try to shut down the local smugglers. You'll have three ways to respond:
- You can let the monks do their thing. All of the smugglers will get arrested, and the cave will empty out.
- You can attack the monks and then the smugglers. You'll earn 51,000 xp for defeating both groups.
- You can attack the monks. If Carras the smuggler survives, then he'll give you a discount on his wares. He'll have a little bit of everything for sale, including
Enkidu's Full Plate +3,
Gargoyle Boots,
Glasses of Identification, and
K'logarath +4. Just be aware that Carras and the other smugglers will flee from the cave when you leave, so you'll only have one chance to shop with them.
Later, after you've defeated Abazigal and Sendai, you'll meet Saemon Havarian here. He'll give you a way to enter the
Amkethran Monastery. See the Overview text above for details.
9 - Kerrick's Smithy and Arcana Archives II
You'll meet two NPCs in here:
10 - Marlowe's Home
You'll meet Marlowe here after talking to him in the Zephir tavern (#5). He'll tell you that a lich named Vongoethe became obsessed with his daughter Malla when they were living in Calimsham, and that after chasing them all the way here, Vongoethe has somehow stolen Malla's soul, leaving her near death. So Marlowe will ask you to kill Vongoethe and return Malla's soul to her.
You'll find Vongoethe inside the Cave of the Dead (#7). The monk out front will let you inside. When you reach the center of the cave, Vongoethe will appear. He'll tell you that Marlowe sold his soul to him in exchange for "twenty years of fortune and success," but that when the time came for him to pay up, he reneged on the deal. Vongoethe will then reveal that he can only accept a soul if it's given freely, which is why he's had to do things like steal Malla's soul -- to force Marlowe to comply.
At this point, you'll have two ways to proceed. You can either attack Vongoethe (see below) or you can offer to bring Marlowe to him in exchange for Malla's soul. For the latter option, you'll have to trek back to Marlowe's home and talk to him. No matter what you say, he'll agree to accompany you to the cave, and you'll automatically travel there. Once inside the cave, Vongoethe will give you Malla's Soul Stone, and he'll prepare to accept Marlowe's soul. Once again, you'll have to make a decision:
- You can let Marlowe and Vongoethe complete their deal. Marlowe will die, and Vongoethe will try to leave, but you'll be given one last chance to attack him.
- You can attack Vongoethe (now or at any point during the quest). Vongoethe will summon two banshees, five skeleton archers, and two skeleton warriors to help him out, and Marlowe (if he's there) will flee. If you set spike traps around Vongoethe before the battle, then he'll die before his summoned minions can even appear. Otherwise, you should take down the banshees (who will cast Wail of the Banshee) and Vongoethe (who will cast high-level spells like Abi-Dalzim's Horrid Wilting) as quickly as possible and then mop up the skeletons. You'll earn over 50,000 xp for winning the battle, and you'll find the
Ring of Anti-Venom (and perhaps Malla's Soul Stone) on Vongoethe's corpse.
Afterwards, you'll have to decide what to do with Malla's Soul Stone, which is a wearable object:
- If Marlowe is still alive and you give him the stone, then each character in your party will earn 15,000 xp, and you'll gain a point of Reputation.
- If Marlowe is still alive and you keep the stone, then each character in your party will earn 6000 xp, and you'll lose two points of Reputation.
- If Marlowe is dead and you give the stone to Malla (by talking to her in Marlowe's home), then each character in your party will earn 20,000 xp. If you also give Malla 5000 gp to help her out, then you'll gain a point of Reputation.
- If Marlowe is dead and you keep the stone, then nothing will happen.
Note: If you don't complete this quest before defeating Abazigal and Sendai, then Marlowe and Malla will disappear from their house, and you won't be able to complete their quest. But when you go to the Cave of the Dead (#7), Vongoethe will ambush you there, so you'll still be able to kill him.
11 - Faheed and Majira's Home
Faheed and Majira are involved in one of the ways to enter the
Amkethran Monastery. See the Overview text above for details.
Exits
- Monastery gates. These gates will start out locked. They'll only open when you need to enter (or exit) the monastery grounds.
- Entrance to the
Amkethran Monastery.


