 Did we miss anything on this map? Is there something we didn't discover? Let us know!
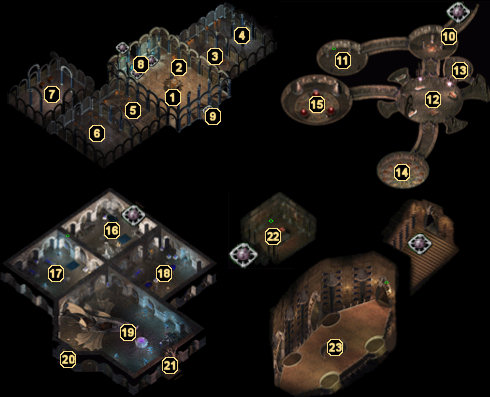
1 - The Machine of Lum the Mad
Did we miss anything on this map? Is there something we didn't discover? Let us know!
1 - The Machine of Lum the Mad
Upon entering this zone you will witness Carston the Magnificant inside of Lum the Mad's machine. Outside there will be some Githyanki and Mind Flayers locked in battle, which Carston will chase away by summoning a demon. When you engage dialogue with him, save yourself some effort and don't anger him. If you do, he will summon four Mind Flayers to attack you party. Don't worry about Carston at this time - continue exploring the level to learn how to destroy his glass shield and utilize Lum's machine.
After you have obtained the Crystal Mallet at area #7, return to the machine and hit Carston's cage with it six times. The shield will dissolve (earning your party 7500 experience points) and Carston will begin begging for his life. You can choose to kill him for 6000 experience points or let him go for 10,000 experience points. Either way, you'll end up with his journal, which explains the correct combination to use on the machine in order to activate the exit portal at area #8. In case you don't feel like looking at the journal or the various notes found around Watcher's Keep, here is a full list of the valid combinations that you can use on Lum's machine:
- Triangle-Red-Medium activates the exit portal at area #8
- Triangle-Green-Medium gets you the Storm Star +3
- Circle-Blue-Long grants you a +1 bonus to Intelligence
- Circle-Square-Triangle grants you a +1 bonus to Wisdom
- Circle-Red-Long grants you a +1 bonus to Constitution
- Square-Blue-Short gets you a +1 bonus to Dexterity
- Square-Short-Medium gets you a +1 bonus to Strength
- Red-Green-Short gets you a +1 bonus to Charisma
- Blue-Green-Long gets you a permanent Magic Resistance bonus
If you choose any other combinations, the character will be subjected to a random effect:
- 10% chance of losing fifteen levels
- 10% chance of losing a point of Dexterity
- 10% chance of losing a point of Intelligence
- 10% chance of suffering 50 points of fire damage
- 10% chance of suffering 75 points of lightning damage
- 10% chance of being poisoned
- 10% chance of being turned to stone
- 10% chance of being Imprisoned
- 10% chance of gaining a Potion of Superior Healing
- 10% chance of gaining 100,000 experience points
Once you're done tinkering with the machine, utilize the Triangle-Red-Medium combination to open the portal at area #8 and earn your party 25,000 experience points.
2 - Cabinets
These four cabinets contain an assortment of normal weapons, as well as a few magical items and quite a few stacks of magical ammunition. Grab some of the normal weapons, as you'll need to equip them during the battle at area #4.
3 - Trolls, Spiders, Containers, and Triangles
Kill the Trolls and Spiders that ambush your party in this chamber, then search the locked containers to nab yourself some more magical ammunition. Pay close attention to the colored triangles on the floor of this room - you'll need to know their color sequence later on (blue, purple, red).
4 - Magic Golems
Two Magic Golems guard the pool in the center of this room. If you've been reading some of the books you've been running across in Watcher's Keep, you'll probably already know that Magic Golems can only be affected by non-magical weapons. If you don't have any mundane weapons to equip, head back to area #2 to loot some from the containers there.
Once the two golems have been destroyed, search the pool to find the Blue Oil, which you'll need to light one of the torches at area #. You'll also want to search the three containers along the north wall to find a
Wand of Magic Missiles and two more stacks of magical ammunition.
5 - Killer Mimics
The four chests along the north wall of this room are actually Killer Mimics, so be careful. Once you've destroyed the Mimics and any other resistance in the room, feel free to loot all the chests to find several more stacks of magical ammunition and a
Wand of Spell Striking. Once again, pay close attention to the color sequence of the triangles on the floor (red, red, purple).
6 - Torches
Once you have the the Blue Oil (area #4), the Red Oil (area #15), the Purple Oil (area #19), and the Flint and Tinder (area #16), you can light the torches in this hall. Using the floor triangles from areas #3 and #5 as a reference, light the torches in clockwise order starting from the top right as so: Blue, Purple, Red, Purple, Red, Red. As soon as all torches are lit, the floor will shake and the large door to area #7 will open. Your party will receive 10,000 experience points for figuring out the order, as well.
7 - The Crystal Mallet
Two powerful minotaurs by the name of Rock and Garock guard the two large containers in this room. They'll summon in four Ice Salamanders once the fight begins, so make sure you're prepared to fight all six creatures.
After you've taken care of all the resistance, search the two minotaur bodies to find the
Axe of the Unyielding +3 and two
Battle Axes +3 and then loot the two large containers to find some magical ammunition, the Crystal Mallet (used to destroy Carston's glass shield at area #1), and the Clay Golem Page needed to construct the
Clay Golem Manual at Cespenar's Forge.
8 - Exits
The left portal here leads to the
Watcher's Keep perimeter, while the right portal leads down to the
fifth level of Watcher's Keep. You won't be able to use the right portal, though, until you've utilized the correct combination on Lum the Mad's machine at area #1. The center archway leads down to the Mind Flayer level (area #10).
9 - Exit to Githyanki Domain
Head down these stairs to arrive at area #16 in the Githyanki domain.
10 - Mind Flayer Greeting
Your arrival into the Illithid domain is met by a single Mind Flayer and four Umber Hulks. Take them down as quick as you can, then proceed to area #11.
11 - First Half of Illithid Rod
Slay the three Umber Hulks that guard this room and then search the floor container to find a
Wand of Cursing and the first half of the Illithid Rod key needed to open the door into area #15.
12 - Illithid Holding Area
Another Mind Flayer and four more Umber Hulks await your arrival in this makeshift prison. Once all the creatures have been dealt with, search the two tables in the room to find another clue for Lum the Mad's machine and then head into the east cell (area #13). You can also venture into the north cell to find a stack of
Arrows +3 and a
Large Shield +1, if you need them.
13 - Carston's Apprentice
Carston's former apprentice lies on the floor of this cell, barely clinging to life. You're able to get a little bit of dialogue about Carston out of him before he dies, however, which will net you 1000 experience points. The information isn't a great help, but it does reveal that the machine of Lum the Mad is indeed the key to getting further into Watcher's Keep.
14 - Second Half of Illithid Rod
Three Mind Flayers and two Umber Hulks guard the second half of the Illithid Rod key, so make sure you're prepared for another difficult fight. Once they're all taken down, grab thee second piece of the key, then disarm the trap on the floor container and loot it for some more magical ammunition.
15 - Vampiric Illithids
Once you've assembled the full Illithid Rod key using the halves from areas #11 and #14, you will be able to enter this chamber. Once inside the chamber, you'll see that there are three vats of red liquid and two locked sarcophagi. You're met with no resistance at first, but as soon as you grab the Red Oil from the top vat, two Vampiric Illithids make their entrance from the sarcophagi. Kill the deadly beasts for 14,000 experience points each, then make your way back to the machine level through the stairs at area #10.
16 - Githyanki Welcoming
A Githyanki Knight, Warrior, and Anti-Paladin attack your party when you arrive in their domain. Once all three guards are dead, search the three chests in the room to find some more magical ammunition, a few potions, a
Wand of the Heavens, an
Adventurer's Robe, and the Flint and Tinder needed to start the torches up at area #6.
17 - More Githyanki
Four more Githyanki guards try to stop you from making it further into their domain. After they've been dealt with, search the room's two containers to find more magical ammunition, a
Wand of Spell Striking, and another note revealing a combination for the machine of Lum the Mad.
18 - Yet More Githyanki
A half dozen more Githyanki line up for the slaughter in this room. Give them what they want, then search the room's two containers to find more
Arrows +3 and a minor scroll.
19 - Githyanki Captain
The Githyanki Captain leads a large number of Githyanki Warriors in this chamber, so make sure you're prepared if any of the other battles on this level gave you trouble. When they've all been slain, search the Captain's corpse to find the
Angurvadal +4 long sword and a note from the diary of Carston's apprentice explaining how to destroy Carston's glass housing. You'll also want to peek into the dragon's maw to find Montolio's Clasp (used to forge
Montolio's Cloak at Cespenar's Forge) and then grab the Purple Oil from the nearby pool.
At this point, you should have everything you need to progress to the next level of Watcher's Keep. However, if you're up for a couple more difficult (and rewarding!) battles, head through the west and south gates of this chamber.
20 - Exit to Demi-Lich
This door leads down into the Demi-Lich lair at area #22.
21 - Exit to Dragon
This door leads down into Saladrex's lair at area #23.
22 - Demi-Lich
If you've fought Kangaxx already, then you know how difficult a Demi-Lich can be. This creature uses Imprisonment almost exclusively, so use summoned creatures to absorb his spells or make sure you have a Freedom spell or scroll available before you enter this chamber. If you're having trouble with the Demi-Lich, please refer to the Kangaxx page of our
Strategy Guides section.
The Demi-Lich is worth 55,000 experience points and drops both the
Dagger of the Star +4 and over 20,000 gold pieces. In addition, a few gems, more gold, and a Summon Nishru scroll can be looted from the Demi-Lich's tomb.
23 - Saladrex
A great Red Dragon by the name of Saladrex makes it lair here. If you appease Saladrex by referring to him as "Great One" and other flattering names, the dragon will not attack your party and you can leave unharmed. Keeping in mind that you're in Watcher's Keep in search of adventure and treasure, though, why would you want to do that?
Saladrex packs a serious punch in battle, so make sure you're well prepared before you enter combat with him. Between his spellcasting ability, wing buffets, and breath weapon, you'll most likely end up with a couple of dead party members. If you have trouble beating him, though, you can always refer to our
Strategy Guides section for help. Killing the dragon will earn you 64,000 experience points, a
Staff of the Ram +4, a
Rogue Stone, scrolls of Mantle and Minor Spell Turning, and 1500 gold pieces.


