 Did we miss anything on this map? Is there something we didn't discover? Let us know!
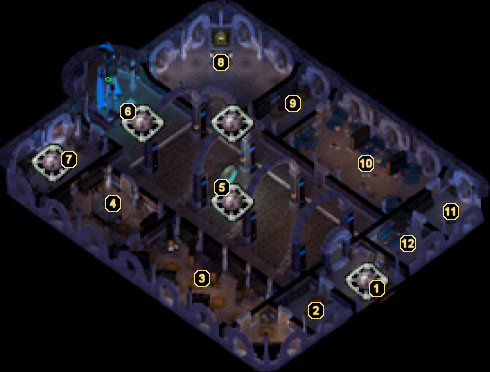
1 - Arrival
Did we miss anything on this map? Is there something we didn't discover? Let us know!
1 - Arrival
Your entrance into Watcher's Keep won't be met with any resistance, so feel free to take a moment to rest up and cast any defensive spells that you'd like. My suggestion is to take the lower left door first. This allows you to fight some of the other monsters on this floor before dealing with the level draining undead in the central chamber.
2 - The Archivist
Here you encounter the ghost of the Archivist. If you strike up a conversation with him, he'll only complain about the cold. Listen to him for a bit, then scour the room to find some
Paladin Bracers, a
Wand of Sleep, and lots of ranged ammo.
3 - Golem Manual
A group of creatures will confront your party in this area, although what you actually face appears to be random. After the fight, search the shelves and chest in the room for several important items, including the
Golem Manual, twenty
Darts of Wounding, notes on how to perform the ritual needed to leave this floor, and a book that tells of some of the new monsters you'll encounter and how to defeat them.
4 - Imprisoned One Statue
This room offers the first glimpse of the "Imprisoned One" in the form of an encased statue, although it's pretty tough to get a good idea of what the creature is unless you're a serious Dungeons & Dragons buff... Once you're finished peering into the glass, search the shelves and chest in the room to find a
Case of Plenty +1, a
Crimson Dart +3, ten
Bullets +3, some
Chain Mail +2, and the bell needed for the ritual at area #11.
Before continuing on to the next room, read the inscription near the symbol of Helm for some helpful information about the archivist and how he tended to the area.
5 - Portal Hall
This room is a long hall with an altar at the back. It connects to area #1 (the exit/entrance) and several chambers off to each side. Awaiting your arrival is a group of Vampire Wraiths (along with a Poison Mist and a Wandering Horror), so you'll want to be prepared with some Negative Plane Protection or have a Restoration spell or two at your disposal. A good tactic is to fight them in the door with only a couple of your party members or summoned creatures so the possibility of level drain is isolated to as few members as possible.
If you've completed the ceremony at area #6, then you will have to battle the statues sorrounding the portal in the center of the room. The spellcaster statue is capable of casting Time Stop, so be prepared for the worst. After all remaining statues have been destroyed, search their remains to find
Usuno's Blade +4,
Foebane +3, a
Dagger +3, a
Bastard Sword +2, a
Large Shield +2, a
Long Bow +3, and a handful of magic arrows, then head through the portal to
the second floor of Watcher's Keep.
6 - Ritual Altar
This area contains a large statue overlooking an altar. A ritual involving the bell at area #4, the candle at area #7, and the book already placed on the altar must be performed in order to activate the portal at area #5. As soon as you remove or place any items on the altar, though, the four statues surrounding it will come to life and you'll be forced into a fairly difficult battle. Watch the dwarven caster especially, as he will cast an extremely potent Creeping Doom spell. Once the four statues have been dealt with, you are free to place all three items on the altar, which will trigger a dialogue session allowing you to perform the ritual. If you've completed all other areas of this level (specifically area #8), then you probably already know how to complete the ritual. For the sake of ease, though, hear are the steps:
- Ring the bell
- Ring the bell a second time
- Light the candle
- Open the book
- Ring the bell a final time
At this point, you will receive 25,000 experience points, the portal at area #5 will activate, and the remaining statues will awaken and attack your party. Refer to area #5 for more information.
7 - Giltham's Chamber
Mustard Jelly supreme! The jellies cannot leave the room, so you may want to just stand outside the door and Fire Arrows inside. Even if you decide to rush them, the fight shouldn't prove to be very difficult. Search the strongbox along the left wall to find the candle needed for the ritual at area #6, twenty
Arrows +3, twenty
Bolts +3, and
Bullets +2. You can also grab a
Wand of the Heavens and twenty more
Bullets +2 in the cabinets near the door.
If you have the Tinderbox from area #8, start the ancient fireplace along the left wall. The ghost of the Giltham the Archivist will arrive from area #2 to express his gratitude (and provide some helpful information about the temple priest and his favorite slippers) and you'll receive 4000 experience points.
8 - Priest of Helm Tomb
In order to enter this chamber, you must first grab the key at area #12. Once you're able to unlock the door, head inside to find a tomb guarded by a pair of Guardian Golems. If you have the Wardstones from areas #10 and #11, then the golems will leave your party alone. If you have the slippers from area #9, equip them and then click on the tomb a couple of times to awaken the priest. If you hand over the slippers to the priest, you'll receive 20,000 experience points and he will not be hostile toward you. In fact, he'll even let you search his sarcophagus. Click on the tomb one more time and you'll be given the specifics for the ritual at area #6 along with 8000 more experience points.
9 - Slippers, Tinderbox, and More
There are four different searchable areas in this room, two of which are locked. The bookshelf contains a pair of Old Slippers, the table contains a Scribbled Note with a hint to light the fires in the kitchen and a couple
Potions of Superior Healing, the locked (and trapped!) cabinet contains a
Quiver of Plenty +1 and a clue for Lum's machine on
the fourth floor of Watcher's Keep, and the locked alcove in the wall contains an
Ammo Belt and the Tinderbox needed for area #7.
10 - Small Library
Devil and Shadow Fiends confront your party in this area, and they're capable of level draining, so you'll want to use similar tactics as you did at area #5. Once their finished off, loot the Wardstone from one of the bookshelves.
11 - Side Chamber
Search the cabinet near the entrance to this chamber to find the second Wardstone and a
Small Shield +2. You can also find a clue about the ritual specifics at area #6 in the shelf between the two doors.
12 - Bedroom
A single Spellwraith awaits you in this bedroom. Destroy the ghastly creature, then ransack the room to find a key to area #8 and another clue for Lum's machine on
the fourth floor of Watcher's Keep.


