Did we miss anything during this quest? Is there something we didn't discover? Let us know!
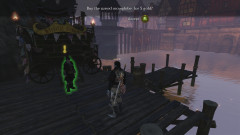
With the See The Future DLC installed, check your journal to discover that you should speak to Murgo about "the curse that afflicts the small village within the snowglobe". As with the Knothole Island DLC, you'll begin this quest along the docks below the main bridge in Bowerstone Market.
Mystical Murgo is busy peddling his goods, so just approach him to hear about the cursed snowglobe he has for sale. As he explains, for a measly sum of 5 gold pieces you can purchase the item and begin a new quest to release the miniature village inside from its torment. Murgo even mentions that, should you buy the item, he'll let you "cast your eyes" on his very best items. He then gives you a taste of what he has on offer by handing you a
Welley's Soldier Helmet, a
Murgo "Pay Me" Model, a
Braided Ponytail hairstyle, a
Psycho Jester Makeup card, a
Traders' Game book, and a
Dog Tricks! The Backflip book. Those last two will help you earn a couple of achievements without owning the Fable II Pub Games XBLA title, so they're welcome additions.
Once the
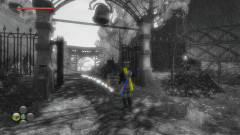
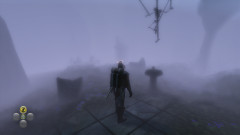
Cursed Snowglobe is in your possession, use it to be whisked inside the device. The first thing you'll notice is that the village and its surrounding flora are grey and dull, though certain things - your weapons, dog, and doors, for example - seem to retain a highly accentuated color here.
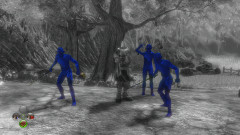
Run up ahead a little ways and you'll discover three "blue shadows" harassing a villager. Take them out, then listen to the man's story about how these "things" sucked all the color out of the world. He asks you to rescue the other villagers before handing you the
Oast House Door Key.
Before going anywhere, pay a visit to the tree ahead of you and pop open the chest at its base for an
Infused Will Potion. Another chest behind the house to your right contains a
Tart Bodice, a
Lover's Plume, a
Tart Skirt, some
Tart Boots, and a
Mood Ring. The path to the left of the tree takes you to a third chest containing the
Dog Tricks! The Bunny Hop book. Unfortunately, the chest inside the windmill can't be opened... yet.
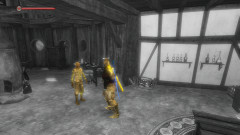
Double back to the first house you saw upon your arrival (the one with the blue door) and use the villager's key to gain entrance. Three more blue shadows are harassing the villager inside, so make short work of them and then watch as the villager releases a "butterfly" (a floating target, to you) from his cabinet. Prior to striking it with a melee attack, go upstairs and open the chest there for four
Condoms and the
Wedding Bells book.
The floating target is going to take you around the village, so just keep hitting it and following it as it makes its rounds. When it reaches the previously inaccessible blue gate, a half dozen blue shadows will ambush you. Kill them, then strike the floating target one last time to open the gate.
Take a moment to browse the town. Looks like a non-ruined version of the drowned farm in Wraithmarsh, doesn't it? Hmm. For now, head down into the well just off to the right when you reach the town center. Keep an eye out for a side path in this first stony hallway, as you'll run into the
Murgo "Chicken" Model trophy not far ahead.
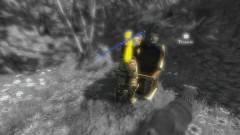
Continue on until you reach the large room at the end of the cave. Here, you'll discover another villager being drained of color by - wait for it - yellow shadows. And, as you may have guessed, these versions carry rifles rather than swords. Blast them from a distance with your own firearm and the villager will open a gate to release a floating yellow target. Blue shadows will then stream into the room through the gate up the ramp to your right.
Slay all of the colored little fiends, then start firing at and following the yellow target. In the water-filled chamber, you'll be forced to take a dive to reach a hallway elsewhere in the dungeon. Another shot at the target will lead you into a chamber filled with suits of armor. From here, head into the side chamber to your left and kill the three blue shadows that spawn amid the huddled armor suits, then pick up
Archie Loggy's Diary and return to the first armor-filled chamber.
A pair of blue shadows assault you as you fire at the target again, though these will be the last you'll have to deal with here in the well. A few more shots at the target will actually send it back up the ladder at the entrance, so follow it back up to the Snowglobe village. Two shots later and you're past the previously inaccessible yellow gate at the town center.
Prior to running off and continuing your adventure, stop by the tree in front of the Shadow Court to your right. A dig spot here will earn you a
Theresa Doll, if you didn't already have one. Further ahead, in the stable, lies a chest containing a
Toy Horse,
Pure Chocolate, and
Crucible Peanuts. You can also head back to the graveyard behind the houses to your right. A dig spot here will net you a
Collar of Brooding,
Thigh Boots, and a
Condom, and then you can utilize the dive spot under the nearby bridge to reach the
Murgo "Dismissive" Model on a low cliff.
Vault off the cliff to confront three red shadows harassing a female villager. This flavor of shadow will hit you with Will attacks, and you'll be forced to use some of your own in order to take them down. When she's safe, the villager (who you'll soon learn is the school mistress) tells you that the children all ran away and that you must find them. There are a total of five children that you need to save, but you might as well grab the
Resurrection Phial from the chest just up the sloped pathway before you start your little babysitting stint.
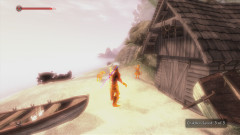
The children are all located around the town center you visited just a bit ago. Each one is being accosted by a single red shadow, so make a round through the homes and along the beach to wipe out all five enemies. When you're finished, you're told to return to the school mistress - but don't go just yet. Explore the left section of beach and you'll discover the
Murgo "Dancing" Model not far from a statue upon the rocks. Free to return to the school mistress, you learn that the children want to present you with a gift, so the teacher gives you
A Red Seal, which is supposedly "the key to this town's secrets".
With the seal in hand, you can now enter the previously inaccessible Shadow Court. Immediately after entering, smash through the cracked wall to your right to reach a hidden area with a book called
The Grumpy Rabbit available for the taking. Leaving this room, walk down the stairs up ahead and smash through a second cracked wall to your right to earn the
Murgo "Begging" Model, too.
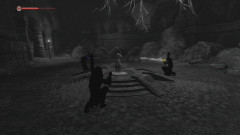
Moving to the next room, you'll be confronted by a red and a blue shadow when you try to pass through the door to your right. Defend yourself, then take the stairs beyond the door up to a circular chamber where three more blue shadows attempt to give you a case of death. Make quick work of them, then go down the next flight of stairs to deal with three yellow shadows with your ranged weapon of choice. The next circular room with a tree at its center is home to three red shadows, so you'll need to prepare for battle once more. th those waves of shadows taken care of, you're now free to loot the chest in the hallway beyond the tree room for a
Cure-All Health Potion and two
Dog Treats.
Beyond the chest lies the final chamber, where you'll confront three black (and invulnerable) shadow cultists. Before you can interrupt their little ceremony, though, you need to contend with two blue, two red, and two yellow shadows. After that, all three cultists become vulnerable to your melee, ranged, and will attacks, so finish them off once and for all. The villager at the center of their wicked magic thanks you for saving her, after which you'll be instantly teleported to the snowglobe village center and color will stream back into the world.
With the curse lifted, the ghosts of the villagers are also freed and you receive 150 renown points for completing the quest. You're now to return to Murgo in order to move on to
The Costume Party quest. Feel free to poke around the village and open the chests that were sealed until the color was restored before leaving, though. There are several items that you can loot as a result (
Performer's Blue Dye,
Regal Purple Dye,
Well Red Dye,
Cursed Grey Dye,
Jaunty Jaundice Dye, and the
Commemorative Mug with the help of the
Ashfield House Key).
Additionally, you can loot
Chesty's Tea Party Invitation from the chest on the beach (with the help of three separate floating targets). This will get you into Myrtle Cottage, where you can hop into something called the Mirror Mist. Within these foggy ruins, you can loot a
Gory Glory Red Dye on a pedestal below the hanging skeleton.