 Did we miss anything in this section? Is there something we didn't discover?
Let us know!
Background
Did we miss anything in this section? Is there something we didn't discover?
Let us know!
Background
You'll trigger this quest when you return to Whiterun at the end of the quest
Purity of Revenge.
Walkthrough
When you head over to Jorrvaskr, you'll discover that the Companions have set up a pyre for Kodlak at the Skyforge, and that they're ready to start his funeral rite. "We grieve. We weep. We shout. We take our leave." Afterwards, Eorlund Gray-Mane will come up to you and accept the
Fragments of Wuuthrad (that you retrieved from the Silver Hand in the previous quest), and he'll ask you to go to Kodlak's room in Jorrvaskr and pick up the final fragment, which Kodlak kept in the nightstand in his room (along with his journal, which you might find interesting to read). When you deliver the fragment to Eorlund, he'll let you know that the other Companions are waiting for you at the Underforge.
At the Underforge, you'll find out (if you didn't know already) that Kodlak considered lycanthropy to be a curse, and that he wanted his soul to be "clean" so he could enter Sovngarde. Eorlund will then show up with the repaired Wuuthrad, and you'll learn that it can be used as a key to enter Ysgramor's Tomb, where a special rite can be performed (using the
Glenmoril Witch Heads that you picked up during the quest
Blood's Honor) to cure Kodlak, even in death.
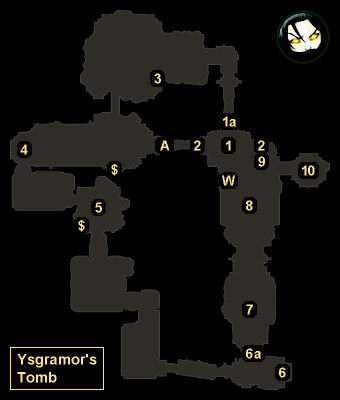
You'll find Ysgramor's Tomb located far to the north near Winterhold. Inside, you'll meet up with the other main Companions, who will be waiting for you at a statue of Ysgramor (#1). To progress farther into the tomb, you'll need to place Wuuthrad on the statue (by activating it). This will cause the door to the north (#1a) to open. Aela and Farkas will then begin following you, but Vilkas will stay behind.
Note: After using Wuuthrad to open the door, you can take it for yourself.
As you make your way through the tomb, you'll face off against Companion Ghosts, who will want to test you to see if you're worthy of meeting Kodlak. You'll also encounter some spiders (#5) and skeevers but no draugr. About halfway through (#4), Farkas will stop following you, and so you'll have to defeat the ghosts with only Aela helping you out.
At the end of the tomb, you'll meet Kodlak's ghost in the burial chamber (#8). Kodlak will tell you that to cure him, you'll need to throw a
Glenmoril Witch Head into the nearby Flame of the Harbinger. When you do, Kodlak's wolf spirit will leave his body and attack you. You and Aela will then need to defeat it. Afterwards, when you talk to Kodlak again, he'll name you the new Harbinger of the Companions, and he'll leave for Sovngarde.
Note: If you don't want to stay a werewolf, then you'll need to throw a second
Glenmoril Witch Head into the flames. But upon doing so, you'll have to defeat your own spirit wolf.
Another Note: The Companions in the tomb will eventually return to Jorrvaskr, but the hike might take them a while. When they do get back, you'll be able to accept more random quests from them, including some new ones.
A Third Note: After being named Harbinger, you'll gain ownership of Kodlak's room in the Jorrvaskr Living Quarters.
1 - Statue / Door (Upper Level)
When you place Wuuthrad on the statue (#1), the door to the north (#1a) will open.
2 - Doors (Upper Level)
These doors won't open until you've cured Kodlak (#8).
3 - Dragon Priest Dagger
You'll find the
Dragon Priest Dagger sitting on the counter here.
4 - Farkas' Stopping Point
5 - Giant Frostbite Spider
6 - Handle / Gate
When you activate the handle (#4), the nearby gate (#4a) will open.
7 - Altar
On the altar here you'll find the book
The Legendary Sancre Tor, which will increase your Two-Handed skill by 1.
8 - Kodlak / Burial Chamber (Lower Level)
9 - Chest (Lower Level)
Inside this chest you'll find the
Shield of Ysgramor and more.
10 - Staircase
This staircase will allow you to move between the upper and lower levels of the tomb, but you'll only be able to reach it after meeting with Kodlak (#8).
Exits:
- Back exit from the tomb. You'll only be able to reach this exit after meeting with Kodlak (#6). If you go through this exit and follow the steps to the top of the mountain, then you'll find a word wall for "animal, animal allegiance." You'll also find a gold ore vein near the word wall.
- World exit.


