 Did we miss anything in this section? Is there something we didn't discover?
Let us know!
Walkthrough
Did we miss anything in this section? Is there something we didn't discover?
Let us know!
Walkthrough
For this quest you'll need to track down an
Elder Scroll. If you've done any work for the College of Winterhold, then you might recognize that the college is a good place to start looking. Otherwise you'll need to talk to Arngeir (inside High Hrothgar) or Esbern (inside or outside Sky Haven Temple) to get a nudge in the right direction.
At the College of Winterhold, you need to talk to Urag gro-Shub inside the Arcanaeum. He'll fetch you two books:
Effects of the Elder Scrolls and
Ruminations on the Elder Scrolls. Reading the second book will trigger the quest
Discerning the Transmundane, and when you ask Urag about the book's author, he'll direct you to Septimus Signus's Outpost, located north of the college.
Note: If you've already completed the quest
Discerning the Transmundane, and if you picked up the
Elder Scroll during the process, then you won't actually have to do anything for this quest. You'll immediately move on to
Alduin's Bane.
Inside Septimus Signus's Outpost, you'll meet the half-crazy mage Septimus Signus. He'll reveal that the Elder Scroll can be found in the caverns of Blackreach. He'll then ask you to make a copy of the
Elder Scroll, and he'll give you an
Attunement Sphere and a
Blank Lexicon to help you out. However, assisting Septimus is a part of the quest
Discerning the Transmundane. All you'll need to do for this quest is fetch the
Elder Scroll.
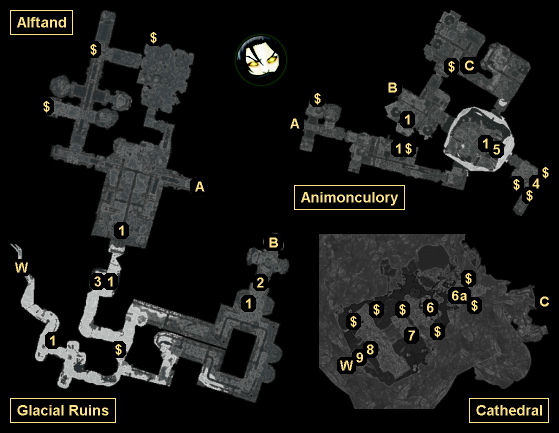
Blackreach is located underneath Alftand, which you'll discover in the mountains to the southwest of the Septimus Signus's Outpost. To descend into Blackreach, you'll have to travel through Alftand's Glacial Ruins, Animonculory, and Cathedral, fighting automatons (including a centurion at #7) and falmer along the way. In the back of the Cathedral you'll find a dwarven mechanism (#8), and when you activate it using the
Attunement Sphere, it will create a staircase leading down to Blackreach.
Note: You can also reach Blackreach by descending to the bottom of Raldbthar or Mzinchaleft, and using the
Attunement Sphere to open the dwarven mechanisms that you'll find there.
Blackreach (not shown) is a huge underground cavern. When you get there, you'll need to follow the path to the southwest, which will lead you to the Tower of Mzark. Inside the tower, you'll discover a large dwarven contraption containing the
Elder Scroll. However, the
Elder Scroll will be out of reach.
On the ledge overlooking the contraption, you'll find a control station with four buttons and a receptacle. To power up the contraption, you'll need to insert the
Blank Lexicon into the receptacle. Then to copy the
Elder Scroll, you'll need to push the buttons in the right way. The two buttons on the right will rotate the sphere at the base of the contraption backwards and forwards between six positions. When the sphere is in the right place, the lexicon will open up and glow blue, and the second button on the left will become active. Pressing that button twice will cause light to be reflected onto the sphere, and also cause the first button on the left to become active. Pressing the first button will copy the
Elder Scroll into the lexicon, and cause the
Elder Scroll to be lowered to a level where you can reach it. Taking the
Elder Scroll will complete the quest.
Note: Near the entrance to Blackreach, you'll discover Sinderion's Field Laboratory. Inside the laboratory, you'll find the book
De Rerum Dirennis (in between the alchemy lab and the arcane enchanter), which will increase your Alchemy skill by 1. You'll also find a
Crimson Nirnroot (in the same place). When you harvest it, you'll trigger the quest
A Return to Your Roots.
Another Note: Inside the Tower of Mzark, you'll find the book
The Armorer's Challenge (on a counter), which will increase your Smithing skill by 1.
1 - Journals and Corpses
In several places in the ruins, you'll find journals and corpses from the ill-fated expedition that preceded you into the ruins. These are mostly just for background information, but the corpses might prove useful for the quest
Discerning the Transmundane.
2 - Barred Gate
You'll only be able to open this gate by pulling the lever on the northern side -- that is, on your way out of the Animonculory (via Exit B).
3 - J'darr
You'll find J'darr here talking to himself about
Skooma. He'll attack you on sight.
4 - Book
On the ground here next to a skeleton you'll find the book
The Locked Room, which will increase your Lockpicking skill by 1.
5 - Ledge
To proceed deeper into the ruins, you'll need to jump down from the ledge here.
6 - Barred Gate / Lever
To open this gate (#6), you'll need to pull the lever on the ledge above it (#6a).
7 - Dwarven Centurion
When the centurion dies, it will drop the
Key to Alftand Lift, which will unlock the "master" gate leading to the exit elevator (Exit W).
8 - Dwarven Mechanism / Exit to Blackreach
9 - Sulla and Umana
Sulla and Umana will be fighting each other when you come upon them, but then they'll switch to you when they spot you. Umana will drop the
Targe of the Blooded when she dies.
Exits:
- Doorway between the Glacial Ruins and the Animonculory.
- Elevator between the Glacial Ruins and the Animonculory.
- Doorway between the Animonculory and the Cathedral. This exit is on the lowest level of the Animonculory.
- World exit.


