 Did we miss anything in this section? Is there something we didn't discover?
Let us know!
Background
Did we miss anything in this section? Is there something we didn't discover?
Let us know!
Background
There are two ways to trigger this quest. You can get it by talking to Septimus Signus inside Septimus Signus's Outpost, which is located north of the College of Winterhold, or you can get it during the main quest
Elder Knowledge, when you visit the College of Winterhold and ask Urag gro-Shub where you can find an
Elder Scroll. Urag will direct you to Septimus Signus, so either way the quest will basically start inside Septimus Signus's Outpost.
Note: You'll need to be at least level 15 to complete this quest.
Walkthrough
When you talk to Septimus Signus, you'll discover that he's more insane than not, and that he's obsessed with the dwarven "lockbox" in the outpost with him. During your conversation with him, Septimus will give you an
Attunement Sphere and a
Blank Lexicon, and he'll ask you to travel to Blackreach and transcribe an
Elder Scroll onto the lexicon. This will allow Septimus to read the scroll and gain enough knowledge to open the lockbox.
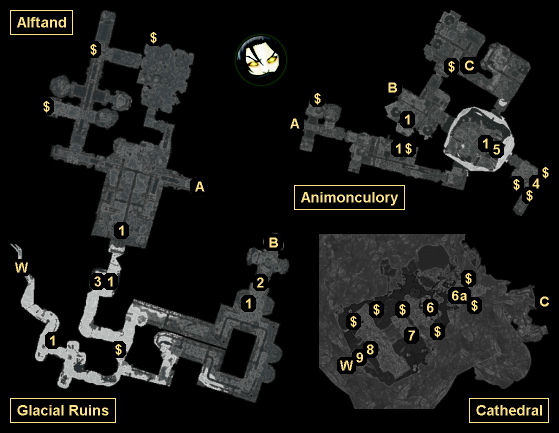
Blackreach is located underneath Alftand, which you'll discover in the mountains to the southwest of the Septimus Signus's Outpost. To descend into Blackreach, you'll have to travel through Alftand's Glacial Ruins, Animonculory, and Cathedral, fighting automatons (including a centurion at #7) and falmer along the way. In the back of the Cathedral you'll find a dwarven mechanism (#8), and when you activate it using the
Attunement Sphere, it will create a staircase leading down to Blackreach.
Note: You can also reach Blackreach by descending to the bottom of Raldbthar or Mzinchaleft, and using the
Attunement Sphere to open the dwarven mechanisms that you'll find down there as well.
Blackreach (not shown) is a huge underground cavern. When you get there, you'll need to follow the path to the southwest, which will lead you to the Tower of Mzark. Inside the tower, you'll discover a large dwarven contraption containing the
Elder Scroll. However, the
Elder Scroll will be out of reach.
On the ledge overlooking the contraption, you'll find a control station with four buttons and a receptacle. To power up the contraption, you'll need to insert the
Blank Lexicon into the receptacle. Then to copy the
Elder Scroll, you'll need to push the buttons in the right way. The two buttons on the right will rotate the sphere at the base of the contraption backwards and forwards between six positions. When the sphere is in the right place, the lexicon will open up and glow blue, and the second button on the left will become active. Pressing that button twice will cause light to be reflected onto the sphere, and also cause the first button on the left to become active. Pressing the first button will copy the
Elder Scroll into the lexicon, and cause the
Elder Scroll to be lowered to a level where you can reach it. You'll need to take the
Elder Scroll for the quest
Elder Knowledge. You'll need to take the (now)
Runed Lexicon to complete the main objective for this quest.
Note: Near the entrance to Blackreach, you'll discover Sinderion's Field Laboratory. Inside the laboratory, you'll find the book
De Rerum Dirennis (in between the alchemy lab and the arcane enchanter), which will increase your Alchemy skill by 1. You'll also find a
Crimson Nirnroot (in the same place). When you harvest it, you'll trigger the quest
A Return to Your Roots.
Another Note: Inside the Tower of Mzark, you'll find the book
The Armorer's Challenge (on a counter), which will increase your Smithing skill by 1.
When you deliver the
Runed Lexicon to Septimus Signus in his outpost, he'll figure out that he needs samples of blood to "trick" the lockbox door into opening. He'll then give you an
Essence Extractor and task you with obtaining dark elf blood, falmer blood, high elf blood, orc blood, and wood elf blood. All of these types of blood except dark elf blood can be found in Alftand / Blackreach from the permanent corpses of the ill-fated expedition party (#1), along with one falmer (which will respawn eventually if you killed them all). You can acquire dark elf blood (plus some other samples) in Silverdrift Lair, which is located in between Alftand and the Tower of Mzark on the world map. Another good source for blood is Liar's Retreat, which is located in between Markarth and Solitude.
On your way out of the outpost, you'll run into a Wretched Abyss, aka the daedra Hermaeus Mora. Mora will tell you that you've impressed him while Septimus hasn't, and that you might make a better emissary for him. He'll then invite you to speak with him again once you've helped Septimus to open the lockbox.
When you eventually return to Septimus with the blood samples, he'll mix them together and use the result to open the lockbox. Inside he'll find the book
Oghma Infinium, but when he touches it he'll get zapped and turned to ash. You'll then need to take the book yourself to update the quest. Nothing bad will happen to you when you touch it.
When you leave the lockbox, you'll meet Hermaeus Mora again. He'll allow you to keep and use the book. Then when you read the book (and turn the page), you'll get to choose one of three paths: The Path of Magic (+5 to Alteration, Conjuration, Destruction, Illusion, and Restoration), The Path of Might (+5 to Archery, Block, Heavy Armor, One-Handed, Smithing, and Two-Handed), or The Path of Shadow (+5 to Alchemy, Light Armor, Lockpicking, Pickpocket, Sneak, and Speech).
Note: The quest will turn out the same no matter what you say to Hermaeus Mora.
1 - Journals and Corpses
In several places in the ruins, you'll find journals and corpses from the ill-fated expedition that preceded you into the ruins. These are mostly just for background information, but the corpses might eventually prove useful for this quest.
2 - Barred Gate
You'll only be able to open this gate by pulling the lever on the northern side -- that is, on your way out of the Animonculory (via Exit B).
3 - J'darr
You'll find J'darr here talking to himself about
Skooma. He'll attack you on sight.
4 - Book
On the ground here next to a skeleton you'll find the book
The Locked Room, which will increase your Lockpicking skill by 1.
5 - Ledge
To proceed deeper into the ruins, you'll need to jump down from the ledge here.
6 - Barred Gate / Lever
To open this gate (#6), you'll need to pull the lever on the ledge above it (#6a).
7 - Dwarven Centurion
When the centurion dies, it will drop the
Key to Alftand Lift, which will unlock the "master" gate leading to the exit elevator (Exit W).
8 - Dwarven Mechanism / Exit to Blackreach
9 - Sulla and Umana
Sulla and Umana will be fighting each other when you come upon them, but then they'll switch to you when they spot you. Umana will drop the
Targe of the Blooded when she dies.
Exits:
- Doorway between the Glacial Ruins and the Animonculory.
- Elevator between the Glacial Ruins and the Animonculory.
- Doorway between the Animonculory and the Cathedral. This exit is on the lowest level of the Animonculory.
- World exit.


