|
|
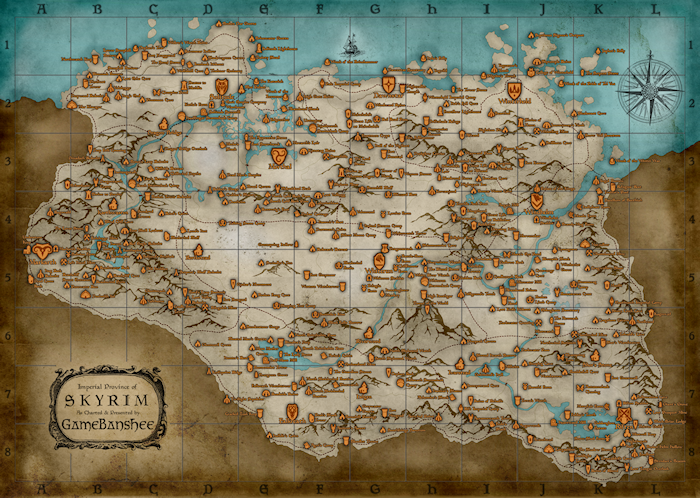
The Province of Skyrim and its Notable Locations
Welcome to GameBanshee's annotated map of the province of Skyrim, the land mass countless adventurers will be exploring during The Elder Scrolls V. Not only have we prepared a glorious high resolution PNG version of the map for your downloading pleasure, but we've also created a nine-page PDF that's set up to print a 3x3 poster-size version of the map for your wall. Click the thumbnail below for the full 9.34MB version of the map, then refer to the list of locations below if you're looking for a specific landmark.
Locations A-G
Abandoned Prison [I5]
Abandoned Shack [E2]
Agni's Camp [F8]
Alchemist's Shack [H7]
Alftand [I3]
Ancient's Ascent [F8]
Angarvunde [I8]
Anga's Mill [I4]
Anise's Cabin [F6]
Ansilvund [L6]
Arcwind Point [H7]
Autumnshade Clearing [K7]
Autumnwatch Tower [I7]
Avanchnzel [J8]
Bannermist Tower [E7]
Bard's Leap Summit [D5]
Battle-Born Farm [G5]
Bilegulch Mine [D6]
Black-Briar Lodge [L7]
Bleak Falls Barrow [F6]
Bleakcoast Cave [K2]
Bleakwind Basin [F5]
Bleakwind Bluff [C4]
Blind Cliff Cave [B4]
Blizzard Rest [G4]
Bloated Man's Grotto [E6]
Bloodlet Throne [F8]
Blue Palace [E2]
Bonechill Passage [F7]
Bonestrewn Crest [J5]
Boulderfall Cave [J7]
Brandy-Mug Farm [J4]
Brinewater Grotto [E1]
Broken Fang Cave [E5]
Broken Helm Hollow [L8]
Broken Limb Camp [J5]
Broken Oar Grotto [D1]
Broken Tower Redoubt [C4]
Bronze Water Cave [I4]
Brood Cavern [E3]
Bruca's Leap Redoubt [B3]
Bthardamz [A3]
Chillfurrow Farm [G5]
Chillwind Depths [C3]
Clearpine Pond [C2]
Clearspring Tarn [J6]
Cliffside Retreat [C3]
College of Winterhold [J1]
Crabber's Shanty [D4]
Cracked Tusk Keep [E7]
Cradle Stone Tower [C5]
Cradlecrush Rock [I5]
Cragslane Cavern [K6]
Cragwallow Slope [K5]
Cronvangr Cave [J5]
Crystaldrift Cave [K8]
Dainty Sload [E1]
Darklight Tower [J8]
Darkshade [I5]
Darkwater Crossing [J6]
Darkwater Pass [I6]
Dawnstar [G2]
Dawnstar Sanctuary [G1]
Dead Crone Rock [A5]
Dead Man's Respite [D3]
Deep Folk Crossing [B3]
Deepwood Redoubt [B2]
Dragon Bridge [C2]
Dragon Bridge Overlook [C3]
Dragonsreach [G4]
Dragontooth Crater [B3]
Drelas' Cottage [F4]
Driftshade Refuge [H2]
Druadach Redoubt [B3]
Dushnikh Yal [B5]
Duskglow Crevice [H3]
Dustman's Cairn [F4]
East Empire Company Warehouse [D2]
Eastmarch Imperial Camp [K5]
Eldergleam Sanctuary [J6]
Eldersblood Peak [E3]
Embershard Mine [F6]
Evergreen Grove [E7]
Faldar's Tooth [J7]
Falkreath [E7]
Falkreath Stormcloak Camp [G7]
Falkreath Watchtower [E7]
Fallowstone Cave [L7]
Fellglow Keep [H4]
Folgunthur [E2]
Forelhost [L8]
Forsaken Cave [I3]
Fort Amol [I5]
Fort Dustand [G3]
Fort Fellhammer [G3]
Fort Greenwall [K7]
Fort Greymoor [F5]
Fort Hraggstad [C1]
Fort Kastav [J3]
Fort Neugrad [G7]
Fort Snowhawk [E3]
Fort Sungard [D5]
Four Skull Lookout [B4]
Froki's Shack [I8]
Frostflow Lighthouse [H2]
Frostmere Crypt [G3]
Gallows Rock [I5]
Geirmund's Hall [I7]
Giant's Grove [L7]
Gjukar's Monument [D5]
Glenmoril Coven [D6]
Gloombound Mine [K5]
Gloomreach [C5]
Goldenglow Estate [K8]
Graywinter Watch [H5]
Great Lift at Alftand [I3]
Great Lift at Mzinchaleft [F2]
Great Lift at Raldbthar [I4]
Greywater Grotto [G7]
Guldun Rock [H5]
|
Locations H-R
Haalfingar Stormcloak Camp [C2]
Haemar's Shame [H7]
Hag Rock Redoubt [A5]
Hag's End [B2]
Half-Moon Mill [E6]
Hall of the Vigilant [G3]
Halldir's Cairn [E8]
Halted Stream Camp [G4]
Hamvir's Rest [F4]
Harmugstalh [B3]
Heartwood Mill [J7]
Hela's Folly [H1]
Helgen [G7]
High Gate Ruins [F2]
High Hrothgar [H5]
Hillgrund's Tomb [H5]
Hjaalmarch Stormcloak Camp [F2]
Hlaalu Farm [J4]
Hob's Fall Cave [H2]
Hollyfrost Farm [K4]
Honeystrand Cave [I7]
Honningbrew Meadery [G5]
Hunter's Rest [E6]
Ilinalta's Deep [E6]
Irkngthand [I4]
Ironback Hideout [D1]
Ironbind Barrow [H3]
Ivarstead [H7]
Japhet's Folly [K1]
Journeyman's Nook [J2]
Kagrenzel [L6]
Karthspire [B5]
Karthspire Camp [B5]
Karthwasten [B4]
Katla's Farm [D2]
Kjenstag Ruins [F3]
Knifepoint Ridge [D7]
Kolskeggr Mine [B4]
Korvanjund [H4]
Kynesgrove [J5]
Labyrinthian [F4]
Largashbur [J8]
Left Hand Mine [A5]
Liar's Retreat [C3]
Loreius Farm [G4]
Lost Echo Cave [B2]
Lost Knife Hideout [I6]
Lost Prospect Mine [L7]
Lost Tongue Overlook [K8]
Lost Valkygg [F4]
Lost Valley Redoubt [D5]
Lower Steepfall Burrow [B1]
Lund's Hut [D4]
Mara's Eye Pond [I5]
Markarth [A4]
Markarth Stables [A4]
Meeko's Shack [D3]
Merryfair Farm [K7]
Mistveil Keep [K8]
Mistwatch [J6]
Mixwater Mill [I5]
Mor Khazgur [B2]
Morthal [E3]
Morvunskar [I4]
Moss Mother Cavern [E6]
Mount Anthor [I3]
Movarth's Lair [E3]
Mzinchaleft [F2]
Mzulft [K5]
Narzulbur [K4]
Nightcaller Temple [G2]
Nightgate Inn [H3]
Nightingale Hall [K8]
Nilheim [I7]
North Brittleshni Pass [E6]
North Cold Rock Pass [E4]
North Shriekwind Bastion [F7]
North Skybound Watch [G6]
Northwatch Keep [B1]
Northwind Mine [K6]
Northwind Summit [K6]
Old Hroldan [C5]
Orotheim [D4]
Orphan Rock [G7]
Orphan's Tear [C1]
Palace of the Kings [J3]
Pale Imperial Camp [F2]
Peak's Shade Tower [F7]
Pelagia Farm [G5]
Pilgrim's Trench [I2]
Pinefrost Tower [B2]
Pinemoon Cave [C2]
Pinepeak Cavern [I6]
Pinewatch [F7]
Purewater Run [A5]
Ragnvald [A4]
Raldbthar [I4]
Rannveig's Fast [E4]
Ravenscar Hollow [C1]
Reach Stormcloak Camp [C3]
Reachcliff Cave [B5]
Reachcliff Secret Entrance [B5]
Reachwater Rock [B5]
Reachwind Eyrie [B5]
Rebel's Cairn [C4]
Red Eagle Redoubt [B4]
Red Road Pass [G2]
Redoran's Retreat [F4]
Refugees' Rest [K3]
Rift Imperial Camp [H7]
Rift Watchtower [J7]
Riften [K7]
Riften Stables [K7]
Rimerock Burrow [B2]
Riverside Shack [J5]
Riverwood [G6]
Roadside Ruins [E7]
Robber's Gorge [D3]
Rorikstead [D5]
Ruins of Bthalft [I7]
Ruins of Rkund [K8]
|
Locations S-Z
Saarthal [I2]
Sacellum of Boethiah [K4]
Salvius Farm [A5]
Sarethi Farm [J7]
Secunda's Kiss [F6]
Septimus Signus's Outpost [J1]
Serpent's Bluff Redoubt [C5]
Shadowed Grove [H3]
Shadowgreen Cavern [D1]
Shearpoint [H4]
Shimmermist Cave [H4]
Shor's Stone [K6]
Shor's Watchtower [K6]
Shrine of Azura [J2]
Shrine of Mehrunes Dagon [F3]
Shrine to Peryite [B4]
Shroud Hearth Barrow [I6]
Sightless Pit [I2]
Silent Moons Camp [F4]
Silverdrift Lair [H3]
Sky Haven Temple [B4]
Skyborn Altar [F3]
Skytemple Ruins [J1]
Sleeping Tree Camp [E5]
Snapleg Cave [J6]
Snow Veil Sanctum [K3]
Snowpoint Beacon [H2]
Snow-Shod Farm [K8]
Solitude [D2]
Solitude Lighthouse [E1]
Solitude Sawmill [D2]
Soljund's Sinkhole [C5]
South Brittleshin Pass [F6]
South Cold Rock Pass [E4]
South Shriekwind Bastion [F7]
South Skybound Watch [G6]
Southfringe Sanctum [G8]
Statue to Meridia [D2]
Steamcrag Camp [K5]
Steepfall Burrow [B1]
Stendarr's Beacon [L8]
Stillborn Cave [J3]
Stonehill Bluff [G3]
Stonehills [F3]
Stony Creek Cave [K6]
Sundered Towers [C4]
Sunderstone Gorge [E6]
Swindler's Den [E5]
Talking Stone Camp [D4]
Thalmor Embassy [D1]
The Apprentice Stone [E3]
The Atronach Stone [J6]
The Guardian Stones [F7]
The Katariah [E2]
The Lady Stone [E6]
The Lord Stone [G3]
The Lover Stone [B4]
The Ritual Stone [H5]
The Serpent Stone [K1]
The Shadow Stone [K8]
The Steed Stone [D1]
The Tower Stone [H2]
Thieves Guild [L8]
Throat of the World [H6]
Tolvald's Cave [K6]
Tower of Mzark [G3]
Traitor's Post [K4]
Treva's Watch [J7]
Tumble Arch Pass [H4]
Twilight Sepulcher [D7]
Understone Keep [A4]
Ustengrav [F2]
Uttering Hills Cave [I4]
Valtheim Towers [I5]
Valthume [C5]
Volskygge [B2]
Volunruud [G4]
Wayward Pass [H3]
Western Watchtower [F5]
Weynon Stones [G3]
Whistling Mine [J2]
White River Watch [H5]
Whiterun [G5]
Whiterun Stables [G5]
Whiterun Stormcloak Camp [H5]
Whitewatch Tower [G4]
Widow's Watch Ruins [C1]
Windhelm [J4]
Windhelm Stables [J4]
Windward Ruins [G2]
Winterhold [I2]
Winterhold Imperial Camp [H2]
Witchmist Grove [J5]
Wolfskull Cave [C1]
Wreck of the Brinehammer [F1]
Wreck of the Icerunner [E2]
Wreck of the Pride of Tel Vos [J2]
Wreck of the Winter War [K3]
Yngol Barrow [K3]
Yngvild [H1]
Yorgrim Overlook [I3]
Ysgramor's Tomb [I1]
|
|
|


