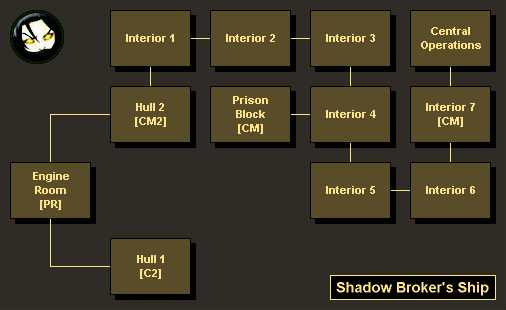
Map Legend:
[B - Background Info] [C - Credits] [M - Medi-Gel]
[P - Power Cells]
[R - Resource] [U - Upgrade] [W - Weapon]
|
Did we miss anything in this section? Is there something we didn't discover?
Let us know!
Walkthrough
You'll begin this part of the mission on the hull of the Shadow Broker's ship, which you'll learn is orbiting the turbulent world of Hagalaz (Sowilo / Hourglass Nebula). Your primary goal on the hull is to find a way to get inside the ship. This will involve a lengthy trek (mostly to the north), and along the way you'll have to defeat maintenance drones, loki mechs, and Shadow Broker agents. Conveniently, many of these battles will take place near lightning capacitors, and if you shoot the capacitors, then they'll damage any enemies (or allies) nearby.
Eventually, on the northern end of the ship, you'll find some hatch controls, which Liara will start hacking them using a bypass shunt program. While the shunt is working, you'll need to defend your position from waves of Shadow Broker agents. In all, you'll have to defeat five waves of attacks: from the east, then from the west, then from the south, then from the east again, and then from the west again. The Shadow Broker agents will never attack from two directions at the same time, so as long as you maintain your cover, you should be okay.
Inside the ship, you'll face even more Shadow Broker agents, but shortly you'll come to the Prison Block, where you'll find Feron hooked up to some sort of torture device. Feron will inform you that the device is resistant to tampering, and that to free him, you'll need to cut the power to the device, which you can do in Central Operations.
When you reach Central Operations, you'll finally come face to face with the Shadow Broker, which you'll learn is a creature known as a yahg, "a pre-spaceflight species quarantined to their homeworld for massacring the Council's first contact teams." The yahg will remain pretty confident given the circumstances, and its first attack will knock out your non-Liara companion, making it just you and Liara against it.
The battle against the yahg will proceed in three phases. The first phase will begin easily enough. The yahg won't do anything special, and it won't seek cover, so as long as you can stay away from it, you should be able to drain its shields and armor pretty quickly. However, when the yahg is down to only its health, it will bring up a new sort of protection that will deflect bullets and powers. That means you'll have to run up to it and punch it, which will trigger the second phase of the fight.
The second phase of the fight will start out just like the first, except now the yahg will have a shield connected to its omni device, and the shield will allow the yahg to deflect bullets (but not powers). So wear the yahg down just like before, aiming carefully around its shield if necessary, and then when it brings up its special protection, run up to it and punch it again.
The third phase will go exactly like the second phase, but this time when you punch the yahg, Liara will collapse the ceiling on it, and the released energy will overload the yahg and cause it to explode. Liara will then take over as the Shadow Broker, and she'll make the Shadow Broker's ship -- and its information -- available to you whenever you visit.
The Shadow Broker's Ship
When you return to the Shadow Broker's ship (either right away or at a later time), you'll find several terminals that you can use for information or business opportunities. These terminals are summarized below:
- Advanced Training: You'll be able to redistribute the ability points of your crewmates here (for 1000 Element Zero each).
- Delivery Pickup: Once per day, or between missions, you'll be able to pick up resources or an upgrade here. There are only four upgrades that you can receive (one each for damage for the four gun types), so usually you'll get resources.
- Dossiers: On this terminal you'll find personal information (including recent emails) for all of your crewmates plus some of the notable NPCs from the campaign.
- Investment Opportunities: You'll get a chance to sponsor missions here. Each mission will take a day to complete, and most of them will give you a profit. More missions will show up over time.
- Survey Information: This terminal will direct you to "good" or "rich" planets with the resources that you're interested in (if any such planets still exist). This information will be displayed on your galaxy map. After mining the planet, you can return to the terminal and repeat the investment -- 1000 for an Element Zero planet, 300 for an Iridium planet, 300 for a Palladium planet, or 650 for a Platinum planet -- as many times as you'd like.
- Video Archive: You'll get to watch short surveillance videos of some of the NPCs from the campaign (such as Emily Wong dancing and Jacob doing sit-ups).
Inside the Shadow Broker's ship, you'll also be able to talk to Liara and Feron, and pick up a
Model - Shadow Broker Ship. If you invite Liara to see the
Normandy, then when she arrives she'll give you your old dog tags, which will then show up on the nightstand next to your bed.
Rewards (This Part)
- Resources: 4000 Palladium (from container in Engine Room)
- Credits: 19,000 (3000 from conductor components on Hull 1,
4000 from conductor components on Hull 1,
3000 from conductor components on Hull 2,
4500 from terminal in Prison Block, and
4500 from terminal in Interior 7)


