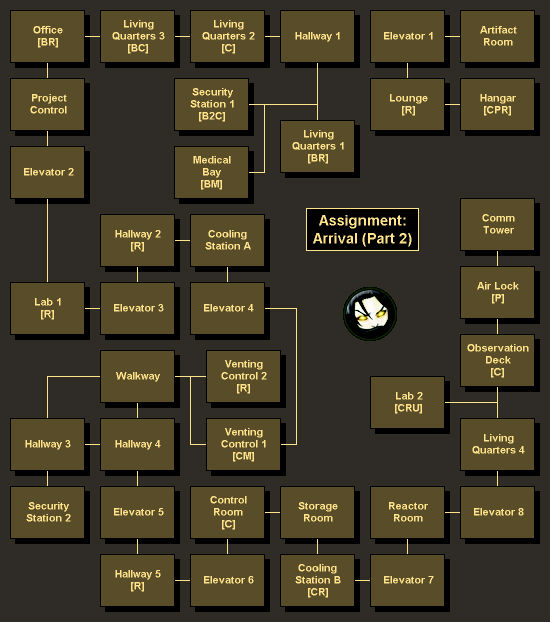
Map Legend:
[B - Background Info] [C - Credits] [M - Medi-Gel]
[P - Power Cells]
[R - Resource] [U - Upgrade] [W - Weapon]
|
Did we miss anything in this section? Is there something we didn't discover?
Let us know!
Walkthrough
At the Project Base, Kenson will show you a countdown timer for the arrival of the Reapers (a little over two days away), and then she'll lead you to the Artifact Room. When you get there, you'll learn -- probably without too much surprise -- that Kenson and her team have been indoctrinated by the Reaper artifact, and that they're not really your allies. The security forces in the base will then try to subdue you.
The battle in the Artifact Room can be difficult. You'll face numerous enemies, including pyros, elites, and a YMIR mech. For best results, you should immediately head to the far left corner where you'll find some counters to hide behind. During the battle, the pyros will give you the worst headache, because they'll try to flank you, and if they succeed then you'll almost certainly die. So keep your eyes peeled, and take out the pyros quickly whenever you spot them. Meanwhile, the mech will probably just walk straight up to you and then fire at whatever you're hiding behind, making it not as much of a threat. You should be able to just duck down and hide whenever it damages you too much.
No matter how well you perform in the battle in the Artifact Room, you'll eventually lose (the artifact itself will take you down if you defeat all of the other enemies). However, if you survive for long enough, then you'll earn the Last Stand achievement. But either way, Kenson's team will capture you and then take you to the Medical Bay, where they'll put you under heavy sedation.
After being sedated for two days, you'll wake up, but your doctor will flee from the Medical Bay and lock you inside. To escape, you'll need to activate the nearby terminal and take control of a mech. This will allow you to kill the doctor and a few enemy mechs, and then destroy a nearby power junction, which will open the door to the Medical Bay.
Back in control of your character, you should exit the Medical Bay and use the weapons locker that you'll find outside. This will give you back all of your weapons and armor. Then you'll need to fight your way to the Project Control room, where you'll find an Engine Control terminal, plus another countdown timer (now showing less than two hours to go). When you click on the terminal, you'll learn that destroying the alpha relay will kill over 300,000 batarians in the system, but you won't get a choice about what to do (you can try to warn the batarians for some paragon points, but you'll get interrupted); you'll simply fire up the asteroid's engines.
With the project in motion, Kenson will go ballistic, and she'll announce that the asteroid must be destroyed. She'll then head to the Reactor Room, where she'll attempt to cause a meltdown. To stop Kenson's sabotage, you'll need to fight your way through the Project Base and insert cooling rods into Cooling Stations A and B. You won't face much in the way of concentrated resistance during this trek, so thwarting Kenson shouldn't be a problem.
With a meltdown no longer possible, Kenson will next attempt to override the engines. For this, you'll actually need to confront her in the Reactor Room. However, your encounter with her won't lead to a fight. You'll just trigger a cut scene where Kenson will pull out a grenade and then blow herself up. You'll get a renegade interrupt to try and stop her, but it won't change anything.
After dealing with Kenson, when you try to contact the Normandy for a pickup, you'll learn that the base's communications system is down, and that you'll need to head outside and try from the Comm Tower. Of course, when you get outside, you'll get attacked again, and you'll have to deal with a multitude of security forces, plus another YMIR mech (which will once again probably just walk right up to you and shoot whatever you're hiding behind).
After surviving the onslaught, you'll just need to make your way over to the communications terminal and try to reach the Normandy again. This time you'll get a response -- just probably not what you were expecting. Harbinger will show up in energy form to have a short and not-so-friendly chat with you, but then Joker and the Normandy will arrive and whisk you away to safety. Later, after the commotion has died down, you'll find yourself on board the Normandy being debriefed by Admiral Hackett, but nothing you say at this point will really change anything.
"However 'insignificant' we might be, we will fight, we will sacrifice, and we will find a way. That's what humans do."
Note: If at any point the timer runs out, the the Reapers will arrive and you'll fail the assignment.
Rewards (This Part)
- Credits: 13550 (1050 from shipping records in Hangar, 1320 from mech parts in Security Station 1, 1320 from mech parts in Living Quarters 2, 1360 from wall safe in Living Quarters 3, 1000 from PDA in Venting Control 1, 1000 from PDA in Control Room, 3000 from wall safe in Cooling Station B, 1400 from wall safe in Lab 2 , 2100 from survey data in Comm Tower)
- Resources: 1500 Palladium (450 from container in Hangar, 525 from container in Lounge, 525 from container in Lab 2),
1500 Element Zero (250 from container in Living Quarters 1, 250 from container in Office, 200 from container in Lab 1, 200 from container in Hallway 2, 200 from container in Venting Control 2, 200 from container in Hallway 5, 200 from container in Cooling Station B)
- Upgrades:
Heavy Skin Weave (from analysis data in Lab 2)
Rewards (Total)
- Experience: 1000
- Credits: 21,050 (4000 from Part 1, 13550 from Part 2, 3500 from Cerberus)
- Resources: 2000 Iridium (from Part 1), 1500 Palladium (from Part 2), 1500 Element Zero (from Part 2)
- Upgrades:
Heavy Weapon Ammo (from Part 1),
Medi-Gel Capacity (from Part 1),
Heavy Skin Weave (from Part 2)


