Map Legend:
[B - Background Info] [C - Credits] [M - Medi-Gel]
[P - Power Cells]
[R - Resource] [U - Upgrade] [W - Weapon]
|
Did we miss anything in this section? Is there something we didn't discover?
Let us know!
Background
After installing the Arrival DLC, you'll receive a message on your private terminal from Admiral Hackett. Your conversation with him will trigger the assignment.
Walkthrough
Hackett will tell you that a deep-cover operative named Dr. Amanda Kenson reportedly found proof of an "imminent Reaper invasion" -- but then subsequently got arrested by the batarians for being a terrorist. Because of the nature of Kenson's discovery, Hackett will ask you to rescue her from the secret prison where she's being held, and to go in alone so it doesn't look like an Alliance military operation.
You'll find the batarian prison on Aratoht (Bahak / Viper Nebula). It will be lightly guarded, and so you'll have two ways to proceed. If you sneak past the batarians, then you'll gain the Covert Action achievement when you reach Kenson (in the Interrogation Room). For this method, you won't be penalized for killing the varren that you run into, but you'll have to avoid being detected by the batarians (which shouldn't be too difficult since they'll mostly be looking the other way), and you'll have to avoid using the Tactical Cloak skill. Meanwhile, if you just kill everything you come across, then you should have a pretty easy time (since you won't encounter many batarians along the way), and you'll pick up more credits and hear more personal logs than if you were sneaking, but you won't get an achievement.
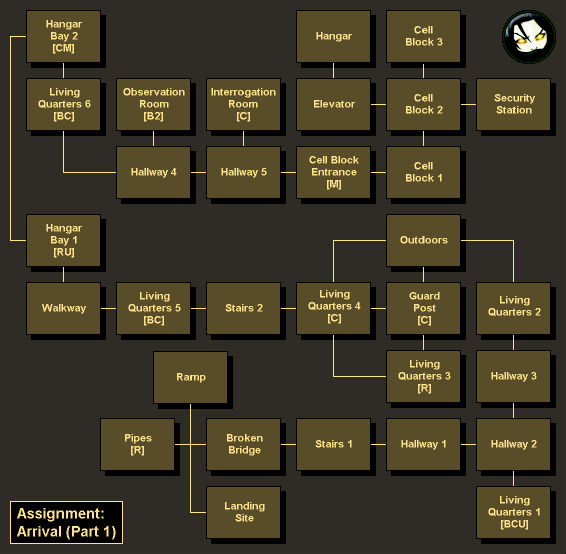
While making your way to Kenson, you'll have to solve some minor puzzles, whether you're sneaking or not:
- When you reach the Broken Bridge, you'll have to move down the Ramp and activate a bridge control (plus kill a varren) to get the bridge extended.
- When you reach Hallways 1-3, you'll have to activate gas valves to change around where flames are coming out of the pipes, so you can open up a route to Living Quarters 1-2.
- When you reach the Walkway overlooking Hangar Bay 1, you'll find three crane control levers. You'll have to move the crane just to clear the path into Hangar Bay 1, but if you operate the crane to pick up the crate in the back corner of the hangar bay, then you'll reveal some iridium and a PDA with an upgrade. The middle lever will move the crane forwards and backwards, the left lever will move the crane left and right, and the right lever will move the crane up and down. To pick up the crate, you'll just need to activate the levers in this order: middle, left, right, right.
- In Hangar Bay 1, you'll need to activate the vehicle lift to travel down to Hangar Bay 2. In Hangar Bay 2, if you activate the vehicle lift again, then you'll reveal a med kit and a PDA worth 1000 credits.
If you choose to sneak past the batarians, then you'll have two more points of interest. At Hallway 1, you'll discover a locked door behind some security beams. There isn't any way to disable the beams, but that's okay because there also isn't any way to go through the door. If you go through the security beams, then you'll alert the batarians and fail the achievement. Finally, at the Guard Post, you'll find some security beams to the north of a pair of guards, and removing the beams (by disabling the power relay next to them) will allow you to sneak past the guards.
After freeing Kenson, you won't have any choice about how to proceed -- you'll have to kill any batarians that you come across. This should be pretty easy until you reach Cell Blocks 1-3. At that point, Kenson will enter the Security Station and hack into the console there, and you'll be left to fend off the batarian attacks on your own. First off in this sequence, you'll have to disable the door you just came through (in Cell Block 1) to prevent extra reinforcements from arriving. New waves of batarians will keep coming through the door until you disable it, and so the quicker you get to it the better (in fact, you might want to run to the door before the batarians even start arriving). After that, you'll just need to deal with a few more waves of batarians, and then you and Kenson will be able to leave the area via the Elevator.
When you enter the Hangar, you'll find a shuttle (the shuttle that arrived during your infiltration) just waiting to be commandeered. To get it out of the hangar, you'll have to defeat the batarians in the area plus destroy a pair of power junctions. While you're on board the shuttle, Kenson will tell you that she discovered a Reaper artifact on an asteroid in the system, and that this "object rho" let her know that the Reapers are coming. She'll then tell you that the Reapers are planning on using the "alpha relay" in the system, and that to delay them, she plans to destroy the relay by shooting an asteroid into it. You'll then demand to see the artifact, and Kenson will take you to the Project Base, where you'll begin
Part 2 of the assignment.
Rewards (This Part)
- Credits: 4000 (400 from locker in Living Quarters 1, 400 from junk at Guard Post, 400 from locker in Living Quarters 4, 400 from locker in Living Quarters 5, 400 from locker in Living Quarters 6, 1000 from PDA in Hangar Bay 2, 1000 from locker in Interrogation Room)
- Resources: 2000 Iridium (400 from container behind Pipes, 400 from container in Living Quarters 3, 1200 from container in Hangar Bay 1)
- Upgrades:
Heavy Weapon Ammo (from technology in Living Quarters 1),
Medi-Gel Capacity (from PDA in Hangar Bay 1)


