|
|
Quest: The Witches of the Dark Forest
 Did we miss anything in this section? Is there something we didn't discover?
Let us know!
Background
Did we miss anything in this section? Is there something we didn't discover?
Let us know!
Background
Yasmin (#1) will give you this quest after you've stolen
Altar Wine for her in the quest
The Stolen Knowledge.
Walkthrough
To gain the support of the witches, you'll need to complete tasks for all of them. Yasmin will be content with her
Altar Wine, but that will leave you with three other witches to satisfy:
- Alvina (#2). Alvina will complain to you that Danos (#3) dumped her for another woman, and she'll ask you to take him a cursed bracelet that will turn him into a toad. When you reach Danos, if you tell him that you have an offer for him, then he'll put on the bracelet without any prompting. Otherwise you'll need to use Intimidate or Fast Talk to convince him to put it on.
When Danos puts on the bracelet, he'll turn into a toad, and Alvina will show up to gloat. Alvina will then give you
Alvina's Owl Skull, which you'll need for the quest
The Stolen Knowledge, and you'll also receive 40 experience points.
The encounter with Danos will complete Alvina's task, but you'll still have to deal with Firniane, Danos' new girlfriend. The next time that you enter Darkforest Manor (#4), you'll witness Firniane insisting to a Ray of Light that you're a "witch sympathizer." The Rays of Light in the courtyard will then attack you.
After the battle, if you confront Firniane, then you'll be able to patch things by offering to fetch Danos (#3) from the forest. This will trigger the quest "The Frog Prince." When you reach Danos, you'll find Alvina with him, still gloating. If you have enough prowess with Fast Talk, then you'll be able to convince Alvina to let you take Danos to Firniane. In all, this option will net you 25 experience points. If you force Firniane to fetch Danos herself, then she'll run into Alvina when she enters the forest, and Alvina will turn her into a toad as well. You won't receive any experience for this option.
- Morla (#4). You'll find Morla in the courtyard of Darkforest Manor. She'll ask you fetch her familiar, a toad named Knowall, and deliver him to Alvina's camp (#2). You'll find Knowall on the western side of Salmon Pond (#5) -- surrounded by Praios Devotee Berndrik and three Rays of Light.
There are a few ways to convince Berndrik and his men to leave. If you previously rescued them from nature spirits (#6), then they'll make the offer themselves. Otherwise, you'll have to trick them in some way. This might involve using social talents or you might have to pass a test about Grand Inquisitor da Vanya (the answers are right; Arngeld, Mihal, and Warina; and six).
If the Praiots leave peaceably, then you'll gain 20 experience points. If you have to fight them, then you'll get about 40 experience points. Either way, when the Praiots are gone and you talk to Knowall, he'll jump into your pocket and you'll receive
Knowall the Toad. Then when you bring him to Morla at Alvina's camp (#2), you'll receive 20 more experience points, plus
Morla's Owl Skull.
- Saphira (#7). You'll find Saphira in her camp near the river. To reach her, you'll need to travel east past the camp, then head north up the hill, and then head west.
Saphira will ask you to retrieve her cooking pot, which was confiscated by the Praiots in the camp to the northwest (#8). When you approach the camp, you'll see a single guard patrolling out front. If you wait for him to get far away from the camp, then you can run inside, grab Saphira's
Bewitched Cooking Pot (sitting in plain sight next to some crates), and then run back out. If the guard sees you, then he'll run into the camp and wake up five of his comrades, and you'll have to fight all of them. Either way, you'll receive 20 experience points when you pick up the pot, and then you'll receive 20 experience points more when you deliver it to Saphira (who will meet you halfway between her camp and the Praiot camp). Saphira will also give you
Saphira's Owl Skull.
After gaining Saphira's trust, she'll have one more task for you. She'll want some revenge on the cook at Darkforest Manor (#4), who let her cooking pot get taken, and she'll ask you to deliver
Saphira's Spices to him. If you agree, then you'll trigger the quest "A Fine Mix of Spices."
When you reach the cook, you'll have two options. If you tell him the truth, then he'll give you an
Ornate Longsword, but you'll fail the quest. If you trick him using Fast Talk, then you'll receive 15 experience points, and when you return to Saphira, you'll receive 10 more experience points, plus an
Herb Sickle.
After satisfying the four witches, you'll be awarded 50 experience points, and you'll be told to meet with Heidruna at the Witches' Dancing Ground (#9). To summon Heidruna, you'll need to click on each of the four witches' monuments surrounding the bonfire. That will cause you to put an owl skull on each one. After the fourth skull, Heidruna will appear, and you'll receive 20 experience points.
Heidruna will tell you that the only way to remove the magic barrier surrounding the fortress ruins (#10) is to kill the sorcerer who is maintaining it. Conveniently, at that moment Grand Inquisitor da Vanya will appear, and Heidruna will reveal that he is the sorcerer in disguise. You'll then have to fight da Vanya.
Da Vanya will have three dragon cultists with him. You should take them down first and then concentrate on da Vanya. When da Vanya dies, three things will happen: you'll automatically pick up
Arm Greaves of Fire, you'll receive 110 experience points, and the magic barrier will disappear, causing a dragon to flee the ruins. Before rushing off to investigate, you should loot the corpses, especially da Vanya's, where you'll find 28 ducats, some potions, and more.
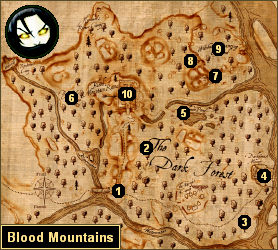
1 - Yasmin
2 - Alvina
3 - Danos
4 - Darkforest Manor
5 - Knowall
6 - Berndrik's Camp
7 - Saphira
8 - Praiot Camp
9 - Witches' Dancing Ground
10 - Fortress Ruins
|
|
|


