 Did we miss anything in this section? Is there something we didn't discover?
Let us know!
Background
Did we miss anything in this section? Is there something we didn't discover?
Let us know!
Background
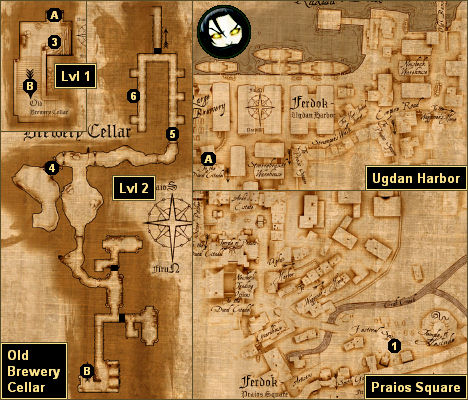
Salina will give you this quest when you talk to her outside of the Temple of Hesinde in Praios Square (#1). But note: Salina won't appear near the temple until after you've visited Ardo's residence (#2) and triggered the quest
Preparation for the Dragon Quest.
Walkthrough
Salina will tell you that she heard about Dranor's arrest, but that she doesn't believe that he's guilty. She'll then tell you that she has a plan to get him out of prison. Apparently, there is a secret passage between the Ferdok brewery (Exit A) and the dungeon of the town guard, and so all you'll have to do is figure out a way to get into the brewery, then fight the wolf rats that are nesting in the tunnels beneath it, and then spirit Dranor away. No problem, right?
When you reach the brewery, you'll meet Muddlemosh's brother Moddlemush there (Exit A), and you shouldn't have any problem convincing him to let you into the brewery to deal with the wolf rats. He'll then escort you into the brewery cellar. To rescue Dranor, you'll have to descend to the lower level of the cellar and then head north to a secret door (#5). Past the door you'll find the dungeon and Dranor (#6).
Note: At various places in the brewery cellar you'll encounter a locked gate or a pile of debris that will block your passage. These spots are denoted by a black box on the map.
However, when you get to Dranor, he won't want to be rescued. He'll steadfastly claim that he didn't steal anything from anybody, and he'll refuse to leave his cell until his good name has been cleared. "After all, I am a man of honor!" Your quest log will update at this point, and you'll receive 10 experience points.
To prove that Dranor is innocent, you'll need to travel to the northwestern corner of the Ducal Citadel, where you'll meet Merchant Harpel, Dranor's accuser. Harpel won't be too clear about anything, and when you talk to his daughter Viola, you'll discover that the merchant wasn't even robbed. Harpel will then give you a letter to clear Dranor's name, and you'll also receive 5 experience points.
When you deliver the
Letter from Merchant Harpel to Barla Borkensmith in the barracks courtyard in the Ducal Citadel, you'll receive 5 more experience points, and Borkensmith will have Dranor freed from his cell in the dungeon. Dranor will then appear in the courtyard with you, and he'll become available once again to join your party.
However, when you return to Praios Square to tell Salina (#1) the good news, you'll find out from her brother Hamlok that she's left the city "to take care of a few things before the celebration begins." Hamlok won't be thrilled to learn that you freed Dranor, but he'll agree to deliver the news to Salina, and you'll receive 10 experience points for your efforts.
1 - Salina and Hamlok
2 - Ardo's Residence
3 - Middlemish
Middlemish (yet another brother) will sell you a few things, including
Pitch Torches. If you go deeper into the tunnels beneath the brewery (which you'll need to do for the quest
The Plague of Rats), then Middlemish will also teleport you between the different levels of the tunnels.
4 - Passage to Deep Beneath Ferdok
This passage will take you deeper under the brewery, where you'll find the source of the rat infestation. See the quest entry for
The Plague of Rats for more information.
5 - Secret Door
6 - Dranor's Cell
Exits:
- Moddlemush. Moddlemush will escort you into and out of the brewery. You won't be able to use the doors yourself.
- Stairway between the two levels of the Old Brewery Cellar.


