 Did we miss anything in this section? Is there something we didn't discover?
Let us know!
Background
Did we miss anything in this section? Is there something we didn't discover?
Let us know!
Background
You'll receive this quest from Moddlemush outside of the Ferdok Brewery in Ugdan Harbor. To make Moddlemush appear, you'll need to talk to Salina in Praios Square.
Walkthrough
Having learned from Salina that the brewery is infected with rats, when you talk to Moddlemush (#1) and offer to take care of the problem, he'll gladly accept. But he'll also warn you that the rats are "really tough" and "really dangerous," and you should heed his words. You'll start out fighting easy gray wolf rats, but then you'll move on to more difficult black wolf rats, and finally at the end you'll encounter Mother Ratzinsky, who will probably make short work of your party if you're in the level 4-5 range.
At the start of the quest you'll also meet Middlemish, who will act as sort of a helper and a guide in the quest. He'll appear in a few places in the tunnels beneath the brewery (#2), and you'll be able to use him as a shopkeeper and a teleporter (he'll instantly move you between different parts of the tunnels that you've previously explored). That means you might as well try out the quest, even if you don't think that you'll be able to complete it, just because Middlemish will make it easy for you to move between the entrance and the deepest levels.
Inside the tunnels, you won't find much of interest other than wolf rats -- but you'll find
a bunch of wolf rats, over 150 of them by the end of the quest. When you see a group of rats, you should immediately retreat. If you allow your party to charge at the rats, then you might trigger a second wave of rats, and while you shouldn't have too much trouble fighting 6-7 rats at a time, 12-14 can be too many, especially when you get to the black wolf rats (#4).
When you reach Mother Ratzinsky, you'll receive 20 experience points, but crystals will shoot up behind you, locking you into the room with her. Mother Ratzinsky is tough. She has a lot of hit points, she can double wound you with her attacks, and three times during the fight she'll summon some wild wolf rats to assist her.
For best results, you should kill the summoned wolf rats right away, but beyond that you'll just have to deal with the damage being done to you. If you don't mind cheating a little, you can save your game before the fight, and then quicksave after every round that goes well for you. Since hits and wounds have a random element, eventually the rolls will go your way. You can also hold one character back and then use that character to cast Balm of Healing and use bandages on the rest of your party, and try to keep everybody healed that way. Finally, you can also just wait and come back later. At level 4-5 the battle will be really tough, but by level 10 it should be relatively straightforward.
When you kill Mother Ratzinsky (#5), you'll receive 60 experience points, and you'll find an unidentified
Ring of Life on her corpse (you'll need an Arcane Lore of 12 to identify it). Then when you return to Moddlemush (#1), he'll reward you with 20 ducats, and you'll also receive 20 more experience points.
Note: After completing this quest and the quest
Salina's Request, you won't be allowed back into the brewery tunnels.
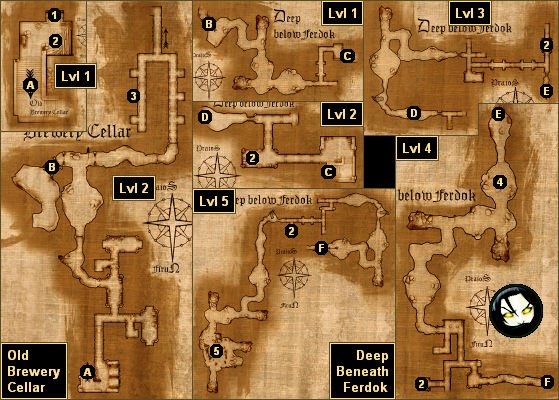
1 - Moddlemush
You'll need to talk to Moddlemush to leave the brewery.
2 - Middlemish
You'll meet up with Middlemish in several places in the tunnels. At each place you'll be able to shop with Middlemish and have him teleport you to one of the other places, provided that you've already visited that place.
3 - Dranor's Cell
You'll need to visit Dranor for the quest
Salina's Request.
4 - Black Wolf Rats
From this point forward, you'll face black wolf rats instead of gray wolf rats. The black wolf rats are a little bit tougher.
5 - Mother Ratzinsky
Exits:
- Stairs between the two levels of the Old Brewery Cellar.
- Passage between the Old Brewery Cellar and Deep Beneath Ferdok.
- Passage between levels 1 and 2 of Deep Beneath Ferdok.
- Passage between levels 2 and 3 of Deep Beneath Ferdok.
- Passage between levels 3 and 4 of Deep Beneath Ferdok.
- Passage between levels 4 and 5 of Deep Beneath Ferdok.


