 Did we miss anything in this section? Is there something we didn't discover?
Let us know!
Background
Did we miss anything in this section? Is there something we didn't discover?
Let us know!
Background
You'll trigger this quest when you pick a trading company during the quest
Investigations at the Harbor. Your choice will lead to a series of tasks, which will span the next few chapters. This page is for the Neisbeck line of quests. The Stoerrebrandt line can be found
here.
Walkthrough
Running Errands (Chapter 3)
For your first task, Pagol Babek (#1) will ask you to visit the Silver Pitcher tavern in Praios Square, and convince Innkeeper Brewmore to deal with the Neisbecks instead of the Stoerrebrandts. You won't need to use any social talents for this. Brewmore will jump at the chance to work with the Neisbecks, and he'll hand over the
Ferdok Brewery Order with little prompting. You'll earn 5 experience points for making the transaction, and then you'll earn 20 experience points and 5 thalers when you return to Babek.
Hops and Malt (Chapter 5)
For your next task you'll have to do something a little bit "riskier." Babek (#1) will ask you to acquire a
Delivery Note from a Stoerrebrandt messenger, then use it to pick up a shipment from the harbor, and then bring it to Babek.
You'll find the messenger near the Fleet Footed Ferret (#2) talking to Juicy Lucy. There are a few ways that you can get the
Delivery Note from him. You can rob him, you can bribe him, you can intimidate him, or you can kill him. Regardless, you'll receive 10 experience points when you pick up the note.
In the harbor (#3), you'll need to give the note to a Stoerrebrandt dockworker, which will allow you to pick up a
Secret Ingredient from a nearby cart. This will net you 10 experience points. Then when you deliver the ingredient to Babek, you'll receive 10 more experience points, plus 10 ducats.
Problem with the Beer (Chapter 5)
When you return to Babek (#1), he'll let you know that the Stoerrebrandts have been complaining about their stolen shipment, and he'll give you 60 ducats so that you can bribe Head Guardsman Tashman and make the problem go away. You'll find Tashman on the northern side of the docks (#4).
When you talk to Tashman, he'll respond rudely to you, but once he's learned who you're working for, he'll change his tune. Then after you've paid him his 60-ducat fee, he'll announce that he has a solution to the problem -- he'll pin the theft on a pair of "old boozers" who have outlived their usefulness. This announcement will earn you 10 experience points.
Tashman will then lead you to a drunkard and a scallywag (#5), and he'll proceed to pick a fight with them. When the pair dies, you'll receive 10 experience points, and Tashman will decide that the case is now closed. Then when you return to Babek (#1), you'll receive 10 more experience points, plus 12 ducats.
An Exclusive Deal (Chapter 5)
This time when you talk to Babek (#1), he'll inform you that the Stoerrebrandts are planning to sign an exclusive contract with the Ferdok Pale Ale brewery -- which the Neisbecks, of course, can't allow. He'll ask you to "make an example" of the Stoerrebrandt negotiator, and force the brewery owner to sign a contract with the Neisbecks instead.
You'll find the contract being signed on the northern side of the brewery (#6). No matter what you say the encounter will turn violent, and you'll have to fight a pair of Stoerrebrandt workers, plus the negotiator. After killing them, the brewery owner will suddenly see the Neibecks in a much more favorable light, and he'll agree to work with them instead. You'll receive 10 experience points for killing the Stoerrebrandts and another 10 experience points for completing the deal.
Then when you return to Babek (#1), you'll receive 10 more experience points, plus 20 ducats. "We're going to be richer than ever!"
Stoerrebrandt Worker (Chapter 6)
When you approach Pagol Babek (#1), a Stoerrebrandt worker will stop you and attempt to recruit you to the Stoerrebrandts. He'll start off by offering you 20 ducats, but with enough prowess in Haggle, you'll be able to increase that offer to 100 ducats. If you accept the worker's offer, then you'll switch to the Stoerrebrandt version of
For a Handful of Ducats, starting with their Chapter 6 quests.
The New General (Chapter 6)
This time when you talk to Babek (#1), he'll move the carts out of the way and allow you access to the Neisbeck Warehouse (#7), where you'll meet Vito Neisbeck. Vito will inform you that the Stoerrebrandts recently questioned a former Dark Eye named Tarosh Strawbeadle at the Fleet Footed Ferret (#2), and that Tarosh "let his mouth run and talked about things he should have kept to himself." Vito will then ask you to silence Tarosh, but not before learning what he said and who he said it to.
Pick Pocketing Note: Vito Neisbeck will drop 10 ducats.
In the Ferret, you'll find Tarosh standing at the bar, drunk. He'll reveal that he told the Stoerrebrandts about Radulf Kramer, who guards one of the gates leading to Wagoner's Home (#8), but then the encounter will turn violent. Tarosh won't have a weapon, and so you shouldn't have any trouble killing him. Afterwards, Innkeeper Pebblebush will complain about what just happened, but you'll be able to pay him 5 thalers (or not) to clean up the mess. For completing this stage in the quest, you'll earn 20 experience points.
When you reach Kramer, you'll find him surrounded by Reginald Stoerrebrandt and three Stoerrebrandt workers. When they notice you, Reginald will beat a hasty retreat, but the workers will attack you and Kramer. This battle should be only slightly more difficult than the one against Tarosh, and you'll receive 20 experience points at the end. Then when you report in to Vito, you'll receive 25 ducats and 20 more experience points.
Testing Times (Chapter 6)
Vito (#7) will announce that it's time to teach the Stoerrebrandts a lesson. "Show those Stoerrebrandts what it means to start trouble with the House of Neisbeck. I want to see blood!" He'll then tell you that you'll find Stoerrebrandt workers in three places -- in front of the Fleet Footed Ferret (#2), at the bridge (#9), and at the docks (#10) -- and he'll ask you to kill them.
The battles shouldn't be tough. At each one you'll only face three or four workers, and they should go down quickly. You'll gain 20-30 experience points after each battle, and then when you report your success to Vito, you'll receive 30 ducats plus 30 more experience points.
The Way of Things (Chapter 7)
When you talk to Vito Neisbeck outside of the Neisbeck Warehouse (#7), he'll invite you inside, where you'll meet Ulwina Neisbeck and two of her lieutenants, Yandric of Andergast and Lars Bravethorn. Ulwina will inform you that Head Guardsman Tashman is in the process of assassinating Reginald Stoerrebrandt, solving one problem, but that he's gotten too greedy, causing another. She'll then ask you to "solve the problem... permanently," but she'll want you to do the job quietly. To that end, Yandric will give you a
Bottle of Poison.
Pick Pocketing Note: Ulwina will drop 2 ducats and more. Yandric will drop two
Ignisphaero Traps.
You'll find Tashman in the Fleet Footed Ferret (#2), enjoying drinks with a few of his men. To poison him, you'll need to figure out a way to get the poison into his beer without anybody noticing. This part of the quest can be a little bit buggy, so be sure to save first.
The first thing you should do is smash the barrel next to the fireplace. This will cause Innkeeper Pebblebush and Bar Wench Aline to leave the bar and argue over the spilled beer. If nothing happens, then you'll need to load your game and try again.
Next, with the bar unattended, you'll need to right click on the
Bottle of Poison, select the "use" (gear) icon, and then select the carafe of beer on the bar. If nothing happens, then you might need to use a different character (when we played this quest, our main character couldn't poison the carafe, but all of his companions could). Successfully poisoning the carafe will cause you to lose the
Bottle of Poison.
Finally, you'll need to talk to Innkeeper Pebblebush (perhaps waiting for him to return to the bar first) and order some beer for Tashman and his men. Aline will then deliver the carafe of beer, and shortly afterwards Tashman will start feeling sick, and he'll leave the bar. When this happens you'll gain 50 experience points.
When you attempt to leave the tavern yourself, Innkeeper Pebblebush will stop you and demand payment for the beer you just purchased. With a high enough prowess in the Haggle talent, you'll be able to write an IOU for the amount (which you'll never have to pay); otherwise, you'll have to give Pebblebush 5 thalers.
Outside of the tavern, Tashman will lead you to the docks (#11). When you confront him there, you'll gain 50 experience points, and Tashman will explain that it was the Neisbecks who ordered Ardo's murder, and that he only covered it up and made it look like one of the other killings. Then, just before dying of the poison, Tashman will give you
Ardo's Key, which you'll be able to use to unlock the upstairs study at Ardo's Residence (in Praios Square). Inside the study you'll find 80 ducats and
Ardo's Ancestral Sword.
Right after Tashman dies, Yandric of Andergast will show up, and he'll announce that he's going to tie up one final loose end -- you. After a bit of gloating (during which he'll admit to killing Ardo), Yandric will attack you. He'll lead off with a fireball spell that will light your entire party on fire (and torch the ship at the dock), and then he'll get down to business.
Yandric is tough. He'll probably toss off a couple of Ignifaxus Burst of Flames early in the battle, which might do enough damage to knock one of your party members unconscious, and he'll have Fastness of Body up, which will make him difficult to hit. But if you use potions or spells to withstand his early barrage, then you should be able to win a battle of attrition against him.
Once you've done enough damage to Yandric, he'll dive into the water and escape, and you'll gain 50 experience points. That's how the quest will end. To take revenge on Yandric and the Neisbecks, you'll need to complete the next quest,
Revenge for Ardo, which you'll trigger when Yandric gets away.
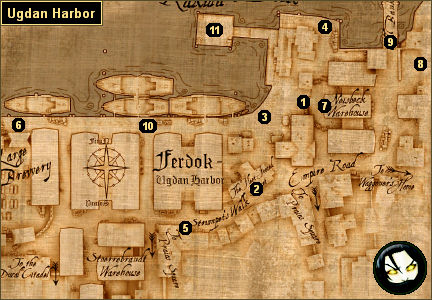
1 - Pagol Babek
2 - Fleet Footed Ferret
3 - Stoerrebrandt Dockworkers
4 - Head Guardsman Tashman
5 - Drunkard and Scallywag
6 - Ferdok Brewery
7 - Neisbeck Warehouse
8 - Gate to Wagoner's Home
9 - Bridge
10 - Docks
11 - Docks


