 Did we miss anything on this map? Is there something we didn't discover? Let us know!
Explore the haunted Tower of Crows for clues to the name Athearorn.
Did we miss anything on this map? Is there something we didn't discover? Let us know!
Explore the haunted Tower of Crows for clues to the name Athearorn.
| Adventure Statistics |
| Party Members |
Recm'd Level |
Total Monsters |
Total Chests |
End Reward |
| 6 |
4th |
18 |
5 |
300 XP |
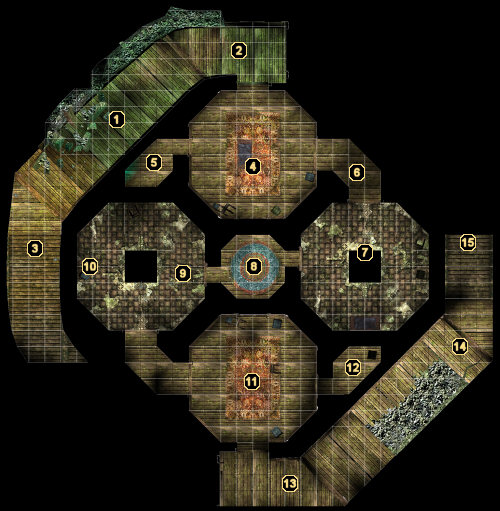
1 - Arrival
The first floor of this tower is inhabited exclusively by undead and elementals. Your goal is to reach the second floor summit to investigate the Svernkaegro family name.
As soon as you take a few steps toward the northeast, you'll be ambushed by Zombies both in front of your party at area #2 and behind your party at area #3.
2 - Zombies
Three of the five Zombies involved in the initial ambush spawn here.
3 - Zombies
The other two Zombies involved in the initial ambush spawn on the stairs behind you.
4 - Ghast and Wight
Opening the door to this chamber immediately puts you into combat with two new undead creatures - a Ghast and a Wight. The Ghast is fairly easy and is worth 50 experience points per party member while the much more difficult Wight will net you 125 experience points per party member.
5 - Trap and Chest
Disarm the trap along the floor of this room (if you have a rogue), then pick, break, or Knock the chest to grab the sizeable amount of gold, Masterwork Trident, Cloak of Charisma +2, and Scroll of Darkvision inside.
6 - Zombie
A single Zombie guards this corridor.
7 - Earth Elementals
You'll have to face off against your first two Medium Earth Elementals in this room. Each one is worth 125 experience points per party member.
8 - Trap and Chests
Another trap lies along the floor near this room's exit door to the west, so be careful. The southern chest is unlocked and contains gold, some Bracers of Armor +1, a Potion of Barkskin +2, and a suit of Leather Armor +1 called "Turtlesnap." The northern chest is also unlocked and contains more gold and a Mithral Chain Shirt.
9 - Earth Elemental and Ghoul
A Medium Earth Elemental and Ghoul will attack your party as soon as you enter this western chamber.
10 - Chest
Check the westernmost wall of this room to discover a locked chest that can be ransacked for gold, a Wand of Burning Hands, a Potion of Mage Armor, and a Potion of Blur.
11 - Two Wights and a Zombie
You'll have to slay a pair of Wights and another Zombie before you can continue to the southeastern stairway.
12 - Chest
This tiny room houses an unlocked chest containing gold, a Scroll of Melf's Acid Arrow, a Potion of Darkvision, and a Battleaxe +1 called "Warspite."
13 - Earth Elemental
A single Medium Earth Elemental will charge your party once you're through the door.
14 - Skeletons and Exit
These two Skeleton archers will prove to be your last opponents before ascending to the tower's second floor.
15 - Exit
Reaching the top of these stairs brings you to the "End of Adventure" screen, after which you'll immediately move on to
The Tower 2.


