 Did we miss anything on this map? Is there something we didn't discover? Let us know!
The remaining goblin raiders are hiding in a temple crypt. Whoever ends the goblin menace will gain great honor.
Did we miss anything on this map? Is there something we didn't discover? Let us know!
The remaining goblin raiders are hiding in a temple crypt. Whoever ends the goblin menace will gain great honor.
| Adventure Statistics |
| Party Members |
Recm'd Level |
Total Monsters |
Total Chests |
End Reward |
| 4 |
1st |
5 |
2 |
300 XP |
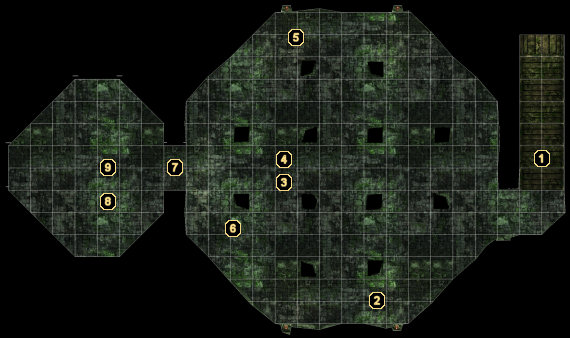
1 - Arrival
The last of the Goblin brigands occupy this ancient crypt. Clearing them out will prompt Sir Broyan to admit you into the Vinsaxi court, so draw a torch and let's get on with it.
2 - Goblin
You'll most likely come across this Goblin first. Make short work of him before moving on to the others toward the back of the chamber.
3 - Goblin
This Goblin patrols the area around the nearby chest.
4 - Chest
In addition to a handful of gold, this chest contains a Masterwork Composite Longbow, some Silver Arrows, a Masterwork Falchion, a Potion of Cure Serious Wounds, and a Potion of Cure Light Wounds.
5 - Goblin
A third Goblin cowers behind this pillar.
6 - Goblin Shaman
The Shaman is the hardest Goblin you've had to deal with yet, but he'll earn every member of your party 150 experience points when he falls.
7 - Doorway
Opening this door will immediately put you into combat with the Goblin at area #8.
8 - Goblin
The fifth and final Goblin resides in this back room.
9 - Chest
Ransack this chest's contents for a nice pile of gold and a Ring of Protection +1. Once the ring is looted, you'll be brought to the "End of Adventure" screen.


