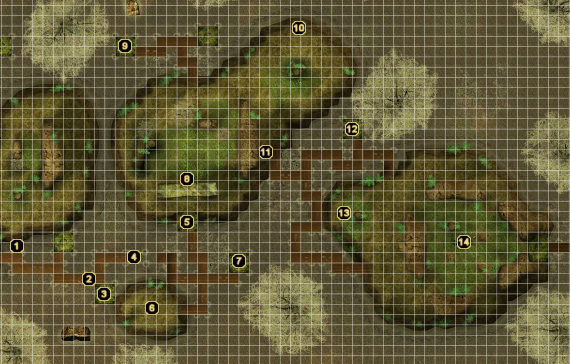
 Did we miss anything on this map? Is there something we didn't discover? Let us know!
In the dark stinkwoods of Linaewen, find the old druid of the forest and ask him about Athaerorn.
| Adventure Statistics |
| Party Members |
Recm'd Level |
Total Monsters |
Total Chests |
End Reward |
| 6 |
3rd |
20 |
8 |
1200 XP |
1 - Arrival
Before you can begin searching this swampy region, Sindarel approaches you and advises you to go no further. Sindarel fears that the druid may have perished, allowing monsters to overrun the area. He promises to return with a warband to help you reach the druid safely, but your brazen leader decides not to delay any longer. Onward!
2 - Trap
This area of the walkway is trapped, so either disarm it or tread carefully. Once you know where the trap is, it will be marked with a red skull and crossbones.
3 - Ambush and Chest
Expect an ambush by four Goblins, a Goblin Shaman, and a Bugbear when you reach this platform. Only one Goblin is within melee range, while the rest of the creatures barrage your party with missile weapons and spells from the walkway and small island to the east. If your party excels in ranged weaponry or you have plenty of spells at your disposal, you can take them down from afar. However, if your party is primarily melee based, then you'll need to shoot the capstan next to the Bugbear at area #4 to extend the bridge at area #3.
The chest on this platform contains a Shortbow, Light Crossbow, Arrows, and Crossbow Bolts, so make sure you grab them if you need some extra ranged firepower or require ammunition for the capstan.
4 - Bridge
This bridge cannot be crossed until you've fired a missile weapon at the release catch of the capstan at area #4.
5 - Capstan
You'll have to fire a missile weapon at the release catch of this capstan to extend the bridge at area #3.
6 - Chest
Once you've dealt with the Goblin on this small island, you can search the chest for a small amount of gold, a Composite Longbow, and some Masterwork Arrows.
7 - Chest
A third chest can be found on this platform. Pop its lid to nab some gold, a Greataxe, a Potion of Cure Light Wounds, and a set of Masterwork Arrows.
8 - Runes
Stepping onto this island triggers a short dialogue about the significance of the runes on the nearby stonework. After concluding that they refer to a place called Aharadum, you'll find yourself locked in a very large battle. Not only do a Goblin and a Fiend Spider await you on the northeast section of the island, but you'll have to deal with a Bugbear, two Goblins, and a Goblin Shaman on each of the walkways to the north and east. This can be a very difficult battle, so make sure your party is rested and that you've prepared accordingly.
9 - Chest
Once this walkway is purged of all enemies, you can search this chest for a Potion of Bull's Strength and a suit of Padded Armor +1 called "Scarecrow."
10 - Chest
When the Fiend Spider is no more, loot this chest for a nice pile of gold, a Scroll of Fireball, a Potion of Heroism, and a Hand Crossbow +1 called "Little Brother."
11 - Chest
This chest will net you more gold and a Guisarme +2 called "Long Memory."
12 - Chest
This chest's contents include a handful of gold, a Dagger, a Potion of Neutralize Poison, and a Scroll of Bear's Endurance.
13 - Chest
Be sure to grab the gold, Scroll of Barkskin, Potion of Cure Moderate Wounds, and Splint Armor +1 called "Black Arm" from this chest.
14 - Dead Druid
Four wolves will charge your party when you approach this clearing. When the wolves are dead, you'll discover that the Druid you've come searching for has suffered a grisly fate. His head has been severed by a Werewolf, which means you cannot resurrect him and tap into any knowledge he had.
And so, with the Druid's body found, the adventure concludes and you're brought to the "End of Adventure" screen.